- Supply Chain Finance User Guide
- Finance Amendment
- Processing Amendment Task
5.2 Processing Amendment Task
This topic describes the steps to process the amendment record.
Note:
Only authorized users can process and authorize the amendment tasks.- Basic Info
- Party
- Interest
- Charges
- Accounting
- Amendment
- Limits
- Summary
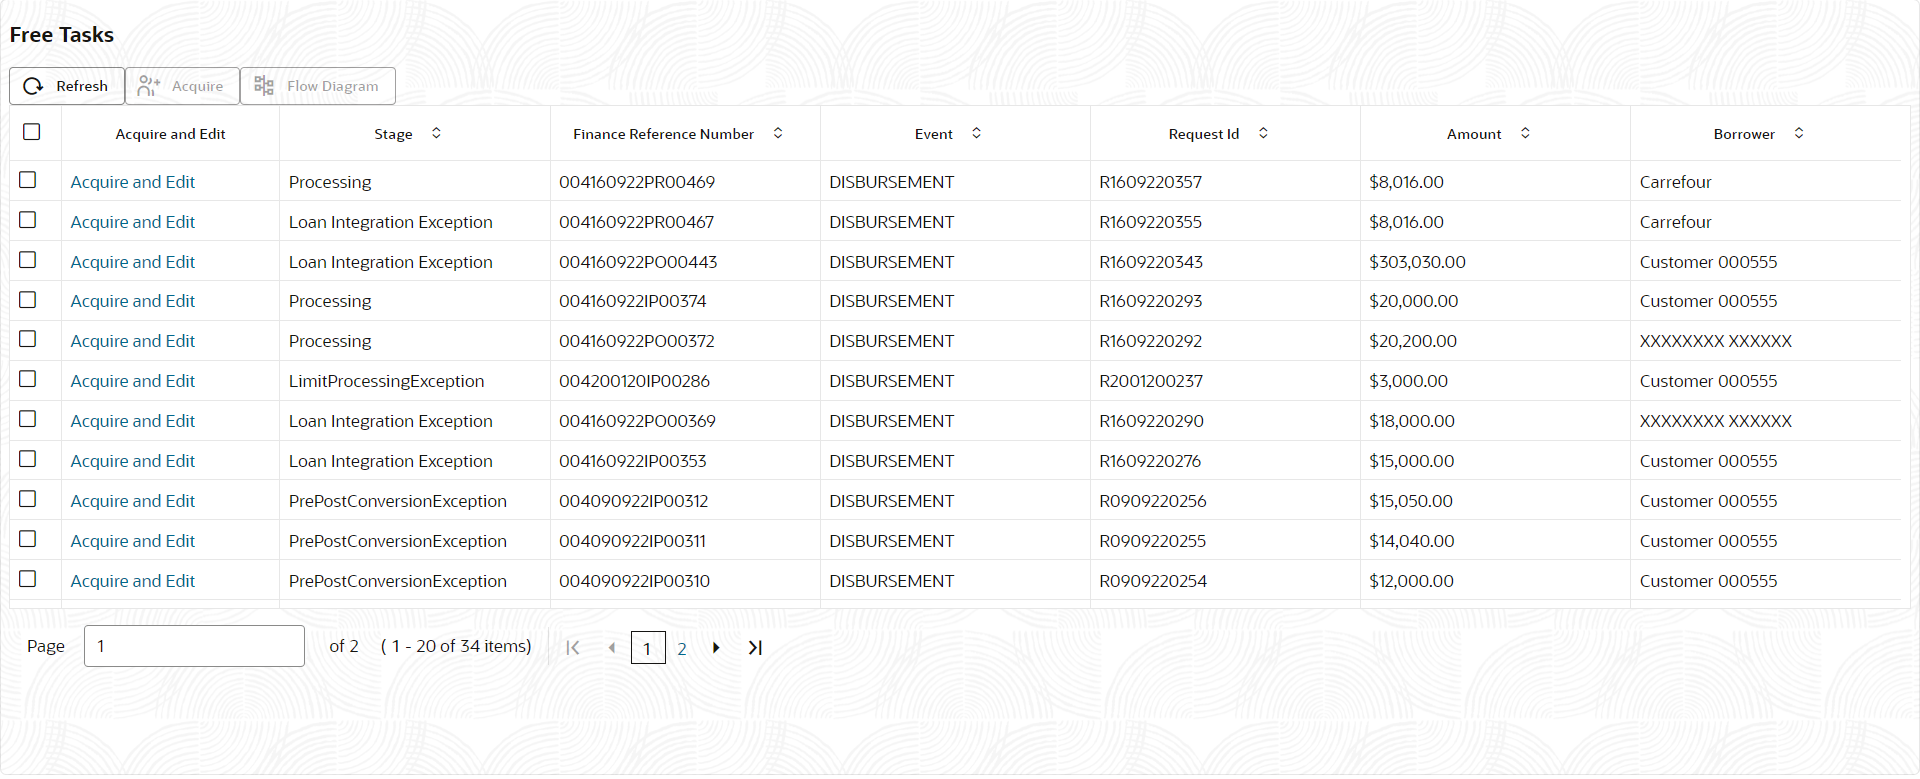
- On Home screen, click Supply Chain Finance. Under Supply Chain Finance, click Tasks.
- Under Tasks, click Finance. Under
Finance, click Free
Tasks.The Finance - Free Tasks screen displays.
- Perform any of the below action from the Free Tasks
screen.
- Click the Acquire and Edit link beside the required amendment tasks to process.
- Select the checkbox of the required tasks and click Acquire button above the grid to acquire multiple tasks. Once you acquire a task, it is moved to the My Tasks list. You can then navigate to My Tasks screen and click Edit link beside the required amendment tasks to process.
Note:
The following information is displayed at the top of the amendment tasks screen for each data segment.- The reference number, the stage, and the operation name of the transaction acquired for processing.
- Click Remarks button to add any comments about the transaction .
- Click Documents button to upload any new documents or view the uploaded documents relevant to the transaction.
Basic Info
- Click the Acquire and Edit link beside the
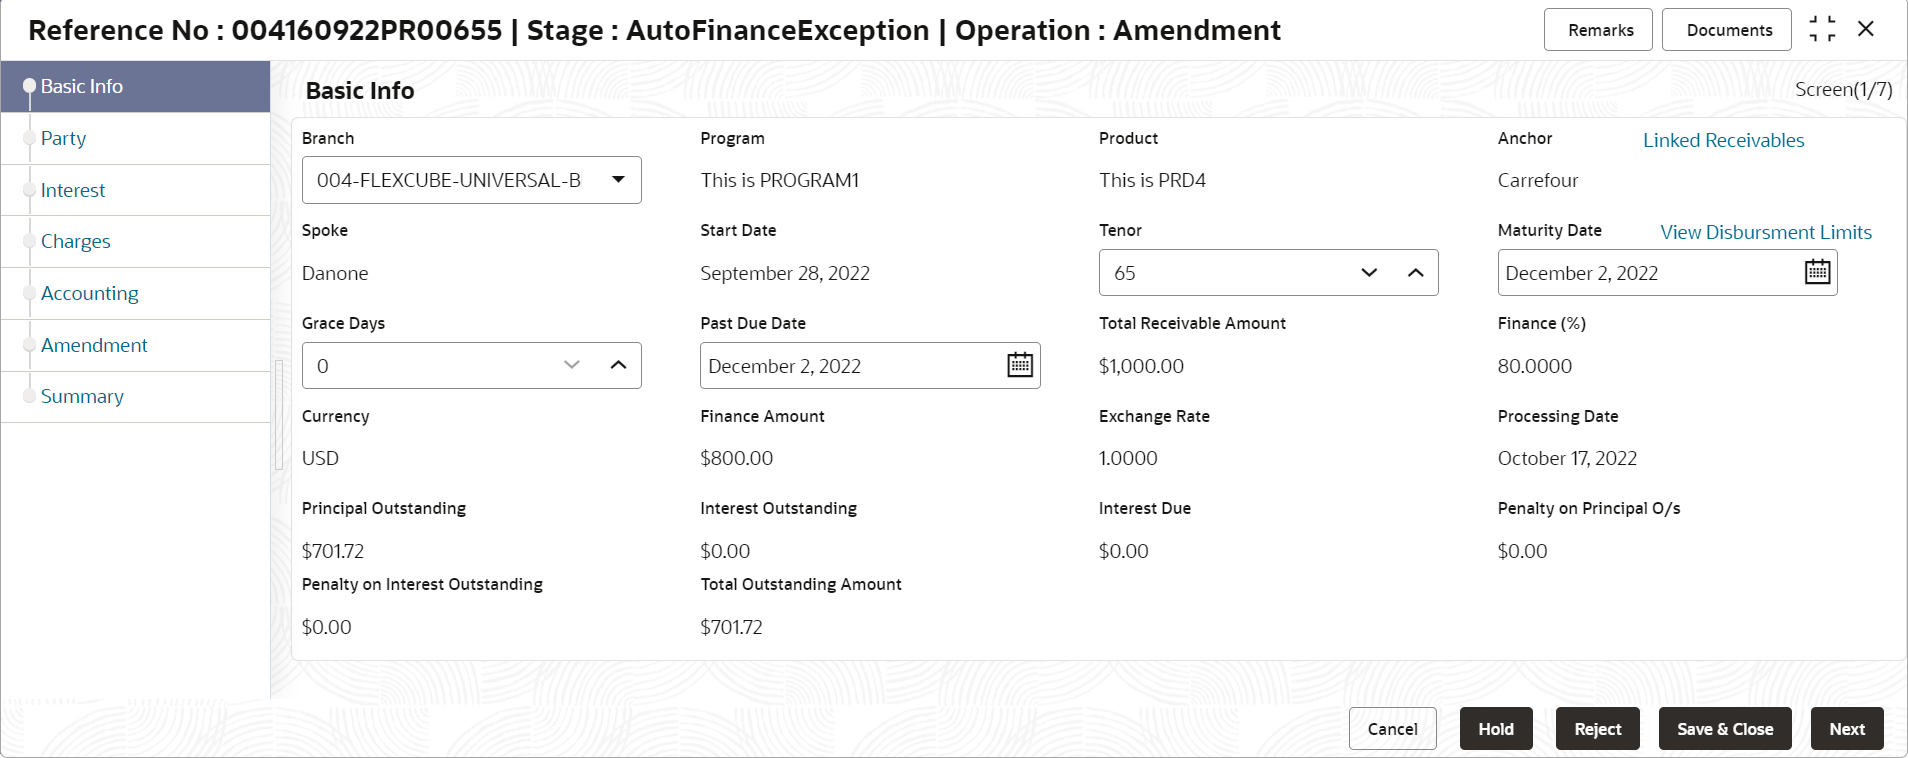
required amendment tasks.The Basic Info screen displays.
- Specify the fields on Basic Info screen.For more information on fields, refer to the field description table.
Note:
The fields marked as Required are mandatory.Table 5-3 Basic Info - Field Description
Field Name Description Branch Displays the branch where the amendment is being processed. By default, the logged-in user’s branch is displayed. Program Displays the name of the program that is linked to the receivables that have been financed. Product Displays the name of the product associated with the program. Anchor Displays the name of the anchor party in the program. Linked Receivables/PO Click the link to view the list of receivables (invoices/debit notes) / PO that have been financed. Spoke Displays the name of the counter party in the program. Start Date Displays the start date of the finance. By default, it is the current business date. Tenor Displays the tenor of the finance. The tenor of the finance gets defaulted basis start date and maturity date. Maturity Date Displays the maturity date of the finance. Maturity date gets calculated basis maturity date parameter selected at product level. View Disbursement Limits Click the link to view the details of the disbursement limits.
This field will not be displayed if there is a limit processing exception.
Grace Days Displays the number of days past the finance due date, within which the finance can be settled without penalty. Past Due Date Displays the new due date post the initial finance maturity date. Total Receivable/PO Amount Displays the total amount of the receivables/PO that have been financed. Finance (%) Displays the percentage of the total receivable/PO amount that have been financed. Currency Displays the currency of the finance amount. Finance Amount Displays the amount that has been financed. By default, this field displays the Finance (%) value of the Total Receivable Amount. Exchange Rate Displays the exchange rate between the receivable/PO amount currency and the finance currency. Processing Date Displays the date of processing of the amendment. Principal Outstanding Displays the outstanding principal amount as on the current date. Interest Outstanding Displays the outstanding interest as on the current date. Interest Due Displays the monthly interest due as on the current date. Penalty on Principal O/s Displays any penalty on the outstanding principal as on the current date. Penalty on Interest Outstanding Displays any penalty on the outstanding interest as on the current date. Total O/S Displays the total outstanding amount as on current date. - Perform any of the below actions from the Basic Info
screen.
- Click Next to go to the Party screen.
- Click Save and Close to save the
details and complete the processing stage of the amendment.
Note:
If the Amendment Auth Required toggle is enabled for the program associated with the transaction, an approval task is created in the system. - Click Reject to purge the amendment transaction.
- Click Hold to move the transaction to the Hold Tasks list.
- Click Cancel to cancel the transaction and return to the Free Tasks screen.
Party
- Click Next on the Basic Info
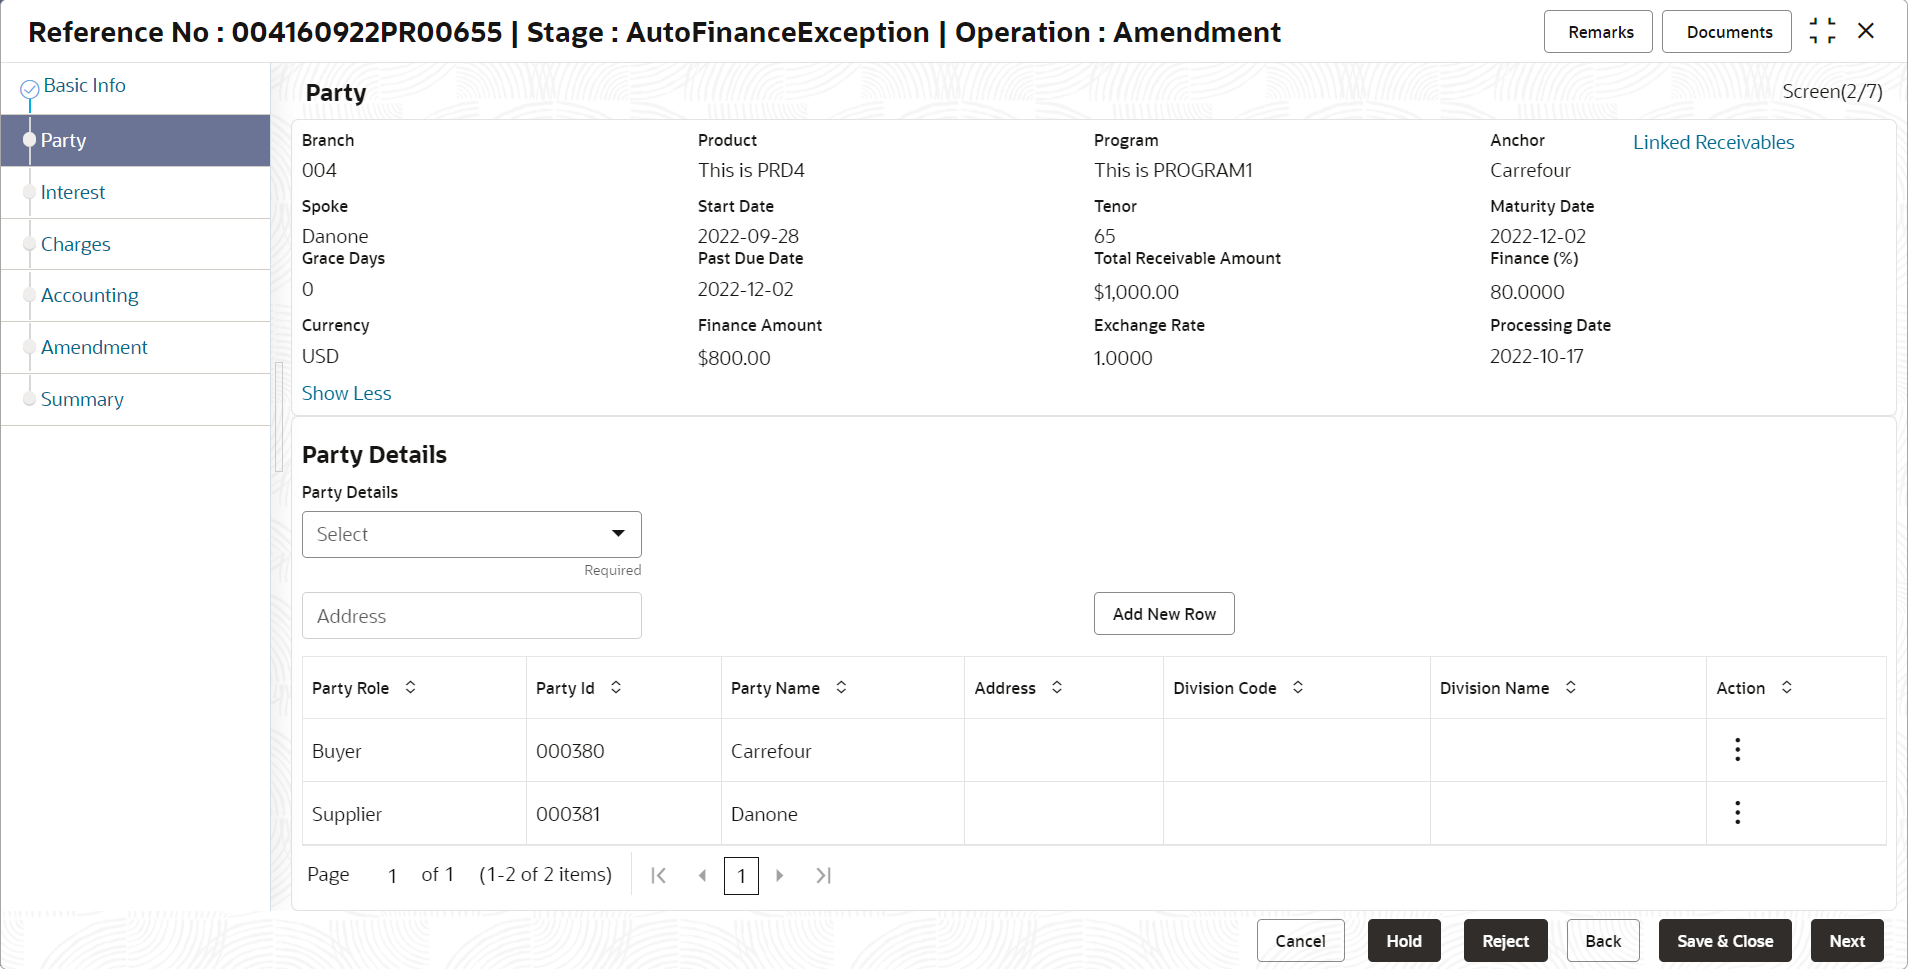
tab.The Party screen displays.
- Specify the fields on Party screen.For more information on fields, refer to the field description table.
Note:
The fields marked as Required are mandatory.Table 5-4 Party - Field Description
Field Name Description Branch Displays the branch where the amendment is being processed. By default, the logged-in user’s branch is displayed. Program Displays the name of the program that is linked to the receivables that have been financed. Product Displays the name of the product associated with the program. Anchor Displays the name of the anchor party in the program. Linked Receivables/PO Click the link to view the list of receivables (invoices/debit notes) / PO that have been financed. Spoke Displays the name of the counter party in the program. Start Date Displays the start date of the finance. By default, it is the current business date. Tenor Displays the tenor of the finance. The tenor of the finance gets defaulted basis start date and maturity date. Maturity Date Displays the maturity date of the finance. Maturity date gets calculated basis maturity date parameter selected at product level. Grace Days Displays the number of days past the finance due date, within which the finance can be settled without penalty. Past Due Date Displays the new due date post the initial finance maturity date. Total Receivable/PO Amount Displays the total amount of the receivables/PO that have been financed. Finance (%) Displays the percentage of the total receivable/PO amount that have been financed. Currency Displays the currency of the finance amount. Finance Amount Displays the amount that has been financed. By default, this field displays the Finance (%) value of the Total Receivable Amount. Exchange Rate Displays the exchange rate between the receivable/PO amount currency and the finance currency. Processing Date Displays the date of processing of the amendment. Party Details Parties with specific roles in the program can be added in this section. Party Details Select the party role to be added.
The available options are:- Buyer
- Supplier
- Import Factor
- Export Factor
- Insurance
- Beneficiary/Counter Party
Search Party Click the search icon to select the party. Division Click the search icon to select the division code of the party. Address Specify the address of the selected party. Add New Row Click this button to add the selected party to the grid. Party Role Displays the role of the party. Party Id Displays the unique ID of the party. Party Name Displays the name of the party Address Displays the address of the party. Division Code Displays the division code of the party. Division Name Displays the division name of the party. Action Click Options icon to view the actions that can be taken on the party record. - Perform the following steps to take action on the parties in the grid:
- Click Add New Row to add more parties.
- Select the record in the grid and click Options icon under the Actions column and then click Delete to remove the party.
- Perform any of the below actions from the Party
screen.
- Click Next to go to the Interest screen.
- Click Save and Close to save the
details and complete the processing stage of the amendment.
Note:
If the Amendment Auth Required toggle is enabled for the program associated with the transaction, an approval task is created in the system. - Click Back to go to the Basic Info screen.
- Click Reject to purge the amendment transaction.
- Click Hold to move the transaction to the Hold Tasks list.
- Click Cancel to cancel the transaction and return to the Free Tasks screen.
Interest
- Click Next on the Party
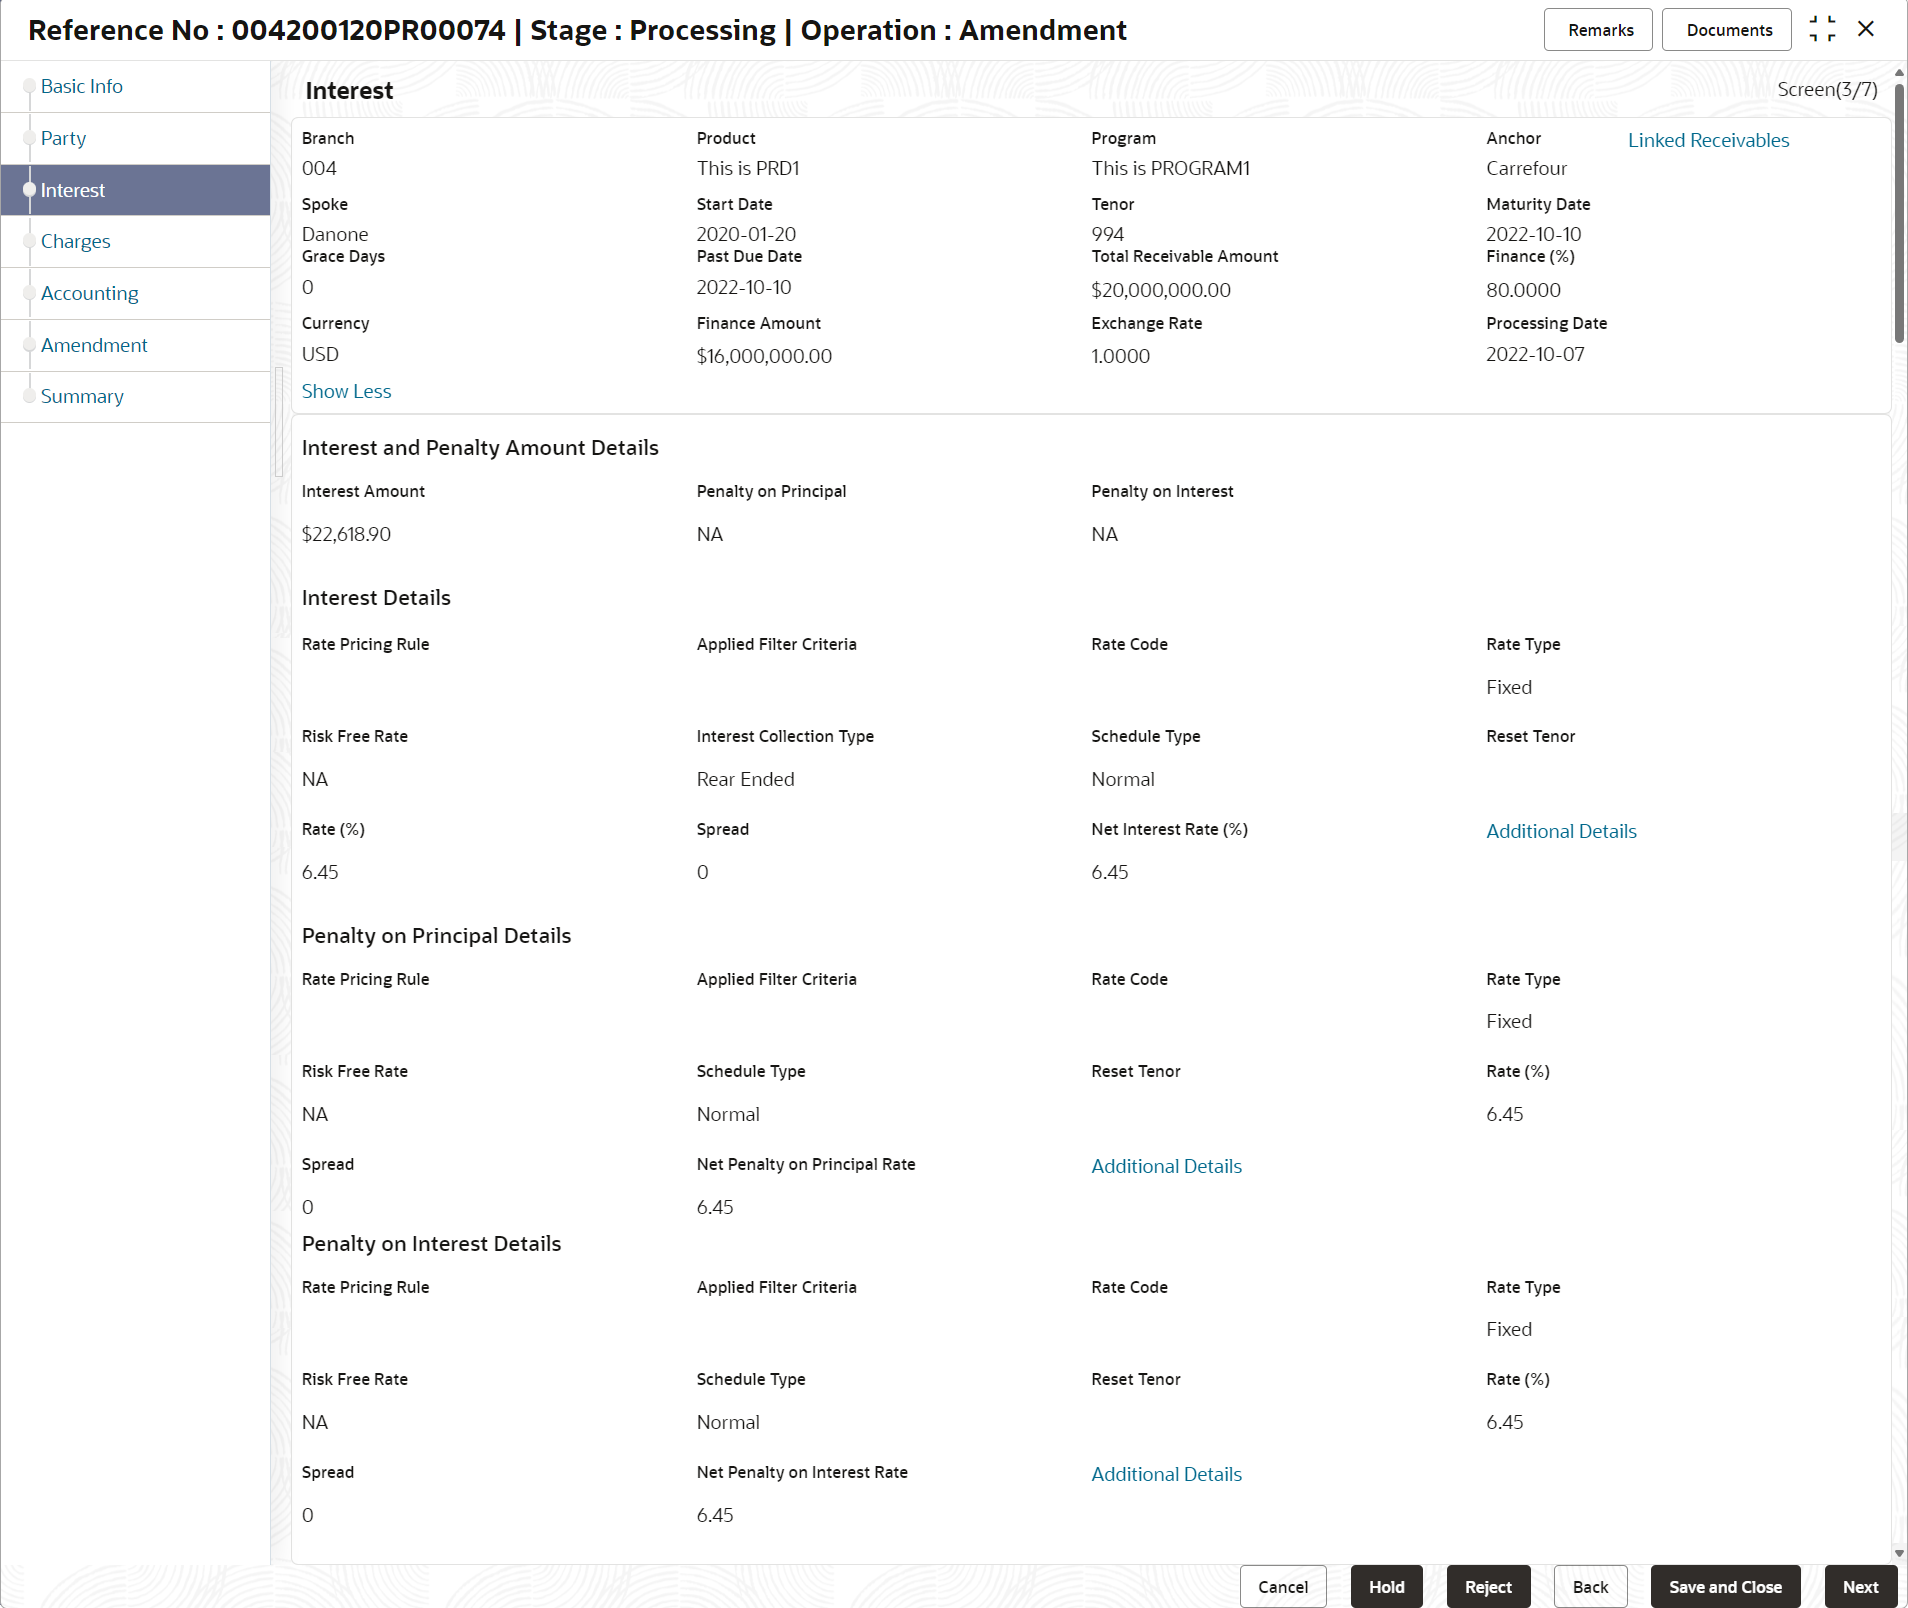
tab.The Interest screen displays.
- Specify the fields on Interest screen.For more information on fields, refer to the field description table.
Note:
The fields marked as Required are mandatory.Table 5-5 Interest - Field Description
Field Name Description Branch Displays the branch where the amendment is being processed. By default, the logged-in user’s branch is displayed. Program Displays the name of the program that is linked to the receivables that have been financed. Product Displays the name of the product associated with the program. Anchor Displays the name of the anchor party in the program. Linked Receivables/PO Click the link to view the list of receivables (invoices/debit notes) / PO that have been financed. Spoke Displays the name of the counter party in the program. Start Date Displays the start date of the finance. By default, it is the current business date. Tenor Displays the tenor of the finance. The tenor of the finance gets defaulted basis start date and maturity date. Maturity Date Displays the maturity date of the finance. Maturity date gets calculated basis maturity date parameter selected at product level. Grace Days Displays the number of days past the finance due date, within which the finance can be settled without penalty. Past Due Date Displays the new due date post the initial finance maturity date. Total Receivable/PO Amount Displays the total amount of the receivables/PO that have been financed. Finance (%) Displays the percentage of the total receivable/PO amount that have been financed. Currency Displays the currency of the finance amount. Finance Amount Displays the amount that has been financed. By default, this field displays the Finance (%) value of the Total Receivable Amount. Exchange Rate Displays the exchange rate between the receivable/PO amount currency and the finance currency. Processing Date Displays the date of processing of the amendment. Interest and Penalty Amount Details Interest, Penalty on Principal, and Penalty on Interest details of the finance is displayed in this section. Interest Amount Displays the interest amount that has been calculated. Penalty on Principal Displays the penalty on the outstanding principal that has been calculated, if any. Penalty on Interest Displays the penalty on the outstanding interest that has been calculated, if any. Interest Details Interest details of the finance is displayed in this section. Rate Pricing Rule Displays the pricing rule applied for the interest rate. Applied Filter Criteria Displays the filter criteria applied for the interest rate. Rate Code Displays the unique code associated with the interest rate. Rate Type Displays whether the rate is floating or fixed. Risk Free Rate Displays whether the interest rate applied is risk free. Interest Collection Type Displays the type of interest collection, whether rear-ended, or front-ended. Schedule Type Displays whether the interest collection schedule is normal or compounding. Reset Tenor Displays the tenor for applying the new interest rate, in case of floating rate type. Rate (%) Displays the base rate of interest. Spread Displays the spread or margin rate of interest. Net Interest Rate (%) Displays the total rate of interest. This is the sum of Rate (%) and Spread. Additional Details Click this link to view additional interest details.
The Interest Additional Details pop-up screen displays the additional information related to the interest.
Penalty on Principal Details Penalty on principal details of the finance is displayed in this section. Rate Pricing Rule Displays the pricing rule applied for the interest rate. Applied Filter Criteria Displays the filter criteria applied for the interest rate. Rate Code Displays the code of the penalty on principal. Rate Type Displays whether the rate is floating or fixed. Risk Free Rate Displays whether the interest rate applied is risk free. Schedule Type Displays whether the interest collection schedule is normal or compounding. Reset Tenor Displays the tenor for applying the new interest rate, in case of floating rate type. Rate (%) Displays the base rate of interest. Spread Displays the spread or margin rate of interest. Net Penalty on Principal Rate (%) Displays the total rate of interest. This is the sum of Rate (%) and Spread. Additional Details Click this link to view additional details related to penalty on principal. Penalty on Interest Details Rate Pricing Rule Displays the pricing rule applied for the interest rate. Applied Filter Criteria Displays the filter criteria applied for the interest rate. Rate Code Displays the code of the penalty on the penalty on interest. Rate Type Displays whether the rate is floating or fixed. Risk Free Rate Displays whether the interest rate applied is risk free. Schedule Type Displays whether the interest collection schedule is normal or compounding. Reset Tenor Displays the tenor for applying the new interest rate, in case of floating rate type. Rate (%) Displays the base rate of interest. Spread Displays the spread or margin rate of interest. Net Penalty on Principal Rate (%) Displays the total rate of interest. This is the sum of Rate (%) and Spread. Additional Details Click this link to view additional details related to penalty on interest. - Perform any of the below actions from the Interest
screen.
- Click Next to go to the Charges screen.
- Click Save and Close to save the
details and complete the processing stage of the amendment.
Note:
If the Amendment Auth Required toggle is enabled for the program associated with the transaction, an approval task is created in the system. - Click Back to go to the Party screen.
- Click Reject to purge the amendment transaction.
- Click Hold to move the transaction to the Hold Tasks list.
- Click Cancel to cancel the transaction and return to the Free Tasks screen.
Charges
- Click Next on the Interest
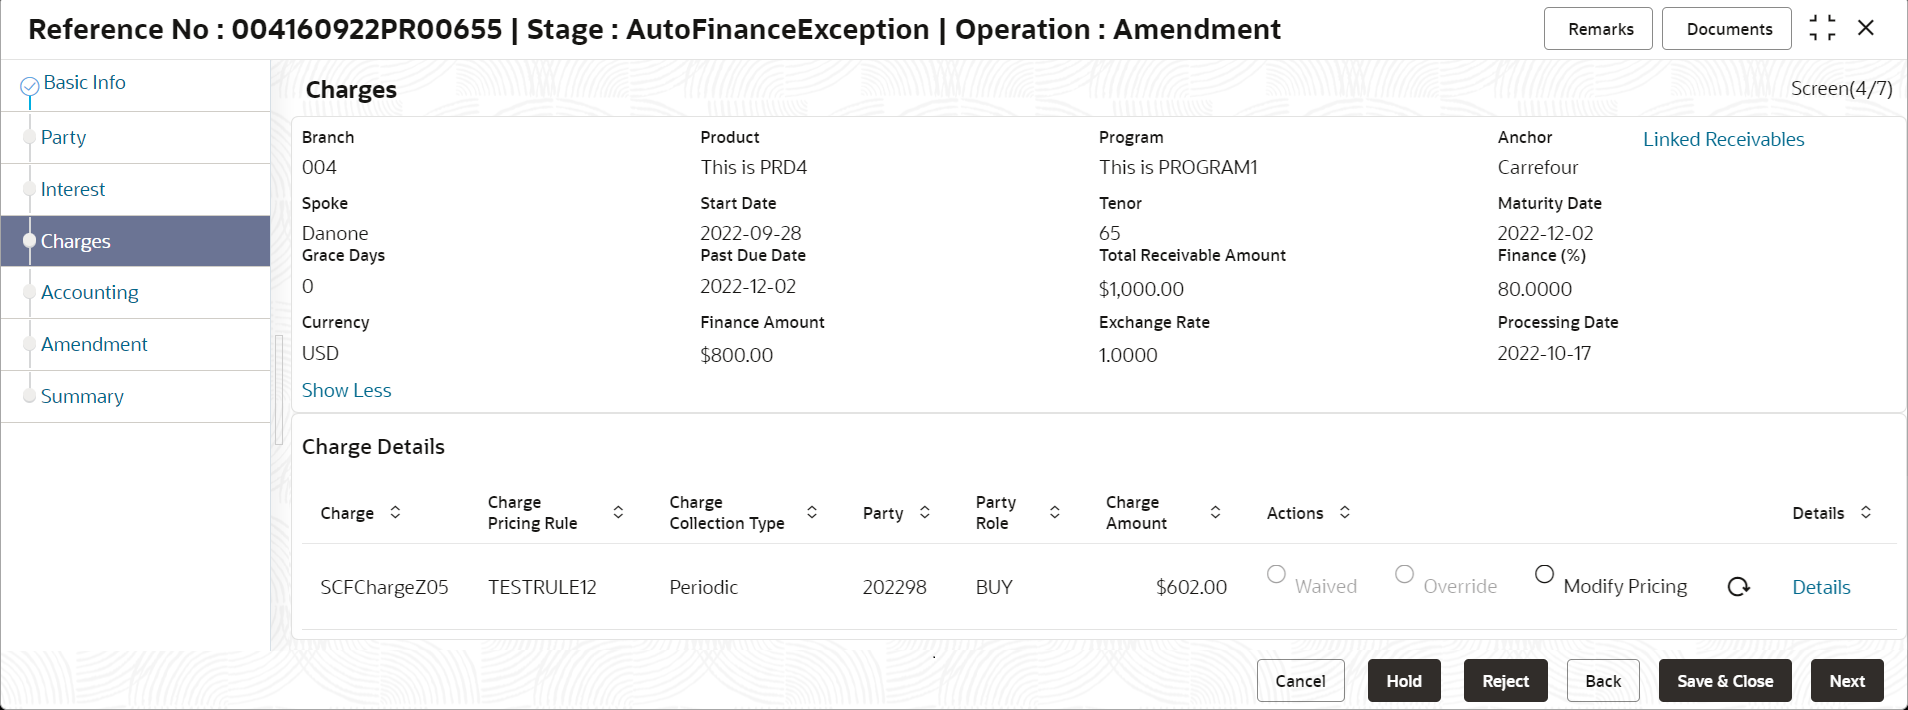
tab.The Charges screen displays.
- Specify the fields on Charges screen.For more information on fields, refer to the field description table.
Note:
The fields marked as Required are mandatory.Table 5-6 Charges - Field Description
Field Name Description Branch Displays the branch where the amendment is being processed. By default, the logged-in user’s branch is displayed. Program Displays the name of the program that is linked to the receivables that have been financed. Product Displays the name of the product associated with the program. Anchor Displays the name of the anchor party in the program. Linked Receivables/PO Click the link to view the list of receivables (invoices/debit notes) / PO that have been financed. Spoke Displays the name of the counter party in the program. Start Date Displays the start date of the finance. By default, it is the current business date. Tenor Displays the tenor of the finance. The tenor of the finance gets defaulted basis start date and maturity date. Maturity Date Displays the maturity date of the finance. Maturity date gets calculated basis maturity date parameter selected at product level. Grace Days Displays the number of days past the finance due date, within which the finance can be settled without penalty. Past Due Date Displays the new due date post the initial finance maturity date. Total Receivable/PO Amount Displays the total amount of the receivables/PO that have been financed. Finance (%) Displays the percentage of the total receivable/PO amount that have been financed. Currency Displays the currency of the finance amount. Finance Amount Displays the amount that has been financed. By default, this field displays the Finance (%) value of the Total Receivable Amount. Exchange Rate Displays the exchange rate between the receivable/PO amount currency and the finance currency. Processing Date Displays the date of processing of the amendment. Charge Details Charge details of the finance is displayed in this section. Charge Displays the charge code. Charge Pricing Rule Displays the charge pricing rule applicable to the transaction.
This field becomes editable if Modify Pricing radio button is selected in the Actions column.
Click the search icon in the Charge Pricing Rule column. The Charge Pricing Rule pop-up screen displays.- Enter complete or partial value in the Charge Pricing Id or Charge Pricing Description fields .
- Click Fetch. The relevant pricing rule(s) displays.
- Select the pricing rule to be applied.
Charge Collection Type Displays the type of charge collection applicable to the transaction. Party Displays the ID of the party that has been charged. Party Role Displays the role of the party that has been charged. Charge Amount Displays the amount charged along with the currency. If the charge is Auto Waived, then the charge amount field defaults to zero.
Actions Displays the below radio buttons.- Waive – Click the button to waive the charge amount. If selected, the charge amount field defaults to zero.
- Override – Click the button to modify the existing charge amount . For Charge Collection Type selected as Periodic, the override charge amount entered will be proportionately adjusted across the schedule.
- Modify Pricing – Click the button to modify the charge pricing rule. Charge Pricing Rule field becomes editable to select a different pricing rule.
- Reset – Click the button to reset to the original calculation of charges and charge pricing rule.
These fields are enabled or disabled as per the charge maintenance parameters set in the Charge Decisioning and the Charge Preferential Pricing screens.
Status Displays the status of the charge and View Original Charges hyperlink is enabled. Click the link to view the system calculated charges.
This field is displayed only if Auto Waive is selected in the Charge Decisioning screen or if the amendment transaction is viewed from checker login.
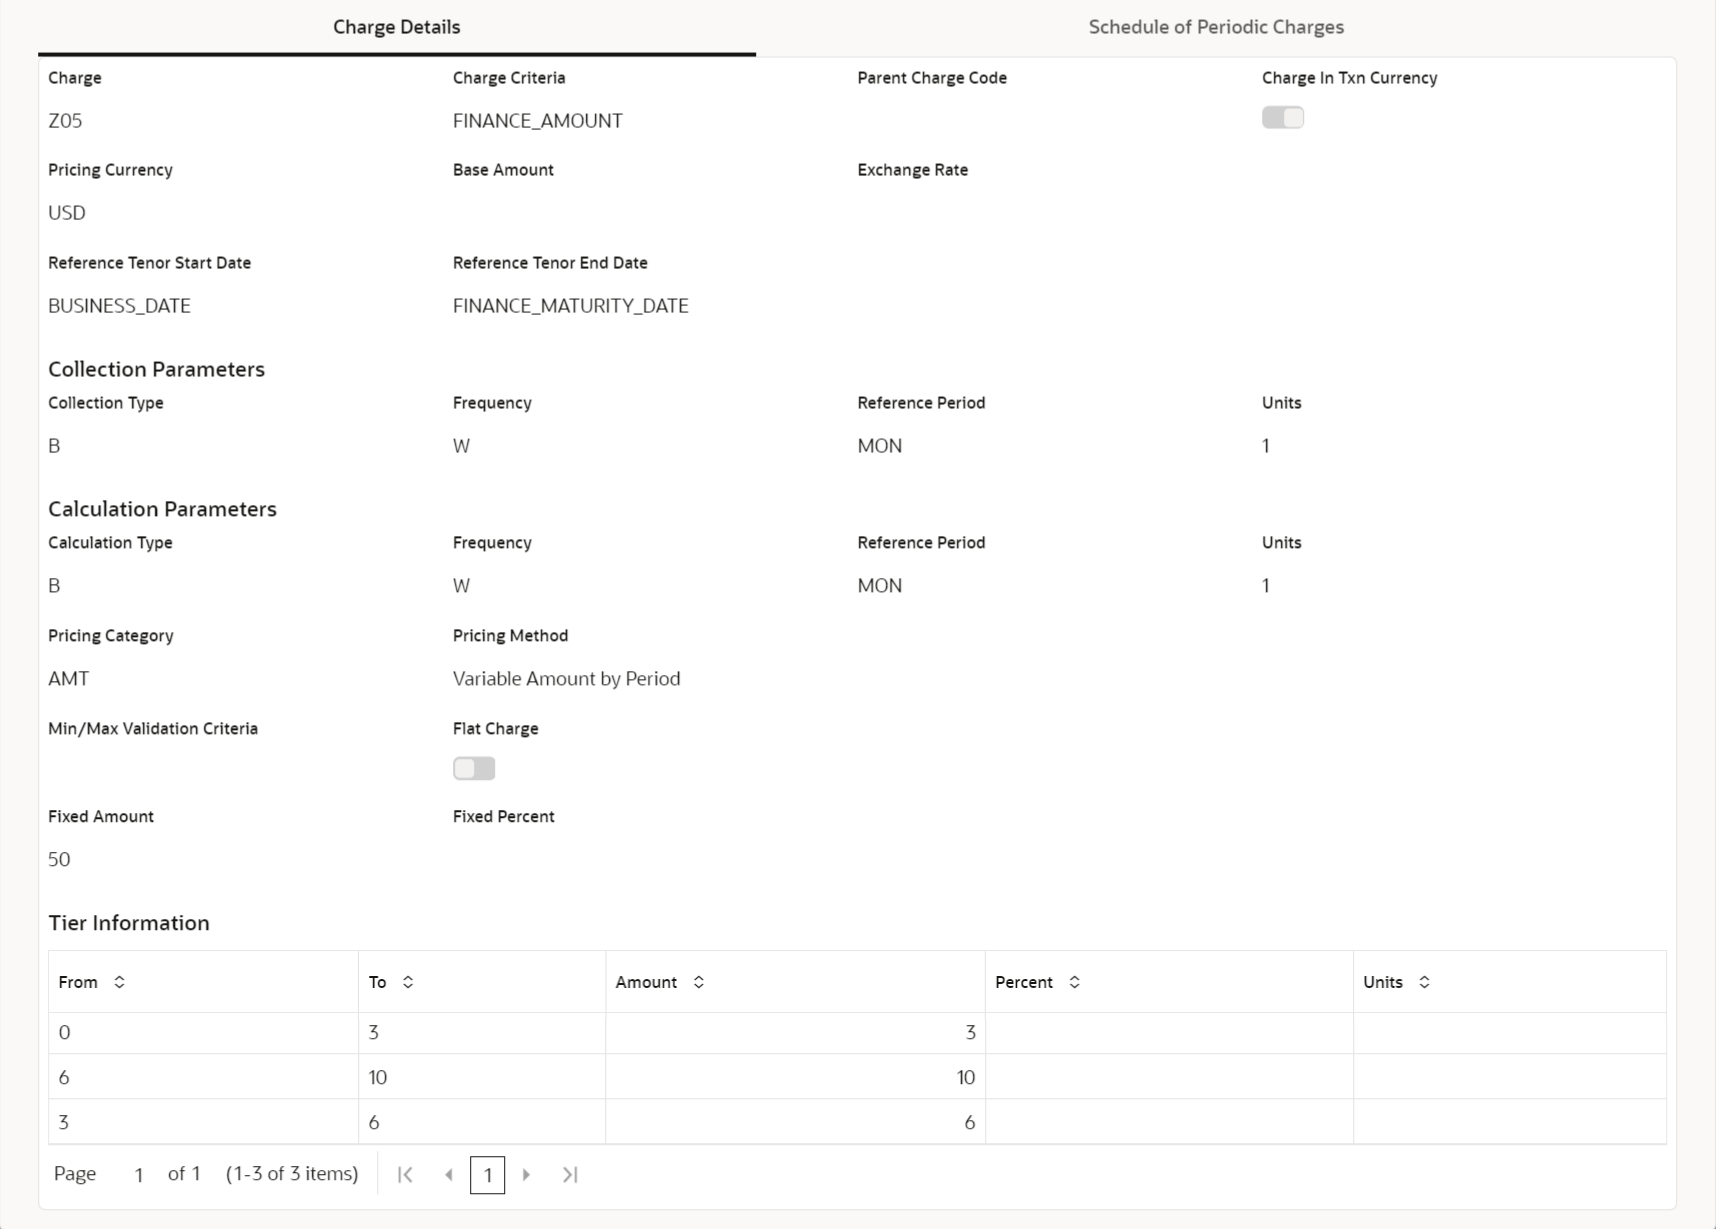
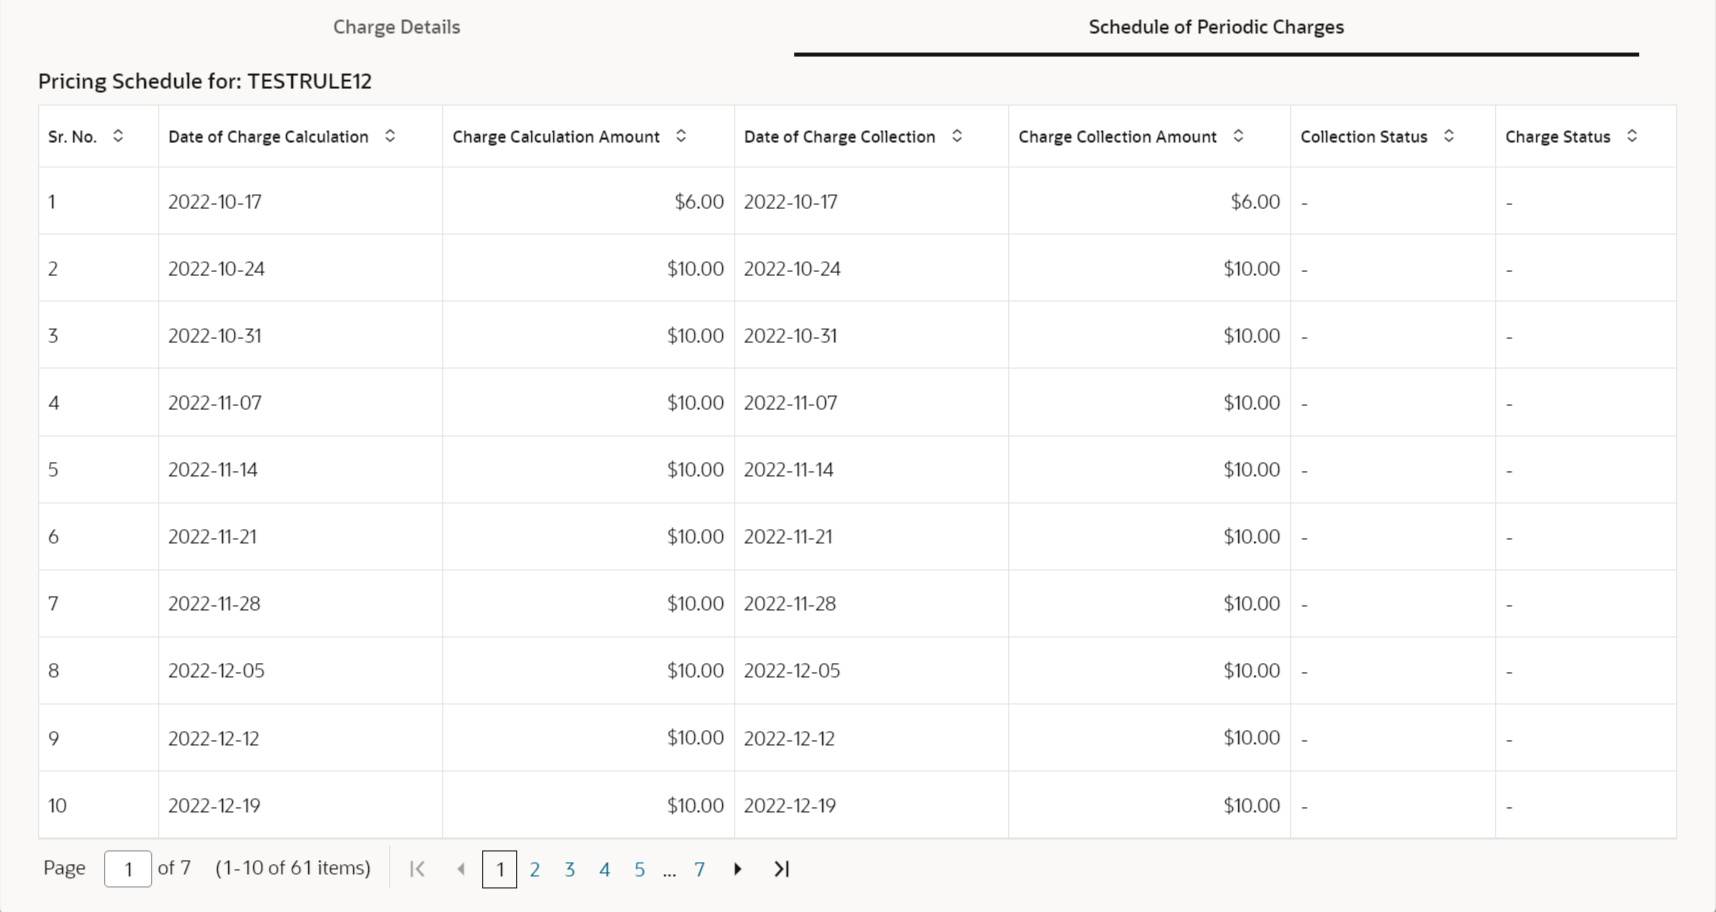
Details Click the link to view the charge details, external pricing details, and schedule of periodic charges.
External Pricing Details tab is displayed only if External Pricing switch is enabled in the Charge Decisioning and Charge Preferential Pricing screens.
Schedule of Periodic Charges tab is displayed only if the Charge Collection Type or Charge Calculation Type is selected as Periodic.
- Click the link in the Details column to view the charge
details, external pricing details, and schedule of periodic charges.
- Perform any of the below actions from the Charges
screen.
- Click Next to go to the Accounting screen.
- Click Save and Close to save the
details and complete the processing stage of the amendment.
Note:
If the Amendment Auth Required toggle is enabled for the program associated with the transaction, an approval task is created in the system. - Click Back to go to the Interest screen.
- Click Reject to purge the amendment transaction.
- Click Hold to move the transaction to the Hold Tasks list.
- Click Cancel to cancel the transaction and return to the Free Tasks screen.
Accounting
- Click Next on the Charges
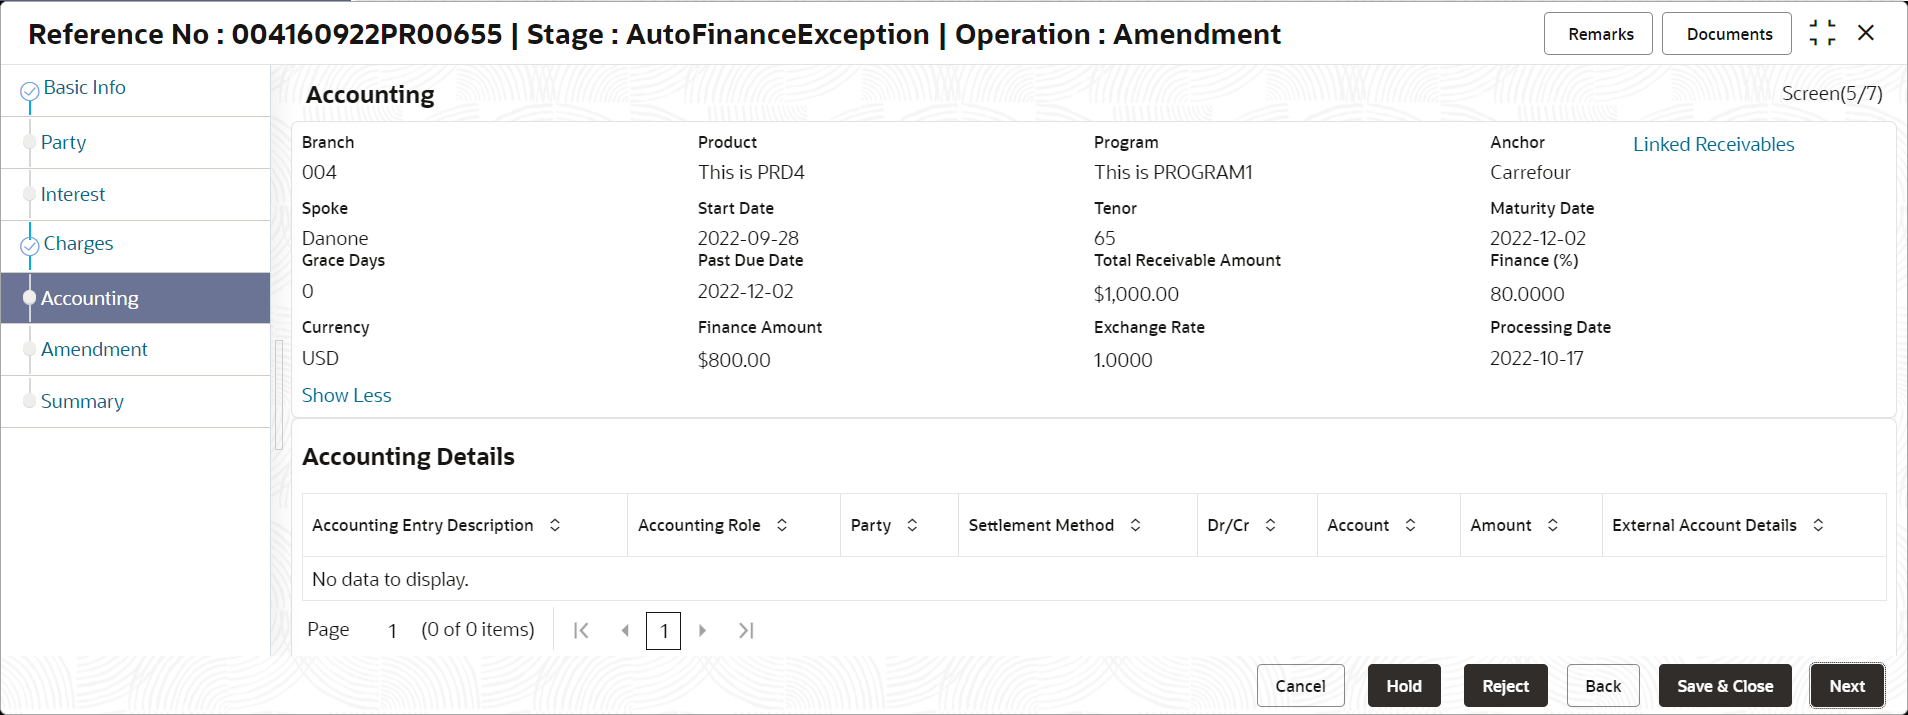
tab.The Accounting screen displays.
- Specify the fields on Accounting screen.For more information on fields, refer to the field description table.
Note:
The fields marked as Required are mandatory.Table 5-7 Accounting - Field Description
Field Name Description Branch Displays the branch where the amendment is being processed. By default, the logged-in user’s branch is displayed. Program Displays the name of the program that is linked to the receivables that have been financed. Product Displays the name of the product associated with the program. Anchor Displays the name of the anchor party in the program. Linked Receivables/PO Click the link to view the list of receivables (invoices/debit notes) / PO that have been financed. Spoke Displays the name of the counter party in the program. Start Date Displays the start date of the finance. By default, it is the current business date. Tenor Displays the tenor of the finance. The tenor of the finance gets defaulted basis start date and maturity date. Maturity Date Displays the maturity date of the finance. Maturity date gets calculated basis maturity date parameter selected at product level. Grace Days Displays the number of days past the finance due date, within which the finance can be settled without penalty. Past Due Date Displays the new due date post the initial finance maturity date. Total Receivable/PO Amount Displays the total amount of the receivables/PO that have been financed. Finance (%) Displays the percentage of the total receivable/PO amount that have been financed. Currency Displays the currency of the finance amount. Finance Amount Displays the amount that has been financed. By default, this field displays the Finance (%) value of the Total Receivable Amount. Exchange Rate Displays the exchange rate between the receivable/PO amount currency and the finance currency. Processing Date Displays the date of processing of the amendment. Accounting Details Accounting details of the finance is displayed in this section. Accounting Entry Description Displays the description of the accounting entry. Accounting Role Displays the accounting role code associated with the accounting entry. Party Displays the name of the party associated with the accounting entry. Settlement Method Displays the amendment mode of the transaction. Dr/Cr Displays whether the amount is debited or credited for the accounting entry. Account Displays the account number involved in the transaction. Amount Displays the amount of the transaction. External Account Details Displays the details of the account if it is an external account. - Perform any of the below actions from the Accounting
screen.
- Click Next to go to the Amendment screen.
- Click Save and Close to save the
details and complete the processing stage of the amendment.
Note:
If the Amendment Auth Required toggle is enabled for the program associated with the transaction, an approval task is created in the system. - Click Back to go to the Charges screen.
- Click Reject to purge the amendment transaction.
- Click Hold to move the transaction to the Hold Tasks list.
- Click Cancel to cancel the transaction and return to the Free Tasks screen.
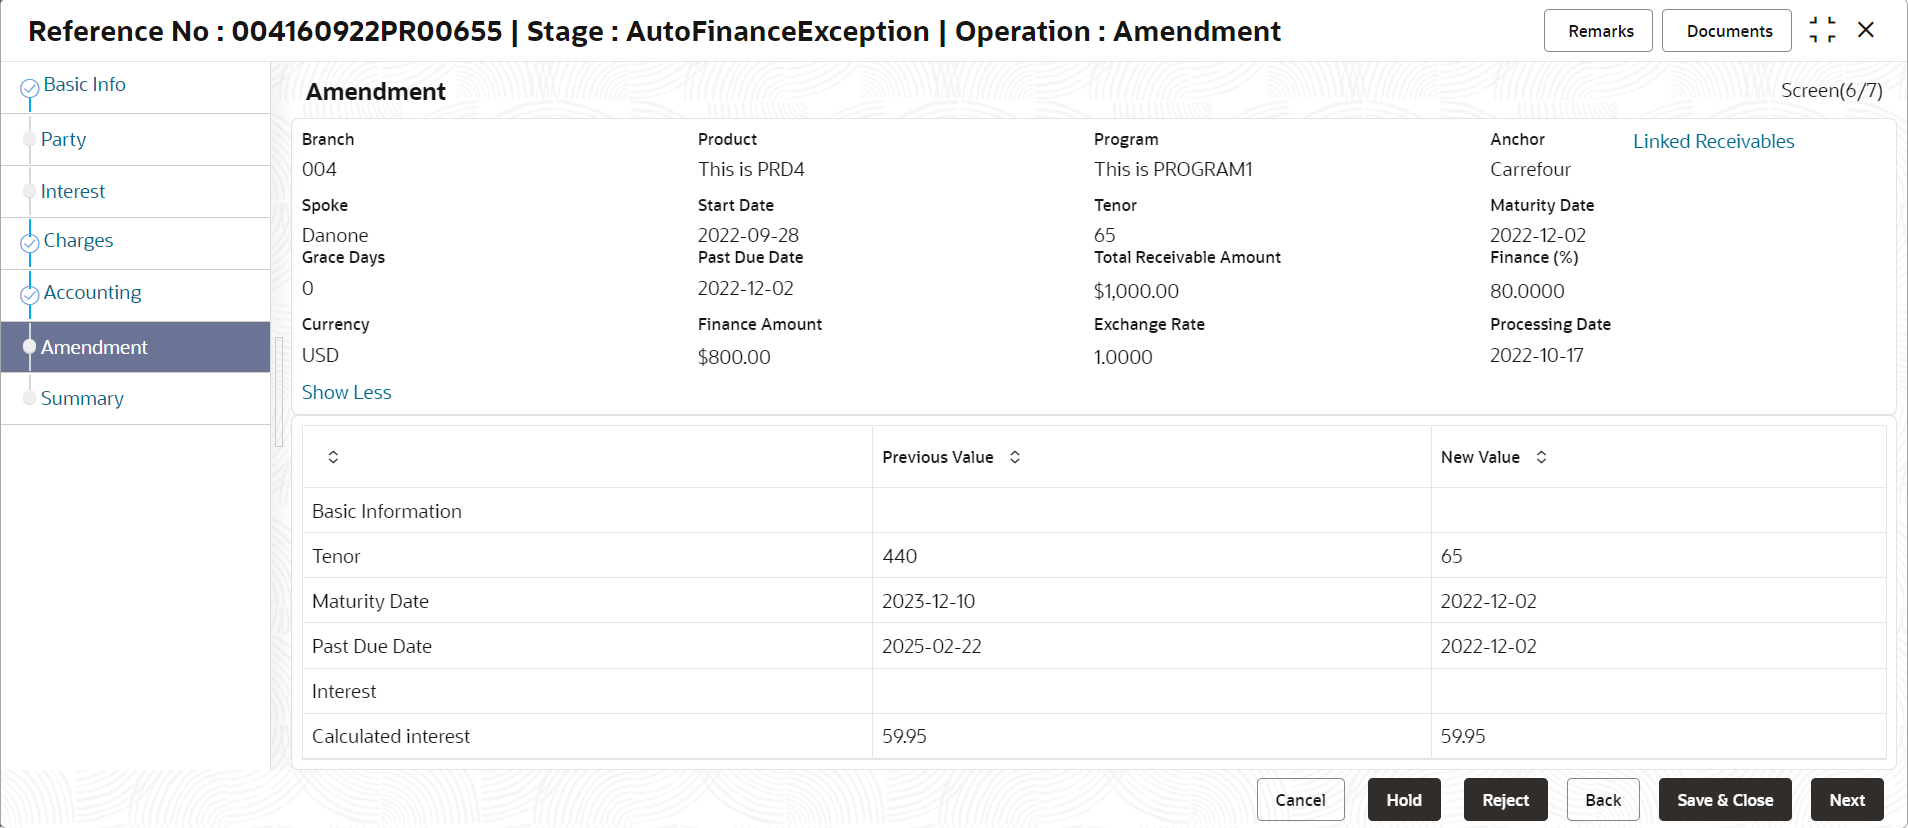
Amendment
- Click Next on the Accounting
tab.The Amendment screen displays.
- Specify the fields on Amendment screen.For more information on fields, refer to the field description table.
Note:
The fields marked as Required are mandatory.Table 5-8 Amendment - Field Description
Field Name Description Branch Displays the branch where the amendment is being processed. By default, the logged-in user’s branch is displayed. Program Displays the name of the program that is linked to the receivables that have been financed. Product Displays the name of the product associated with the program. Anchor Displays the name of the anchor party in the program. Linked Receivables/PO Click the link to view the list of receivables (invoices/debit notes) / PO that have been financed. Spoke Displays the name of the counter party in the program. Start Date Displays the start date of the finance. By default, it is the current business date. Tenor Displays the tenor of the finance. The tenor of the finance gets defaulted basis start date and maturity date. Maturity Date Displays the maturity date of the finance. Maturity date gets calculated basis maturity date parameter selected at product level. Grace Days Displays the number of days past the finance due date, within which the finance can be settled without penalty. Past Due Date Displays the new due date post the initial finance maturity date. Total Receivable/PO Amount Displays the total amount of the receivables/PO that have been financed. Finance (%) Displays the percentage of the total receivable/PO amount that have been financed. Currency Displays the currency of the finance amount. Finance Amount Displays the amount that has been financed. By default, this field displays the Finance (%) value of the Total Receivable Amount. Exchange Rate Displays the exchange rate between the receivable/PO amount currency and the finance currency. Processing Date Displays the date of processing of the amendment. Amendment Details Existing and the updated values after an amendment transaction are displayed in this section. Basic Info The following fields displays the basic information of the modified details of the finance. Tenor Displays the tenor of the finance. Maturity Date Displays the maturity date of the finance. Grace Days Displays the number of days past the finance due date, within which the finance can be settled without penalty. Past Due Date Displays the new due date post the initial finance maturity date. Interest The following fields displays the interest details of the finance. Calculated Interest Displays the interest amount that has been calculated. - Perform any of the below actions from the Amendment
screen.
- Click Next to go to the Limits screen.
- Click Save and Close to save the
details and complete the processing stage of the amendment.
Note:
If the Amendment Auth Required toggle is enabled for the program associated with the transaction, an approval task is created in the system. - Click Back to go to the Accounting screen.
- Click Reject to purge the amendment transaction.
- Click Hold to move the transaction to the Hold Tasks list.
- Click Cancel to cancel the transaction and return to the Free Tasks screen.
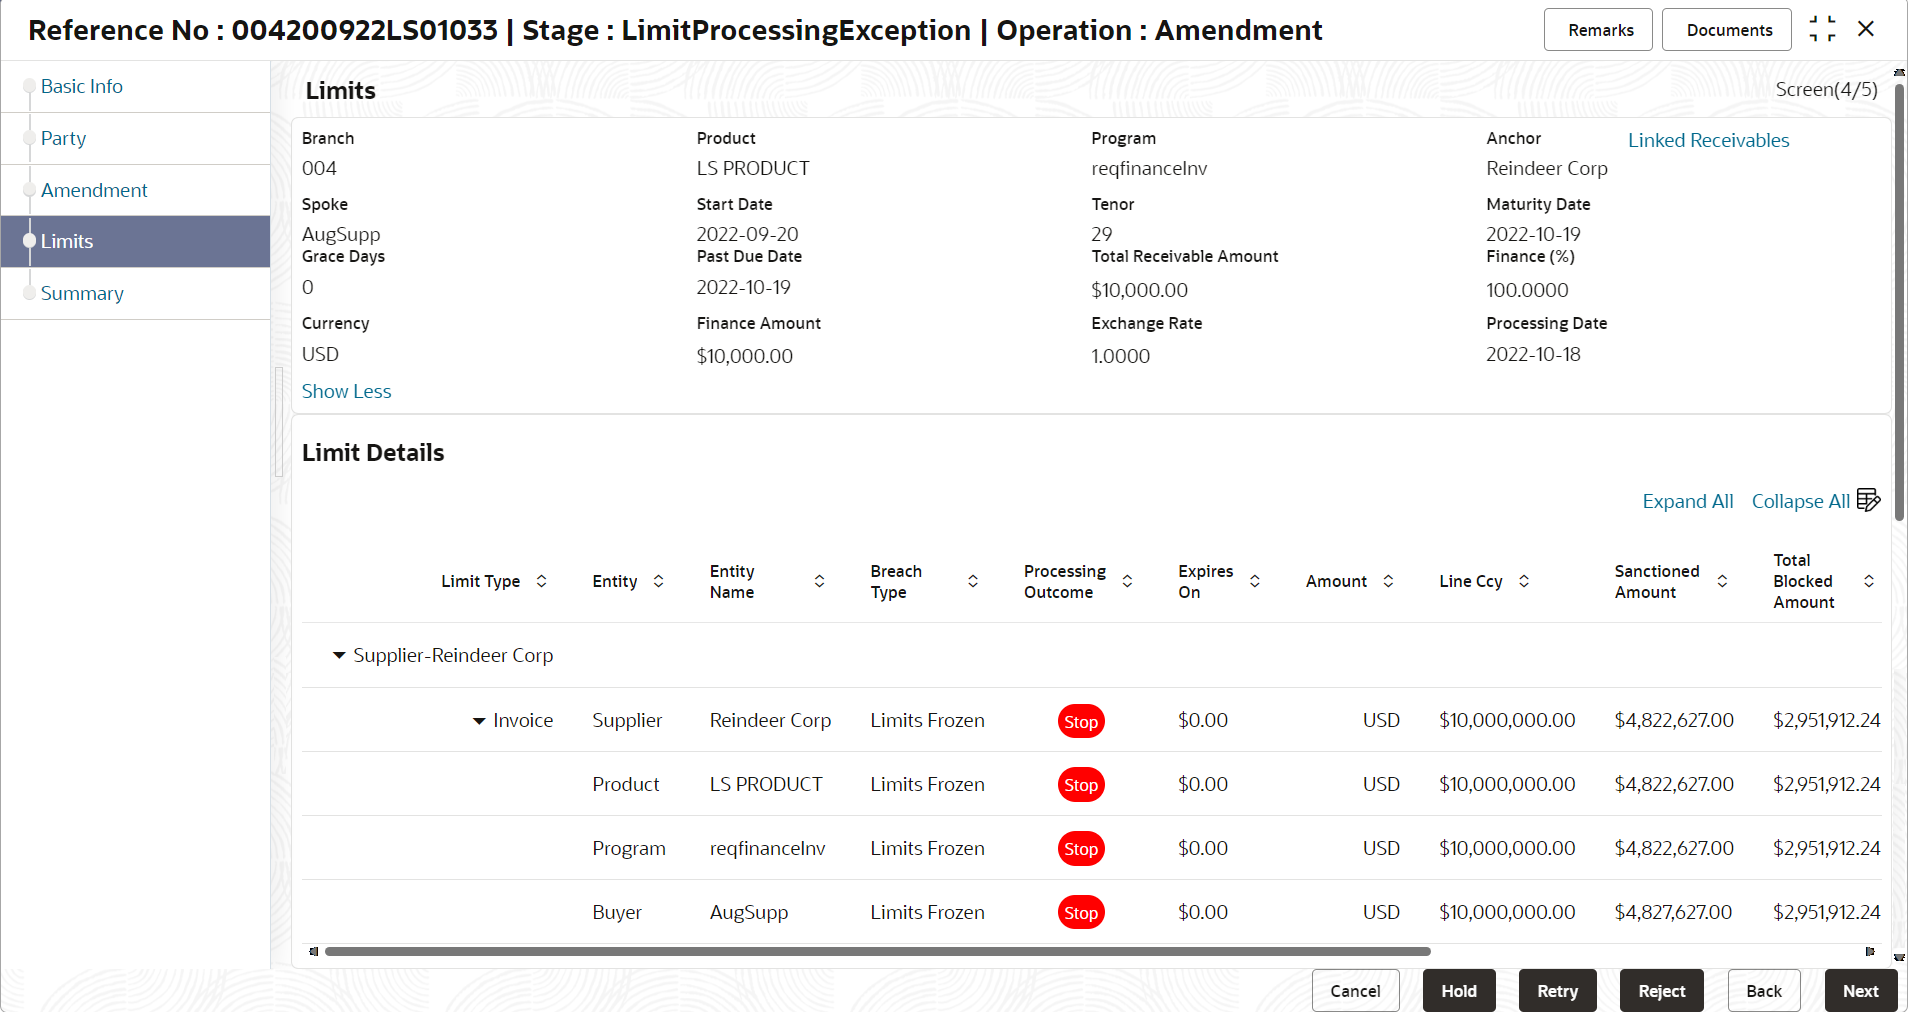
Limits
This tab is displayed only if there is a limit freeze or if the limit is expired.
- Click Next on the Amendment
tab.The Limits screen displays.
Note:
When the main limits are being utilized, the Limit Details grid displays details related to the main limits. You can add columns related to the adhoc limits by clicking Add/Remove Columns icon, if required. If adhoc limits are being utilized, then the Limit Details grid displays the Sanctioned Adhoc Amount, Utilized Adhoc Amount, and Available Adhoc Amount columns. You can add the columns related to the Main Limits using Add/Remove Columns icon, if required. - Specify the fields on Limits screen.For more information on fields, refer to the field description table.
Note:
The fields marked as Required are mandatory.Table 5-9 Limits - Field Description
Field Name Description Branch Displays the branch where the amendment is being processed. By default, the logged-in user’s branch is displayed. Program Displays the name of the program that is linked to the receivables that have been financed. Product Displays the name of the product associated with the program. Anchor Displays the name of the anchor party in the program. Linked Receivables/PO Click the link to view the list of receivables (invoices/debit notes) / PO that have been financed. Spoke Displays the name of the counter party in the program. Start Date Displays the start date of the finance. By default, it is the current business date. Tenor Displays the tenor of the finance. The tenor of the finance gets defaulted basis start date and maturity date. Maturity Date Displays the maturity date of the finance. Maturity date gets calculated basis maturity date parameter selected at product level. Grace Days Displays the number of days past the finance due date, within which the finance can be settled without penalty. Past Due Date Displays the new due date post the initial finance maturity date. Total Receivable/PO Amount Displays the total amount of the receivables/PO that have been financed. Finance (%) Displays the percentage of the total receivable/PO amount that have been financed. Currency Displays the currency of the finance amount. Finance Amount Displays the amount that has been financed. By default, this field displays the Finance (%) value of the Total Receivable Amount. Exchange Rate Displays the exchange rate between the receivable/PO amount currency and the finance currency. Processing Date Displays the date of processing of the amendment. Limit Details Limit details of the entity is displayed in this section. Limit Type Displays a label of the entity and the linked limit type. Entity Displays the entity – Anchor / Product / Program / Spoke and so on. Entity Name Displays the name of the entity. Breach Type Displays any limit breach exception that has occurred with respect to the entity. (Limits Frozen, Amount Breach, Limits Expired). Processing Outcome Displays the action that will be taken on the limit as a result of settlement.- Utilize - If the limit is being booked.
- Stop - If in case of an exception, the transaction should be blocked and not allowed to be processed further.
- Skip - If in case of an exception, the transaction is to be processed without limit booking.
This behavior is driven by the credit limit mapping as configured in product parameters.
Amount Displays the finance amount with respect to the entity. Line Ccy Displays the currency of the limit line. Exchange Rate Displays the exchange rate between the finance amount currency and the line currency. Amount (In line CCY) Displays the finance amount in line currency. Sanctioned Amount Displays the limit amount assigned to the entity, in line currency. Total Blocked Amount Displays the total amount that has been blocked for finances that are currently being processed, with respect to the entity. Total Utilized Amount Displays the limit amount that has already been utilized. Available Amount Displays the limit amount available to the entity for financing. Line Id Displays the unique ID of the limit line of the entity. Action Displays the action being taken on the amount being settled. Actual Available Limits Displays the actual limit available to the entity for financing. - Perform any of the below actions from the Limits
screen.
- Click Next to go to the Summary screen.
- Click Save and Close to save the
details and complete the processing stage of the amendment.
Note:
If the Amendment Auth Required toggle is enabled for the program associated with the transaction, an approval task is created in the system. - Click Back to go to the Amendment screen.
- Click Reject to purge the amendment transaction.
- Click Hold to move the transaction to the Hold Tasks list.
- Click Cancel to cancel the transaction and return to the Free Tasks screen.
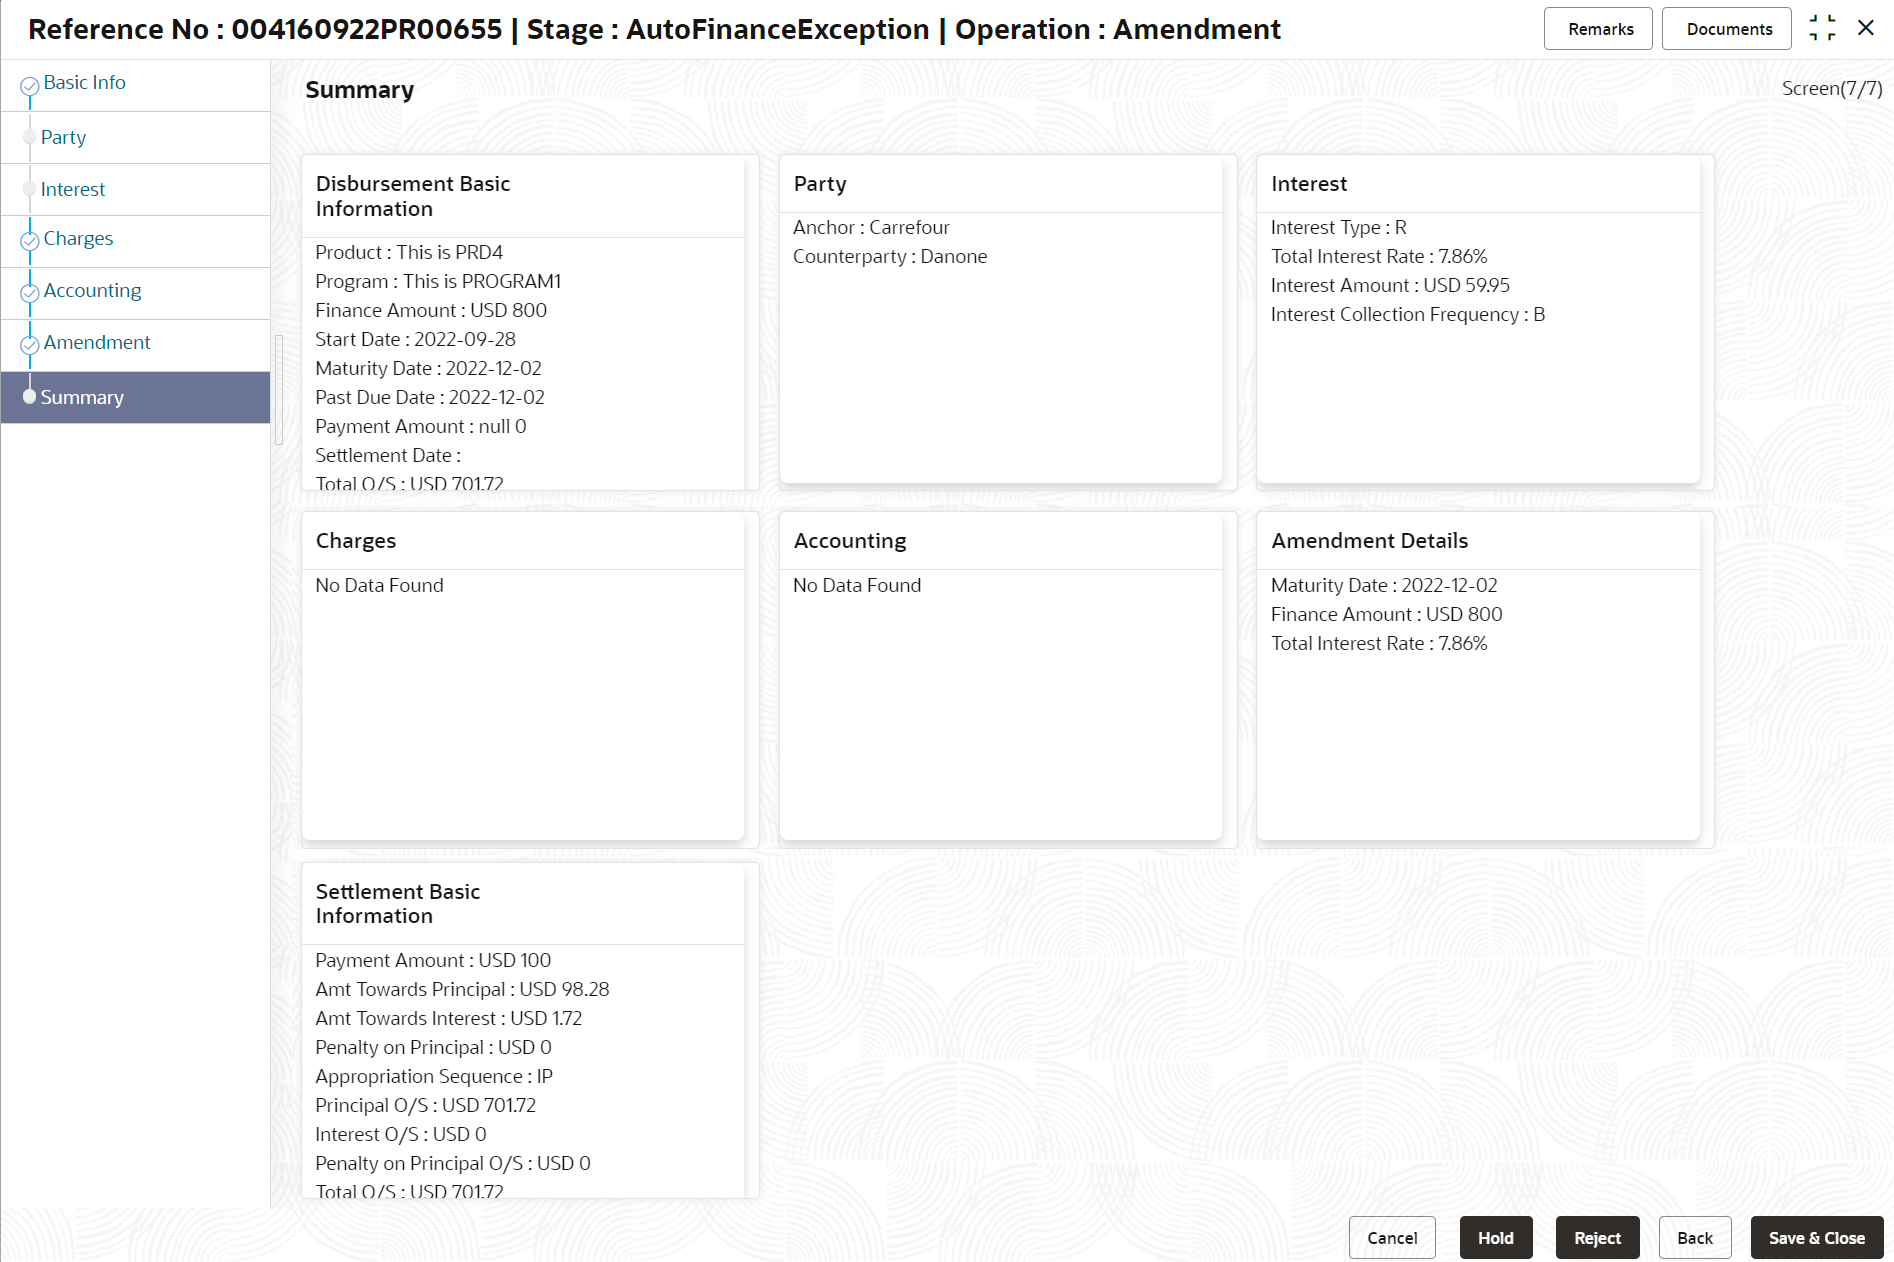
Summary
The Amendment Summary tab shows a snapshot of the complete amendment transaction along with finance amount, interest applicable, amendment details, terms, and so on. A tile is displayed for each data segment.
- Click Next on the Limits
tab.The Summary screen displays.
- Review the details of the amendment transaction and perform any of the
following action from the Summary screen.
- Click each tile to view the detailed information of the data segments.
- Click Save and Close to save the
details and complete the processing stage of the amendment.
Note:
If the Amendment Auth Required toggle is enabled for the program associated with the transaction, an approval task is created in the system. Once approved, the finance gets modified in the core lending system, which in-turn will return the amendment status to Supply Chain Finance system. - Click Back to go to the Limits screen.
- Click Reject to purge the amendment transaction.
- Click Hold to move the transaction to the Hold Tasks list.
- Click Cancel to cancel the transaction and return to the Free Tasks screen.
Parent topic: Finance Amendment
