1.2.6 Accounting Roles

Use the Accounting Roles to set up of accounting roles for a product.

In Oracle Banking Treasury Management, accounting—simplistically, posting accounting entries to the appropriate ledgers maintained in your Chart of Accounts—is automated. This is achieved by defining an intricate accounting structure that includes the Chart of Accounts, Transaction Codes and Amount Tags, and by identifying accounting roles, heads and amount tags for the products you create at your bank. As a result, the accounting entries that are generated at the various events in the life cycle of contracts are automatically posted to the ledgers specified for the product.
Before we proceed with setting up accounting details for a product, we shall discuss a few terms that you will frequently encounter in this section.
  • Accounting Head - In Oracle Banking Treasury Management, the different General Ledgers (GLs) and Sub-Ledgers (SLs) maintained in your Chart of Accounts are referred to as accounting heads, or, simply, account heads.
  • GL Types - The GL/SLs that you have maintained in your bank can be categorized into different GL Types: Asset, Liability, Income, Expense, Contingent Asset, Contingent Liability, Position GL, Position Equivalent GL, etc. When maintaining a GL in the Chart of Accounts, you have to identify its type.
  • Amount Tag - A contract would typically consist of several components. For instance, a contract would consist of the principal, interest, charges, tax, etc. These amounts are referred to as the ‘components’ of a contract. In Oracle Banking Treasury Management, a unique tag called the Amount Tag identifies each component.
  • Accounting Roles - Accounting Roles are tags that identify the type of accounting entry that is posted to an accounting head.
The following Accounting Roles will be automatically generated in Oracle Banking Treasury Management to identify all possible types of accounting entries involving these commission components:

Table 1-3 Contents of the report

COMMISSION 1 COMMISSION 2 Type of Accounting Entry

ISSCOMM1_INC

ISSCOMM2_INC Income
ISSCOMM1_EXP ISSCOMM2_EXP Expense
ISSCOMM1_PAY ISSCOMM2_PAY Payable
ISSCOMM1_REC ISSCOMM2_REC Receivable
ISSCOMM1_RIA ISSCOMM2_RIA Received in Advance
ISSCOMM1_PIA ISSCOMM2_PIA Paid in Advance
Similarly, based on your accounting set up in a module, accounting roles are automatically generated for the other components of a contract. You can maintain the accounting details for a product in two screens:
  • The Product Accounting Roles to Head Mapping Definition screen
  • The Product Events Accounting Entries and Advices Maintenance screen
Before you define the accounting details for a product, you should define the various components of the contracts involving the product such as interest, charges, tax, etc.

In the Product Accounting Role to Head Mapping Definition screen, a list of accounting roles will automatically be generated based on the components you define for the product. You should map all the accounting roles that are available with the appropriate accounting heads.

  1. Click the Accounting Roles button in the Product Definition screen.
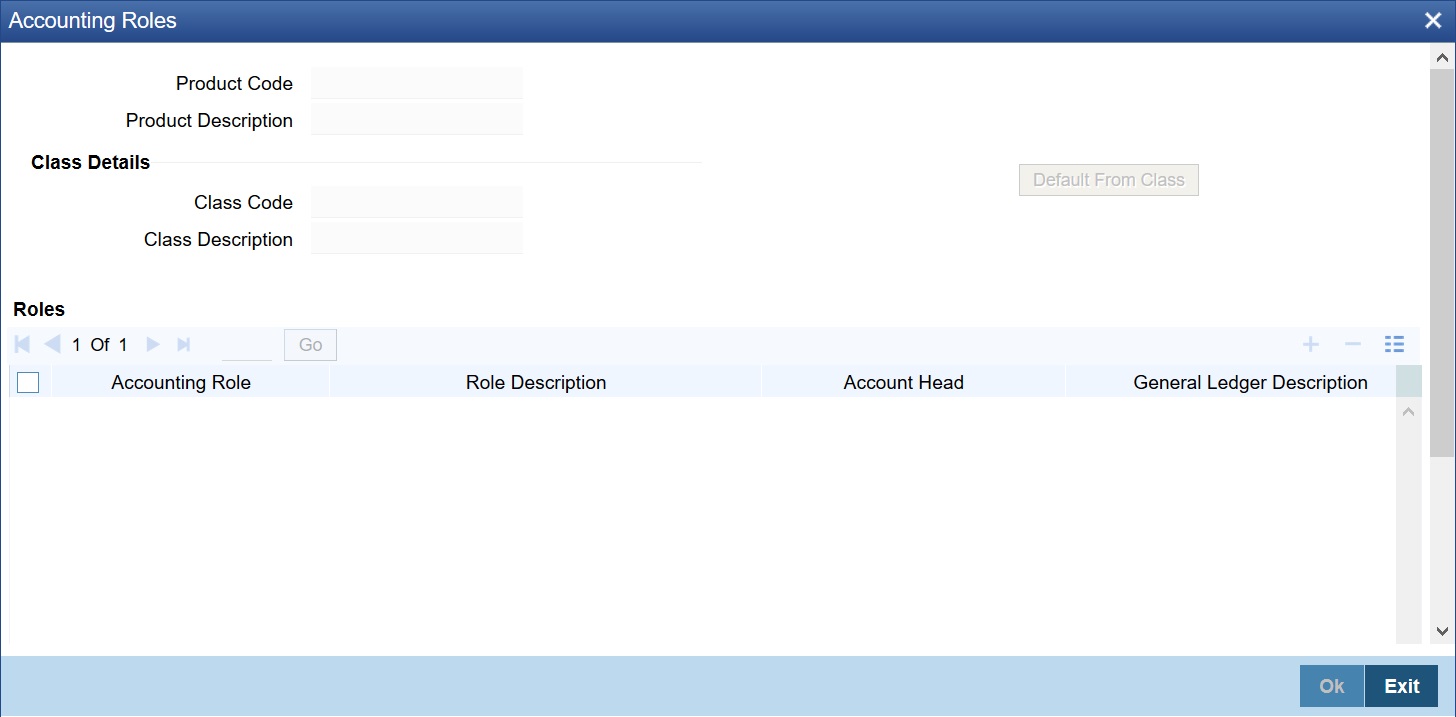
    The Accounting Roles screen is displayed.
  2. In the Accounting Roles screen, specify the fields.
    For detailed explanation on the fields, refer to the below table.

    Table 1-4 Accounting Roles - Field Description

    Field Description
    Product Code

    Select the product code from the displayed list of values.

    Product Description

    In this field, briefly describe the product that you are maintaining. The description that you enter here will help you identify the product all through the module.

    Adopting either of the following procedures, you can specify the accounting roles and heads for a product:
    • Associating the product with an Accounting Role to Head Mapping Class. (This is possible only if you have maintained classes of Accounting Roles and Heads specifically for the module.)
    • Mapping accounting roles and heads specifically for the product
    Class Details Specify the Class Details as described below.
    Class Code and Description

    You can opt to associate an Accounting Role to Head Mapping Definition Class (that you have maintained) with the portfolio product that you are creating. By opting to associate a class with a product, you save the effort of defining the accounting roles and heads for a product, all over again. The roles and heads defined for the class will automatically default to the portfolio product. You can change these defaults to suit the product you are defining.

    Click the Default From Class button in the Product Accounting Role to Head Mapping Definition screen to associate the product you are maintaining with a class of mapped roles and heads. A list of the classes that you have defined specifically for the module will be displayed. Choose a class with the requisite accounting heads and roles mapped.

    The procedure for setting up an Accounting Role to Head Mapping class is similar to mapping accounting roles and accounting heads specifically for a product. This is discussed below.

    Specifying Roles Specify the Roles fields as described below.
    Accounting Role

    This indicates the brokerage rule code and description on the basis of which brokerage is calculated. If you do not use a class to define accounting role and heads for a product, in this screen, you can define them specifically for the product you are creating.

    In the Accounting Roles column, select an Accounting Role from the adjoining option list. You can choose a role by double clicking on it. Next, in the Account Head column, select an accounting head from the adjoining option list. Click add icon to map the role with the corresponding head in the Accounting Head column. If you would like to delete a role to head mapping, click delete icon.

    Account Head

    If you choose not to associate the product with a class, you have to specify the account heads for the product, in this field. You can invoke a list of the accounting heads that you have maintained from the option list positioned next to this field. Choose a head by double clicking on it.

    Description

    A brief description of each accounting head that you choose will be provided in the Description field.