- Standalone Scheduler Property File Creation Guide
- Create Property File for Standalone scheduler
- Creating Property File
- Configuring Scheduler Queues
1.1.4 Configuring Scheduler Queues
- In the displayed Property File Creation - Scheduler Queues screen, specify the fields.
Figure 1-9 Property File Creation: Scheduler Queues

Description of "Figure 1-9 Property File Creation: Scheduler Queues"Table 1-4 Field Description: Property File Creation - Scheduler Queues
Field Description Notify Destination Specify the notify destination. Select one of the following options:- QUEUE
- TOPIC
Queue Name Set ‘NOTIFY_DEST_QUEUE’ as the destination queue name.
Queue Connection Factory Set ‘NotifyDestQCF’ as the queue connection factory
Secure Check this box to indicate that it is a secured queue connection factory. If you check this box, the caller ID and caller password will be enabled.
Caller ID Specify the caller ID for the secured queue connection factory.
Caller Password Specify the password for the caller ID to access the secured queue connection factory.
If the queue connection factory is not secured, i.e., if you have not checked the box ‘Secure’, the installer will not display the fields ‘Caller ID’ and ‘Caller Password’. You need not provide these details in that case.
Notify Queue Location Specify the notify queue location. Select one of the following options:- Internal
- External
For Oracle WebLogic application server, the notify queue location should be selected as ‘Internal’.
If you choose ‘External’ following details for the external queue will be enabled
Provider URL Specify the provide URL (iiop://localhost:1010).
1010 is the default IIOP port.Table 1-5 Server Details
Application Server EMS Out Initial Context Factory Oracle WebLogic t3://<ip_adress>:port For example: t3://10.10.10.10:1010 Here, 10.10.10.10 represents the local host and 1010 to the target server default port (AdminServer/ManagedServer). IBM WebSphere iiop://<ip_adress>:port For example: iiop://10.10.10.10:1010 Here, 1010 represents the default iiop port Security Principal Specify the login ID to access the application server.
Security Credentials Specify the password to access the application server.
Click ‘Next’ to proceed with scheduler configuration..
Notify Deffered Queue Name Set ‘DEFFERED_DEST_QUEUE’ as the notify differed queue name.
Deffered Queue Connection Factory Set ‘DefferedDestQcf’ as the deffered queue connection factory.
Secure Check this box to indicate that it is a secured deffered queue connection factory. If you check this box, caller ID and caller password will be enabled.
Specify the caller ID and caller password for the secured deferred queue connection factory.
Notify Queue Name Set ‘NOTIFY_QUEUE’ as the notify queue name.
Dead Letter Queue Name Set ‘NOTIFY_QUEUE_DLQ’ as the dead letter queue name.
Notify Queue Connection Factory Set ‘NOTIFY_MDB_QCF’ as the notify queue connection factory.
Secure Check this box to indicate that it is a secured notify internal Queue. If you check this box, caller ID and caller password will be enabled. Specify the caller ID and caller password for the secured notify queue connection factory.
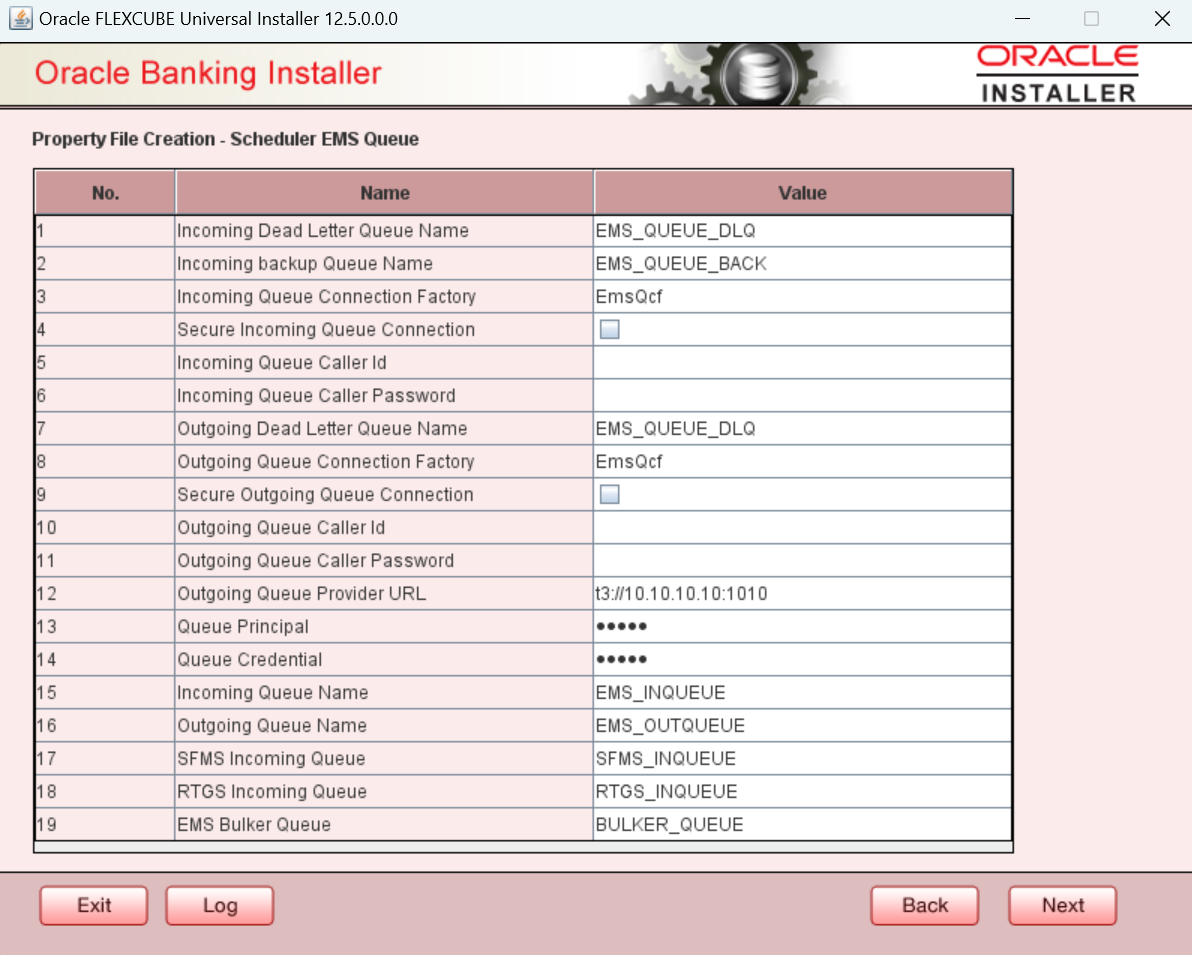
- Click Next and the following screen is displayed:
Table 1-6 Field Description
Field Description Incoming Dead Letter Queue Name Set ‘EMS_QUEUE_DLQ’ as the incoming dead letter queue name.
Incoming Backup Queue Name Set ‘EMS_QUEUE_BACK’ as the incoming backup queue name.
Incoming Queue Connection Factory Set ‘EmsQcf’ as the incoming queue connection factory.
Secure Incoming Queue Connection Check this box to indicate that it is a secured queue connection.
Incoming Queue Caller ID Specify the caller ID for the secured queue connection.
Incoming Queue Caller Password Specify the caller password for the secured queue connection.
Outgoing Dead Letter Queue Name Set ‘EMS_QUEUE_DLQ’ as outgoing dead letter queue name.
Outgoing Queue Connection Factory Set ‘EmsQcf’ as the outgoing queue connection factory.
Secure Outgoing Queue Connection Check this box to indicate that it is a secured outgoing queue connection.
Outgoing Queue Caller ID Specify the caller ID for the secured queue connection.
Outgoing Queue Caller Password Specify the caller Password for the secured queue connection.
Outgoing Queue Provider URL Specify the URL of the outgoing queue.
Queue Principal Specify the queue principal.
Queue Credential Specify the queue credential.
Incoming Queue Name Specify the incoming queue name.
Outgoing Queue Name Specify the outgoing queue name.
SFMS Incoming Queue Specify the SFMS Incoming Queue.
RTGS Incoming Queue Specify the RTGS incoming Queue.
EMS Bulker Queue Specify the EMS Bulker Queue.
Once you have specified the above details, click ‘Next’ and system displays the next screen.
Parent topic: Creating Property File
