- Party Configurations User Guide
- Configurations
- Service Level Agreements (SLA)
- Core Maintenance
1.13.3 Core Maintenance
This topic describes the systematic instructions to create and view the Core maintenance for Service Level Agreements.
Create SLA in Core Maintenance
- On Home screen, click Core Maintenance. Under Core Maintenance, click SLA Maintenance.
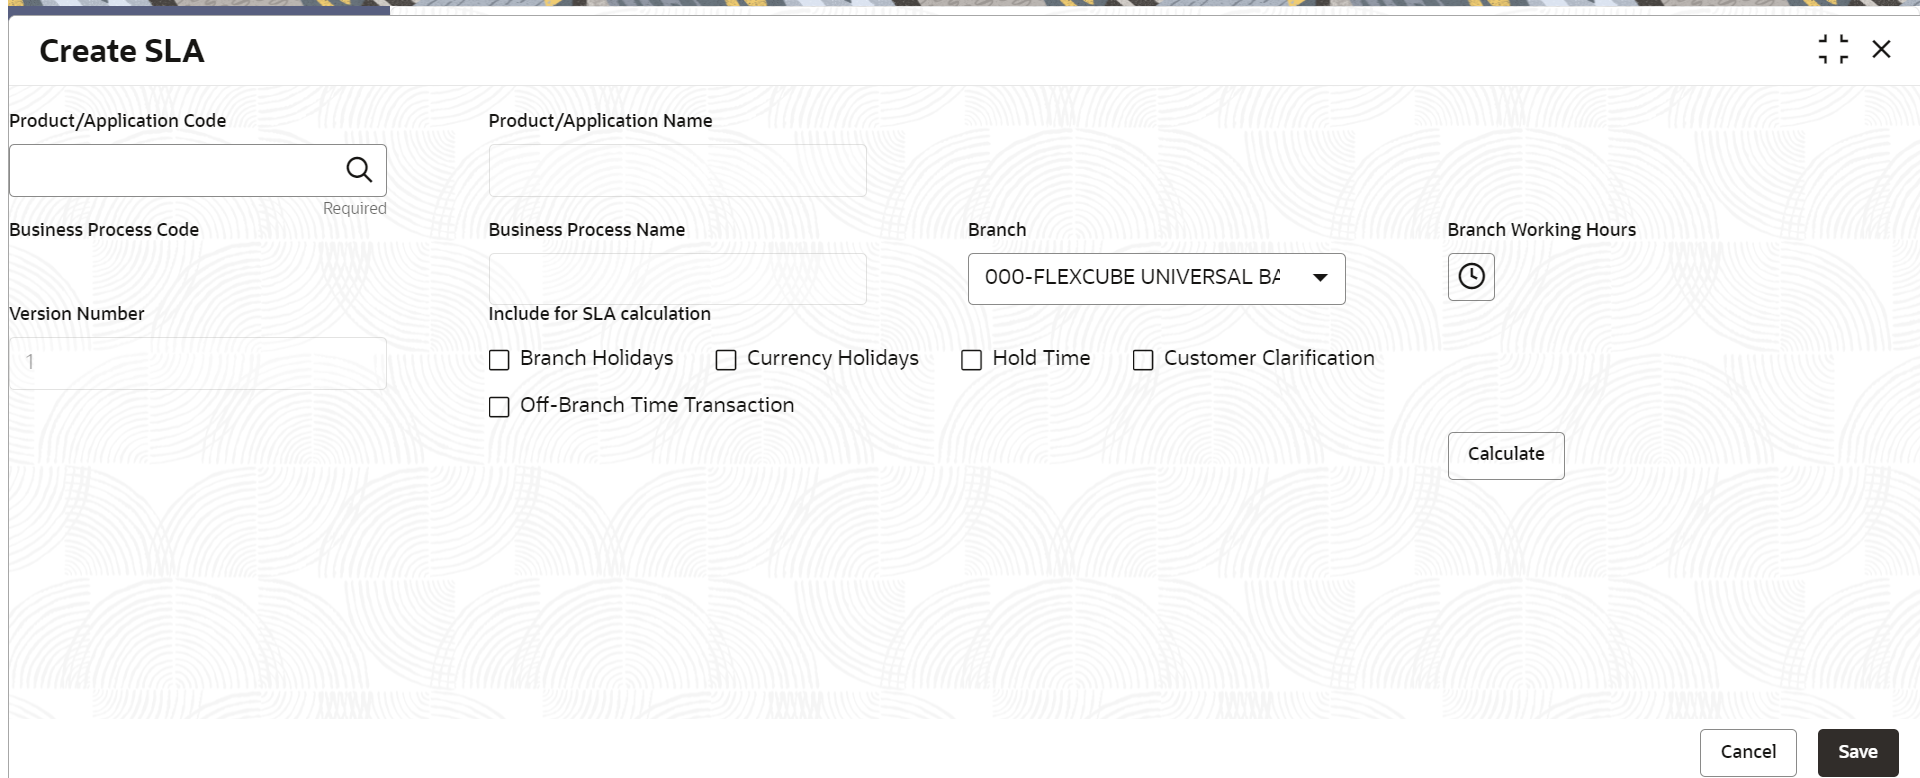
- Under SLA Maintenance, click Create SLA.The Create SLA screen displays.
- On Create SLA screen, specify the following attributes.For more information on fields, refer to the field description table.
Table 1-17 Create SLA - Field Description
Field Description Product/Application Code Specify the Product or Application Code as “OBPY”. Product/Application Name Displays the name of the Product/Application. Business Process Code Select the Business Process Code for which the SLA maintenance needs to be maintained. Business Process Name Diplays the Business Process name pertaining to the Business Process code selected. Branch Code Select the branch code for which SLA maintenance needs to be maintained. User can also select “All” as a value which will enable the SLA to be applicable for all branches in the bank. Branch Name Displays the branch name pertaining to the branch code selected. Branch Time Displays the branch working hours as populated. Version Displays the version as defaulted on creating/updating the screen. Hold Time Select the checkbox if the hold time is to be considered for SLA calculation. Branch Holidays Select the checkbox if the branch holidays is to be considered for SLA calculation. Currency Holidays Select the checkbox if the currency holidays is to be considered for SLA calculation. Customer Clarification Select the checkbox if the Customer Clarification items is t to be considered for SLA calculation, Off-Branch Time Transactions Select the checkbox if the SLA should be calculated after branch hours. - To calculate the SLA Setup, specify the following attributes.
Table 1-18 SLA Setup - Field Description
Field Description Stage Name Displays the various stages available for the process on selection of the process code. Stage ID Displays the stage ID based on the stage name. Parallel Stage Displays the parallel stage details. Time In Select the time in dropdown values as Mins or Days-Hr-Mins. If Days-Hr-Mins is selected, the system will display a pop-up UI for input of the Stage SLA in Days/Hours/Minutes combination. The system will convert into minutes and display in the respective field.
If Mins is selected, the user can directly input the SLA in Minutes.Low Priority - Offline Specify the SLA time for Low Priority Offline Applications. Low Priority - Online Specify the SLA time for Low Priority Online Applications. The system validates that the time in minutes is not more than the value input for offline. Medium Priority - Offline Specify the SLA time for Medium Priority Offline Applications. The system validates that the time in minutes is not more than value for Low Priority. Medium Priority - Online Specify the SLA time for Medium Priority Online Applications. The system validates that the time in minutes is not more than value input for offline and Low Priority. High Priority - Offline Specify the SLA time for High Priority Offline Applications. The system validates that the time in minutes is not more than value for Medium Priority. High Priority - Online Specify the SLA time for High Priority Online Applications. The system validates that the time in minutes is not more than value input for offline and Medium Priority. Breach SLA Time Specify the SLA Breach Alert time in minutes for the stage. This indicates the minutes before which a user needs to be alerted for likely SLA breach for the stage. This is the same for all the different priority combinations for a stage irrespective of the individual SLA times. SLA Required Select the toggle to indicate whether SLA calculation is required for this stage. By Default, the toggle should be set to Yes. User can change the value to No. If the toggle is changed to No, the user input should be disabled and the SLA values for the stage should be blank. Total SLA Displays the value based on the sum of SLA stages. SLA Near Breach Alert Time (in Minutes) Specify the minutes before which an impending SLA breach is to be notified to the user. The system validates that this is not more than the SLA in minutes. - Click Calculate to create the SLA’s and calculate the overall SLA for the workflow and populate the total SLA’s.
- Click Save to save the SLA details.
View SLA in Core Maintenance
Once the record is authorized by the checker, the user can view the Entity Maintenance.
- On Home screen, click Core Maintenance. Under Core Maintenance, click SLA Maintenance.
- Under SLA Maintenance, click View SLA.
Parent topic: Service Level Agreements (SLA)
