15 Blackout Window

This topic describes the systematic instructions to perform the configuration.

End-user can configure the blackout windows of providers or consumer services to block the routing hub requests for the specific period.
  1. From Home screen, click Core Maintenance. Under Core Maintenance, click Interconnect .
  2. Under Interconnect , click Routing Hub. Under Routing Hub, click Blackout Window.
    The Blackout Window screen is displayed.

New Blackout Window

Users can create blackout windows.

  1. Click New Blackout Window.
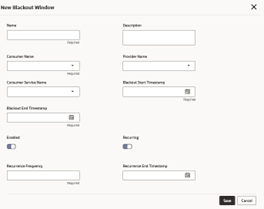
    The New Blackout Window screen is displayed.

    Figure 15-2 New Blackout Window


  2. Specify the fields on the New Template screen.

    Note:

    The fields marked as Required are mandatory.

    For more information on fields, refer to the field description table.

    Table 15-1 New Blackout Window - Field Description

    Field Description
    Name Specify the name of the blackout.
    Note:
    • Enter 0 to maximum of 255 characters.
    • No numeric value at beginning and no space allowed.
    Description Specify the description.
    Note:
    • Enter 0 to maximum of 1000 characters.
    • No space allowed at beginning or ending of the characters.
    Consumer Name Select the consumer name for which blackout is applicable.
    Provider Name Select the provider name for which blackout is applicable.
    Consumer Service Name Select the consumer service name for which window is applicable.
    Blackout Start Timestamp Effective start date and time for the scheduled blackout.
    Blackout End Timestamp Effective end date and time for the scheduled blackout.
    Enabled Toggle to enable or disable the blackout window.
    Recurring Toggle to enable or disable the recurrence of blackout window.
    Recurrence Frequency Specify the frequency for the blackout to repeat.

    Note:Frequency has to be mentioned in terms of days.

    Recurrence End Timestamp Effective end date and time for the recurrence
  3. Click Save to save the details.

View / Edit Blackout Window

The user can view or modify blackout window.

  1. Click Edit icon.
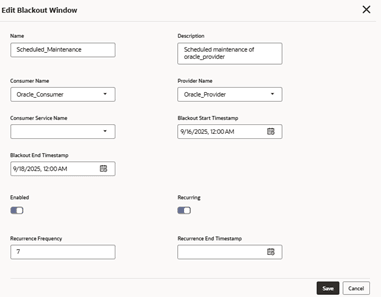
    The Edit Blackout Window is displayed.

    Figure 15-3 Edit Blackout Window


  2. Click Save to save the modified blackout window details.

Delete Blackout Window

The user can delete the blackout window.

  1. Click Delete Blackout Window button.
    The Blackout Window gets deleted.