1 Role

A role refers to a set of permissions, access rights, and functions.

Roles are assigned based on the functions and responsibility of a persona in the bank. For example, users working in the same department and at the same hierarchy level usually have similar roles. In such cases, you can define a role that provides access to all the standard activities of the group of users.

Distinct features of roles are:

  • Roles defines what actions and data a user can access in the banking system. For example, viewing customer information, performing transactions, managing accounts, accessing reports, and other functions.
  • Each role provides specific permissions or privileges that determine the actions a user can perform. For example, a teller role may have permissions to process transactions. A manager role may have additional permissions to approve transactions and generate reports.
  • Roles ensure data security and prevent unauthorized access. By assigning roles with appropriate permissions, banks can ensure that users have access only to the resources necessary for their roles.
  • Roles simplify user management by grouping users based on their responsibilities and access needs. Having defined roles makes it easier to onboard new users, update user permissions, and deactivate user access when users change roles or leave the organization.

This topic contains the following subtopics:

1.1 Create Role

Role creation is the process by which administrators create a role by associating functional activities that identify with the role code and description. This topic provides systematic instructions to create roles and assign their activities.

Roles help manage functional responsibility, security, and access control by grouping related permissions and privileges.

Note:

The fields marked as Required are mandatory.
  1. Click Security Management, and under Security Management, click Role.
  2. Under Role, click Create Role.
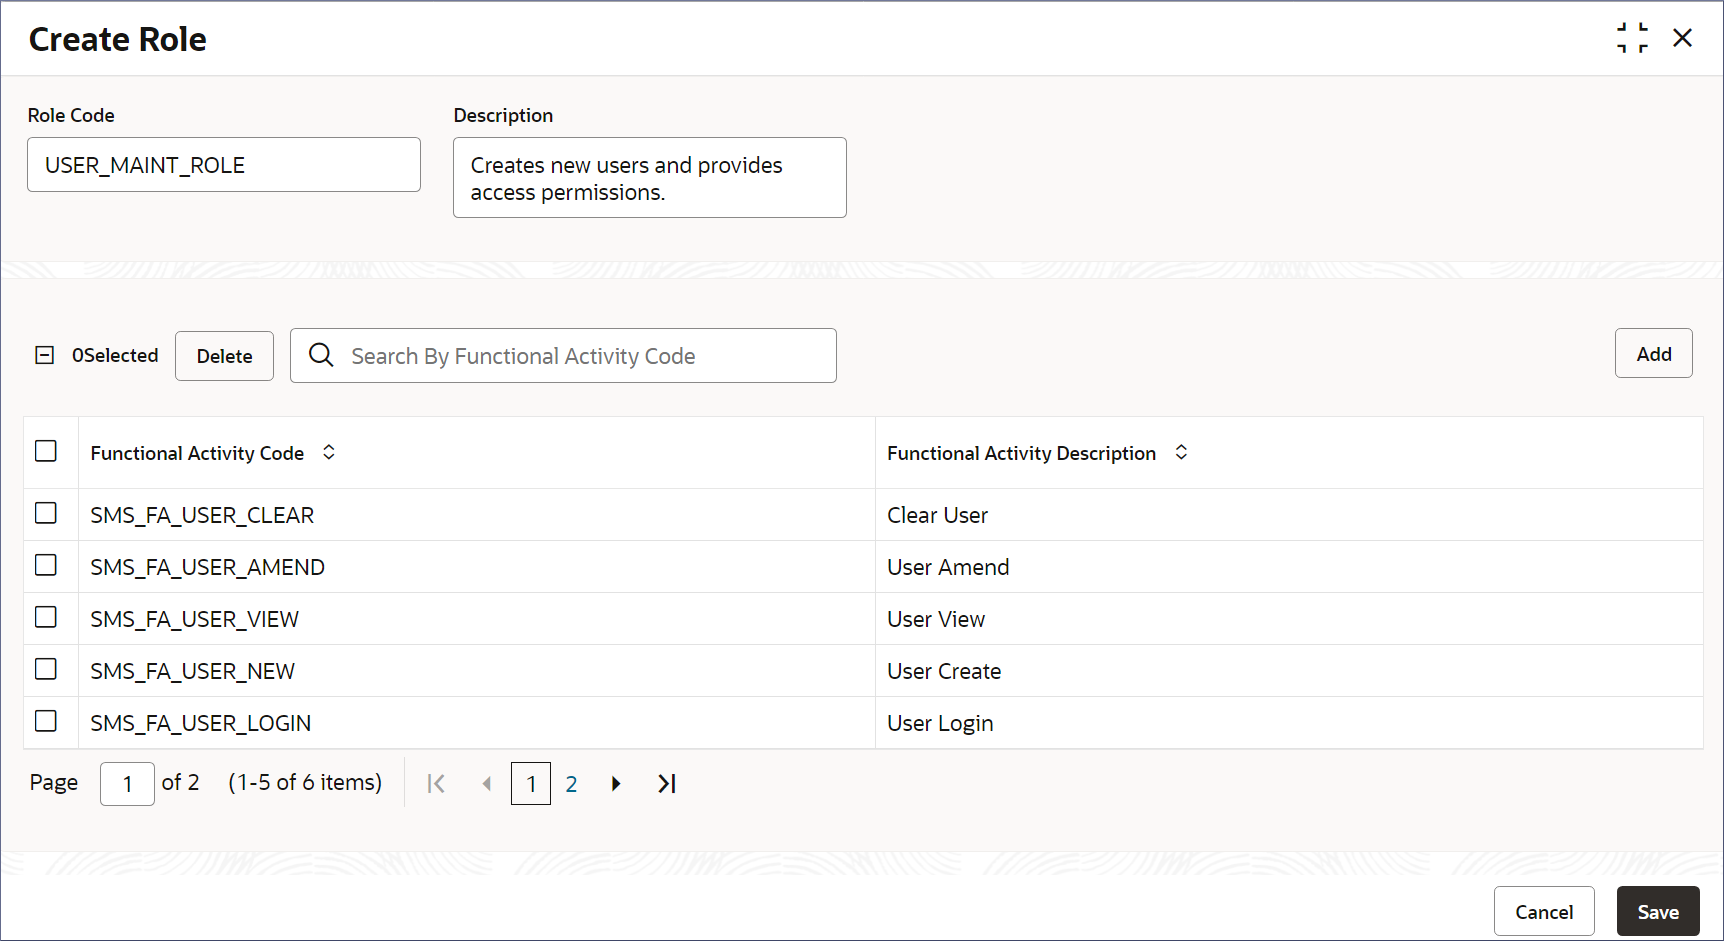
    The Create Role screen displays.
  3. Specify the fields on the Create Role screen.
    For more information on fields, refer to the field description table below.

    Table 1-1 Create Role - Field Description

    Field Description
    Role Code Specify a unique identifier or code assigned to a specific role within the system. The field is mandatory and takes alphanumeric characters and the underscore character .

    Security administrators create roles that determine the permissions the system grants to the users assigned a role. Administrators use Roles to sort employees or contractors into groups such as Bank Tellers, Loan Officers, underwriters, and Relationship Managers. Based on the functional responsibilities expected of a role, corresponding functional activities (FAs) defined in the system map to the role.

    For instance, administrators can create a role code BANK_TELLER specifically for individuals who need permission to handle customers' cash and instruments and perform operations like cash deposits and withdrawals. This role would have the relevant functional activity codes mapped to the role.

    Description Specify a description of the role. Provide additional details about the role that cover the functions and responsibilities associated with the role. The length of the description is 255 characters.
  4. Specify the functional activity codes that map to the functions of the role.
    1. Click Add to add a functional activity code
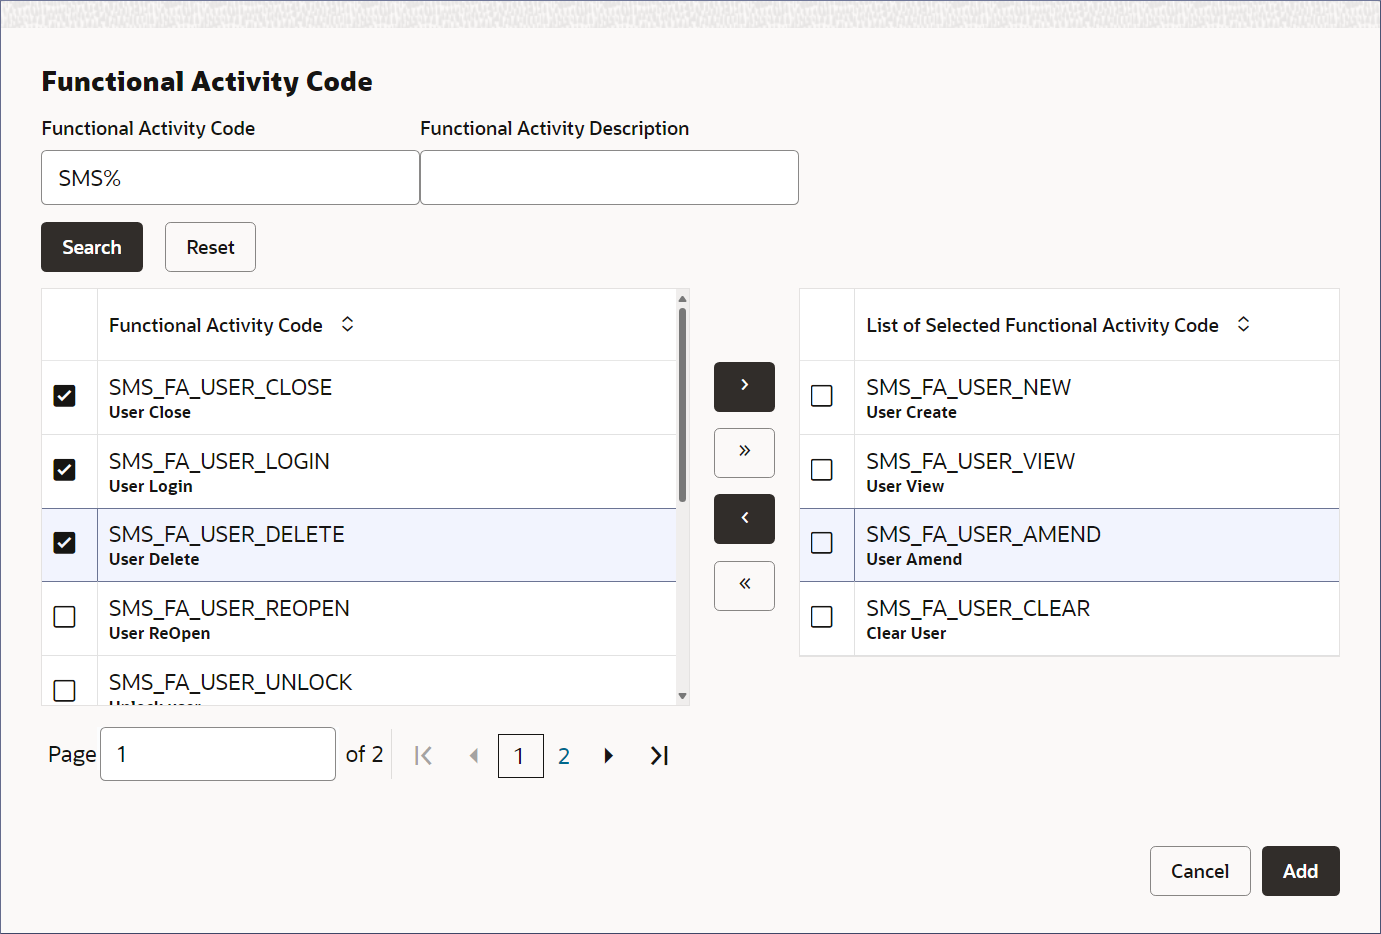
      The Functional Activity Code dialog displays.

      Figure 1-2 Function Activity Code


      Table 1-2 Add Functional Activity - Field Description

      Field Description
      Functional Activity Code Specify and search for the required functional activity code. Functional Activity Codes indicate the functions in the system that are associated with the role based on the nature, purpose, and characteristics of the role. A Functional Activity Code is an entitlement that allows the user to access a unique system function.

      Functional activity codes are factory shipped and are available as a list of values for use by system and security administrators.

      For example, the functional activity code SMS_FA_USER_NEW is internally mapped to a code that governs the user creation action. Even if a user has access to the user interface to create users, without access permission to this functional activity code, they cannot create a new user.

      Functional Activity Description Specify a description of the functional activity codes to search.

      Note:

      You can search using either Functional Activity Code, or Functional Activity Description, or both.
    2. Scroll the list or search for the required functional activity codes.

      Note:

      Use the Reset button to clear the current search terms and provide new ones.
      For more information on the required functional activity codes, refer to the product specific user manual for the respective functional activity codes. For SMS related functional activity codes, see Functional Activity Codes.
    3. Click to select the required codes in the Functional Activity Code column on the left.
    4. Click Add button to add the selected codes to the List of Selected Functional Activity Code column on the right.

      Note:

      You can select up to fifty functional activity codes at a time. Use the >> button to select all the functional activity codes listed in the left column, up to fifty at a time.
    5. Click Add.
      The Create Role page displays the selected functional activity codes.
  5. (Optional Step)Verify and complete the set of functional activity codes required for the role.
    Add more FA codes required or delete unnecessary FA codes from the list.

    Note:

    Usually, this step is necessary when you amend a Role.
    1. Search for the required FA codes or scroll through the list of FA codes.

      Note:

      The search field is case sensitive and filters the FA codes as you type.
    2. Clear the search field to get back the full list of FA codes.
    3. To add more FA codes, return to Step 4.
    4. To delete FA codes, proceed to Step 6..
  6. Delete the functional activity codes that are not required for the role.
    1. Select the functional activity code(s) you want to delete.
      The number of codes selected display beside the Delete button.
    2. Click Delete.
  7. Click Save.
    The Save dialog displays.
  8. Provide appropriate maker remarks about the role.
  9. Click Confirm.
    The new role is created.

    Note:

    At this point, the status of the Role is Unauthorized. After approval, the status changes to Authorized, and the Role is available for use by another process.
  10. Approve the Role.
    To approve or reject the Role, see View Role.

    Note:

    As a maker of the Role, you cannot approve it. It has to be approved by another user with appropriate permissions.

1.2 View Role

The View Role page displays the list of roles. Each role record allows you to view, amend, copy, authorize, and delete the role. This topic provides the systematic instructions to view the list of configured roles and perform specific actions on a role record.

Note:

The fields marked as Required are mandatory.
  1. Click Security Management, and under Security Management, click Role.
  2. Under Role, click Create Role.
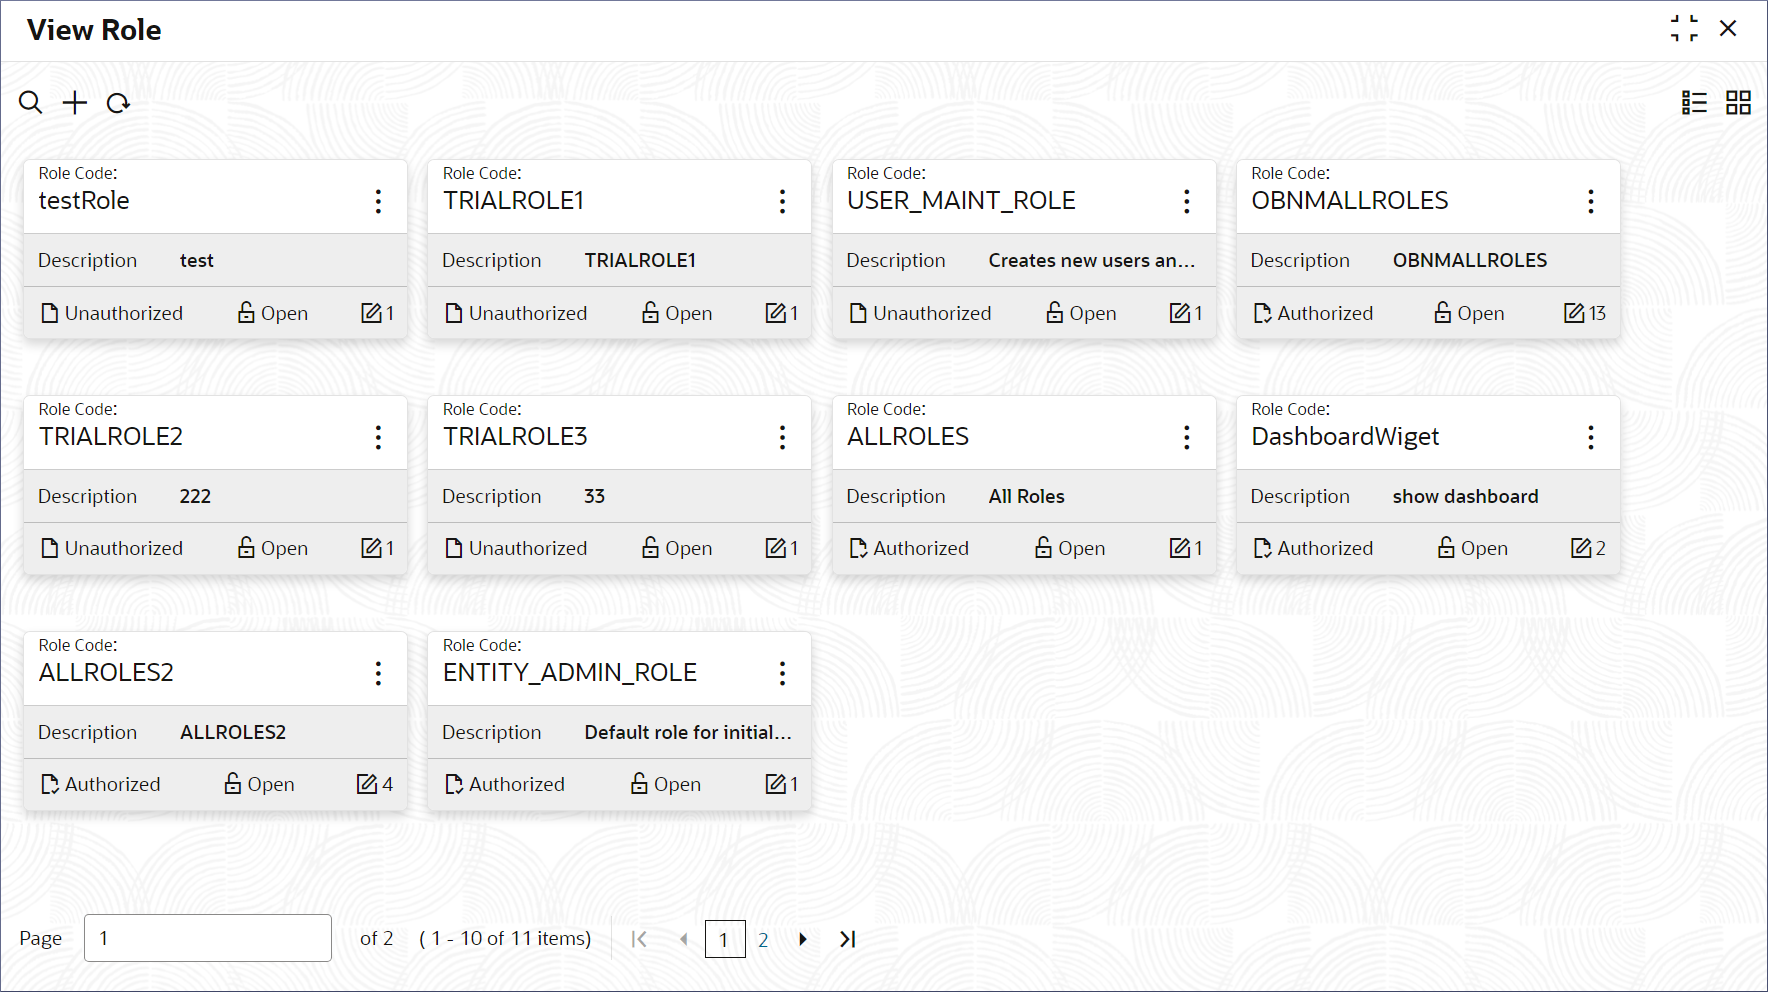
    The View Role page displays the existing Roles in the Tile view.

    Tip:

    Click Tile view or List view to switch between the Tile view and the List view.

    Table 1-3 View Role Tile - Field Description

    Field Description
    Role Code Displays the Role code.
    Description Displays additional details about the Role.
    Authorization Status Displays the authorization status of the record.
    The available options are:
    • Authorized
    • Rejected
    • Unauthorized
    Record Status Displays the status of the record.
    The available options are:
    • Open
    • Closed

    The following table describes the action items in the More Options (More Options menu icon) menu on a record and the action items on the page.

    Table 1-4 Action Items Description

    Action Item Description
    Unlock Unlock a record and make amendments.
    Close Close a record to make it inactive. The record ceases to be available in the system.

    Note:

    A closed record can be reopened to make it active.
    View View the details of a record.
    Delete Delete a record.

    Note:

    Once deleted, the component can no longer be used to define an entity. But entities already defined using the component can continue to use it.
    Reopen Reopen a closed record.
    Authorize Authorize a record to make it active and available to define entities.

    Note:

    Creator of a record cannot authorize the component. Another user with authorize permissions can.
    Audit Select to view the Maker, Checker, Status, and Modification Number of a record.
    Errors and Overrides Select to view all existing errors or warnings on the page.

    Note:

    The actions you can perform depend on your role and the record status.
  3. View the details of a Role.
    1. Click More Options menu icon and select View.
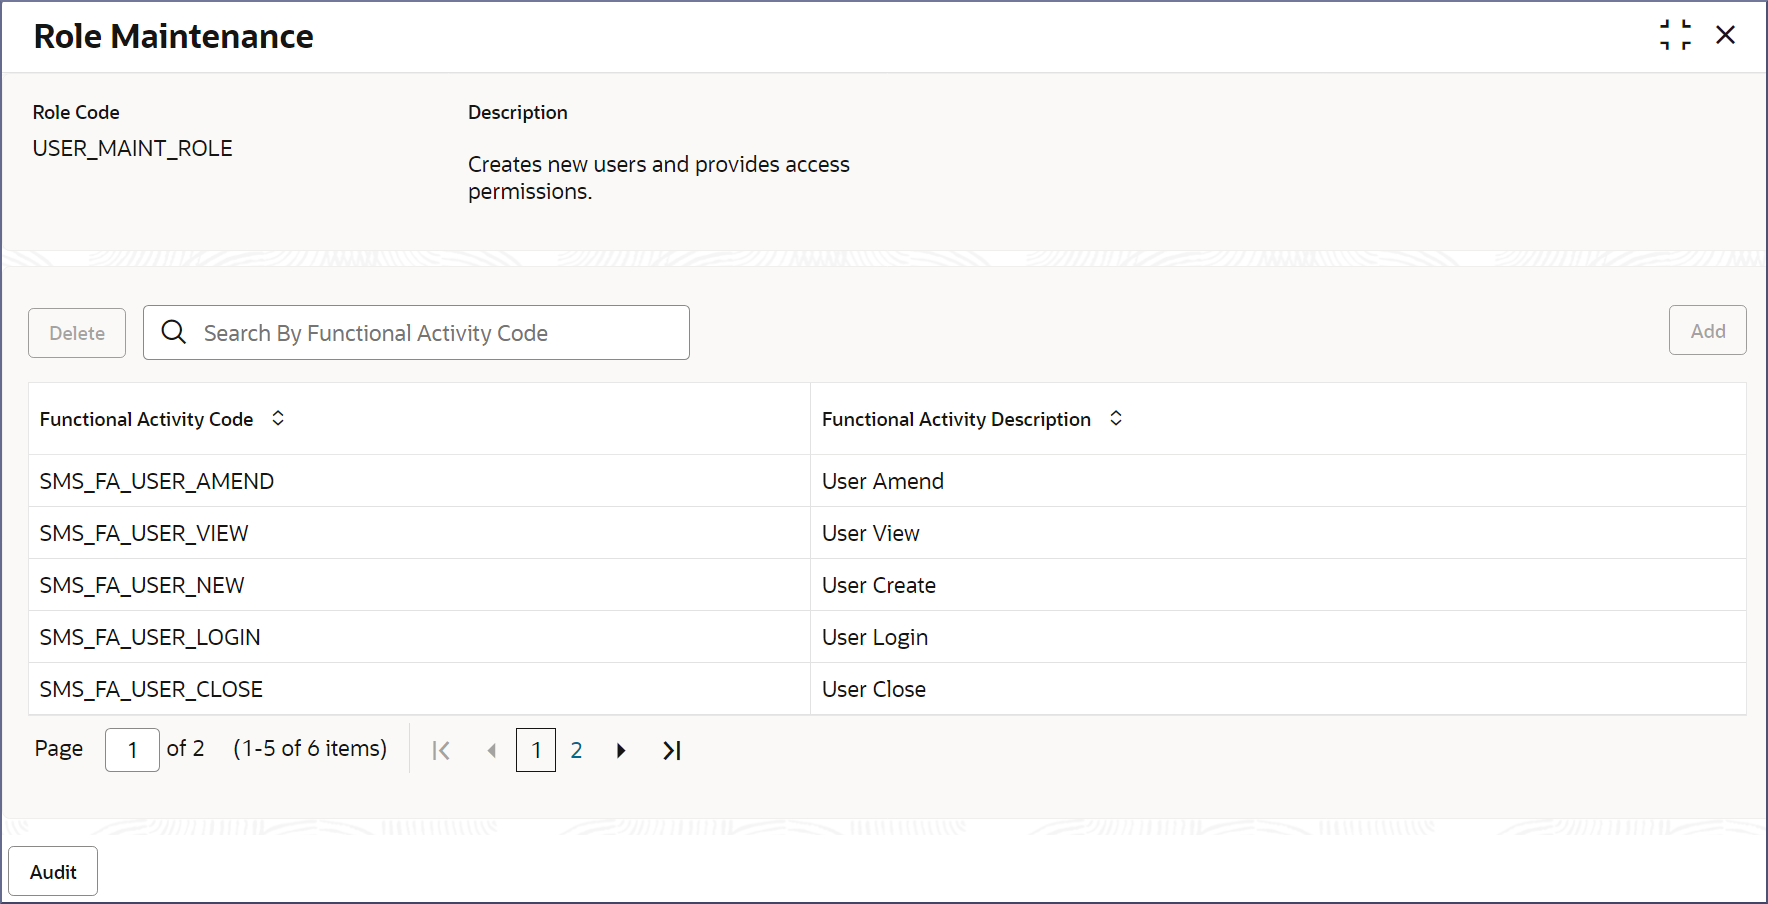
      The Role Maintenance page displays Role details.

      Note:

      To know more about the fields, see Create Role.
    2. Click Audit.
      The Maker, Checker, Status, and Modification No of the record displays.
  4. Unlock and update Role details.
    1. Click More Options menu icon and select Unlock.
      The Role Maintenance page displays.
    2. Update the Role details as necessary.

    Note:

    To know more about updating Role details, see Create Role.
  5. Approve or Reject an unauthorized Role.
    1. From the Search Filter, search for the required record that is in an Unauthorized and Open state.
    2. Click More Options menu icon and select Authorize.
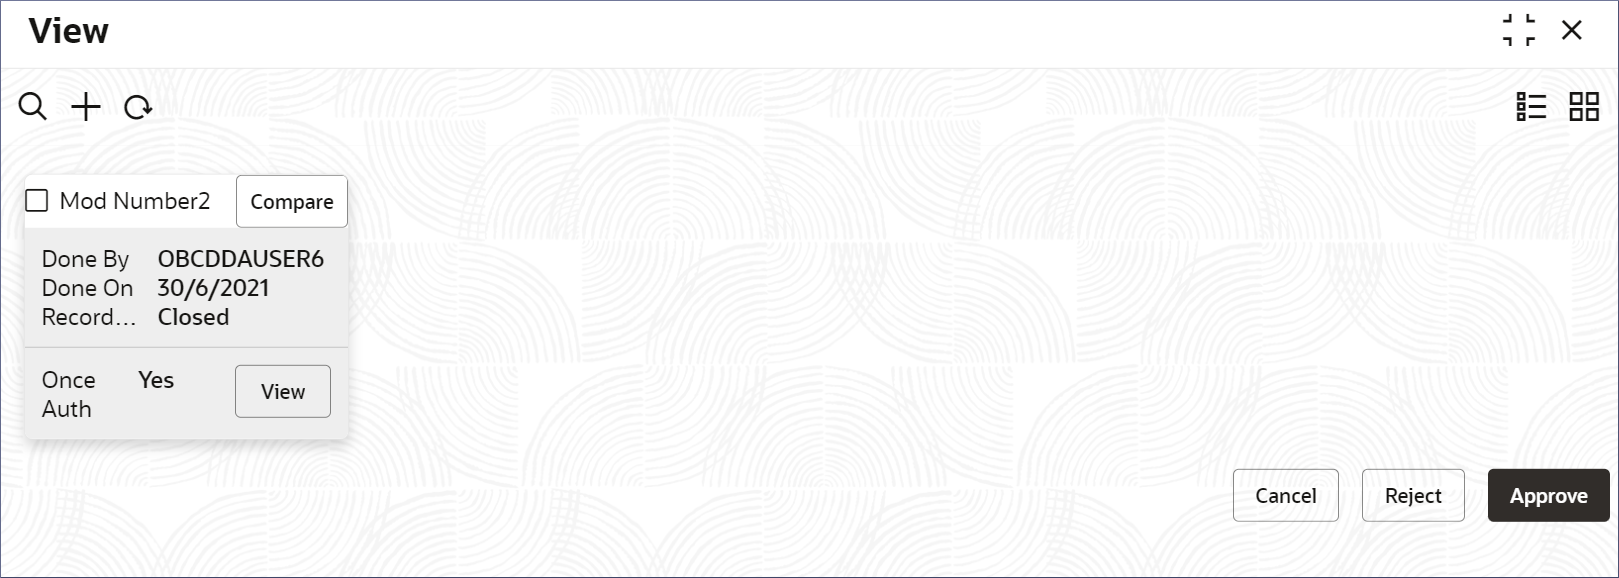
      The View page displays.

      Table 1-5 Authorize View

      Field Name Description
      Mod Number<N> Indicates the number of times the record was modified. Where N represents the number of modifications.

      Note:

      For a newly created record the modification number is 1.
      Done By Name of the user who performed the latest modification.
      Done On Date on which the record was modified.
      Record Status The status of the record.

      Note:

      To authorize a record, its status should be Open.
      Once Auth Specifies if the record was authorized at least once.

      Note:

      For a newly created record, the value is No.
      Compare (Button) Click to compare the modified record with the previous version of the record.
      View (Button) Click to display the record details.
    3. Click the check box besides Mod Number<N> to select the modified record.
    4. Click Approve or Reject.
      The Confirm dialog displays.
    5. Enter checker remarks and click Confirm.
      A toast message confirms the successful approval or rejection of the record.