- Administration and Configuration Guide
- Configurations for Connecting OFSAA to Oracle Database using Secure Database Connection (TCPS)
- Configuring OFSAA and various Web Application Servers with Oracle Wallet
- Configuring OFSAA and WebSphere as Web Application Server with Oracle Wallet
Configuring OFSAA and WebSphere as Web Application Server with Oracle Wallet
- Since there is no Oracle Client on the WebSphere server instance, manually
create a directory called "network" and copy
tnsnames.ora,
                        sqlnet.ora
files into the "network" folder. Copy complete wallet directory "clientwallet" configured from OFSAA layer. - Modify
sqlnet.orawith new WALLET_LOCATION path. - Copy
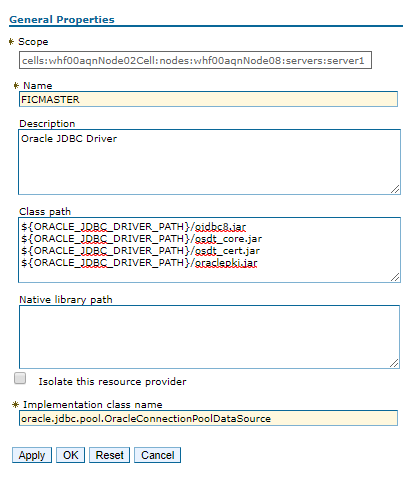
ojdbc8.jarand Oracle PKI related jarsoraclepki.jar, osdt_cert.jarandosdt_core.jarfrom$FIC_HOME/ficapp/common/FICServer/libinto <WebSphere located jdbc drivers> (that is usually referred in WebSphere as${ORACLE_JDBC_DRIVER_PATH}). - In the WebSphere console, navigate to Resources >JDBC>JDBC Providers,
and click the link that corresponds to OFSAA Config, Atomic and Sandbox. Then
add the references of oracle PKI related jars. Click OK and save to Master
configuration.
Figure 13-3 General Properties window

Note:
This Step requires restart of WebSphere profile restart. - Navigate to Resources>JDBC>Data sources, and click the link that corresponds to
Config, Atomic and Sandbox Datasource to update to use SSL.
Figure 13-4 Data Source Configuration window

- From the Additional Properties pane, click Custom properties.
- Add "connectionProperties" with a value of :
javax.net.ssl.trustStore=<wallet_locatioin>/cwallet.sso;javax.net.ssl.trustStoreType=SSO;oracle.net.ssl_version=1.2;oracle.net.ssl_server_dn_match=true;
                        oracle.net.tns_admin=<path of network
                        folder>;oracle.net.wallet_location=(SOURCE=(METHOD=file)(METHOD_DATA=(DIRECTORY=<wallet_locatioin>)))
Figure 13-5 Data Source Configuration window

- Click OK and return to the main Datasource Configuration
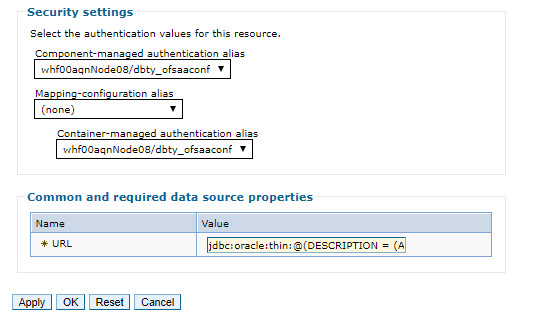
page. Scroll down to the bottom where the connection properties are displayed
and update the URL to the SSL value.For example:
jdbc:oracle:thin:@(DESCRIPTION=(ADDRESS=(PROTOCOL=tcps)(HOST=db_host_name)(PORT=security_port))(CONNECT_DATA=(SERVICE_NAME=database_alias)))Figure 13-6 Security Settings window

- Click Save directly to the master configuration.
Figure 13-7 Messages pane

- Click Test connection to test the connection to Oracle server through secured port.