Creating Dataset
You can create Dataset by defining the Dataset Details, Entities, and Dataset Definition. You must have Dataset Write role mapped to create Datasets.
To create a Dataset:
- From the Dataset Summary window, click Add from the Datasets
tool bar.
The Dataset Details window is displayed.
Figure 9-8 Dataset Details window

- Enter the details in the Dataset Details section as tabulated.
The following table describes the fields in the Dataset Summary window.
Table 9-3 Fields in the Dataset Summary window and their Description
Field Description Code Enter a distinct code to identify the Dataset. Ensure that the code is alphanumeric with a maximum of 8 characters in length and there are no special characters except underscore “_”.
Note the following:
The code can be indicative of the type of Dataset being created.
A pre-defined Code and Short Description cannot be changed.
Same Code or Short Description cannot be used for Essbase installation: "$$$UNIVERSE$$$", "#MISSING”, "#MI”, "CALC”, "DIM”, "ALL”, "FIX”, "ENDFIX", "HISTORY”, "YEAR”, "SEASON", "PERIOD”, "QUARTER”, "MONTH”, "WEEK”, "DAY".
In Unauthorized state, the users having Authorize Rights can view all the unauthorized Metadata.
Short Description Enter a Short Description based on the defined code. Ensure that the description is of a maximum of 8 characters in length and does not contain any special characters except underscore “_”. Long Description Enter the Long Description if you are creating subject-oriented Dataset to help users for whom the Dataset is being created or other details about the type/subject.
Ensure that the description is of a maximum of 100 characters in length.
- From the Entities pane, you can perform the following:
- Select the required entity and click Move .
- To select all entities, click Move All .
- To remove an entity, select the entity from the Selected Values grid and click Remove.
- To remove all entities from the Selected Values grid, click Remove All.
- Specify the required table-join condition in the Dataset Definition pane as
tabulated:
Figure 9-9 Dataset Definition pane
 The following table describes the fields in the Dataset Definition pane.
Table 9-4 Fields in the Dataset Definition pane and their Descriptions
Field Description ANSI Join The ANSI Join condition defines which set of data have been joined along with the type of join condition. It also describes the exact operations to be performed while joining the Datasets. In ANSI join, the join logic is clearly separated from the filtering criteria. Join/Filter Condition The Join/Filter Condition facilitates the objective of creating Datasets. Datasets with linked tables using the join conditions help in reducing the query time. There are two ways of defining the join condition:
JOIN condition for SQL Server/SQL OLAP combination should contain only EQUI JOIN condition as required by SQL OLAP.
In case of SQL Server/Essbase and Oracle/Essbase, Dataset must be defined. Multiple cubes can be built with a single pass and the underlying Dataset definition should be the same for all the cubes mapped which reduces the aggregation time considerably.
Date Filter The Date Filter condition enables you to cascade the cubes that are using the Dataset with the defined Date Filter. Order By The Order By condition enables you to sort the dimension data in order. The order of the Dimension nodes will be maintained only for Business Intelligence enabled hierarchies. The Order By condition is specific to the Essbase database. - Enter the required expression or click More Options to define an expression using the Expression Builder window. For more information, see Expression Builder.
- Click Preview.
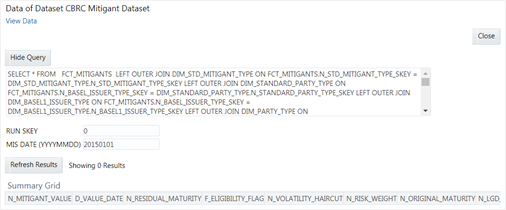
The Data of Dataset <<dataset name>> window is displayed.
Figure 9-10 Data of Dataset CBRC Mitigant Dataset window

This window displays an error message if the Query execution fails. Up to 400 records of data is displayed in the Summary Grid pane.
- Click Show Query to view the query.
- Enter the values for MIS DATE (YYYYMMDD) and RUN SKEY parameters.
- Click Save to save the Dataset Definition details.