Non Business Intelligence Enabled Hierarchy
When you have selected Regular - Non Business Intelligence Enabled Hierarchy option, do the following:
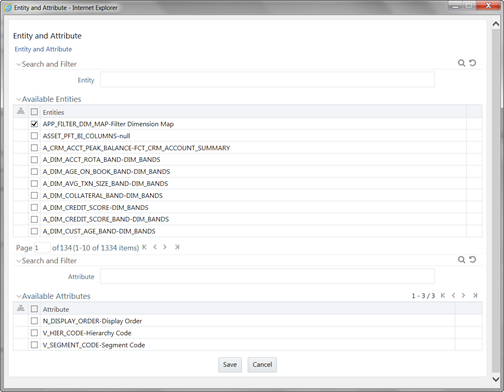
- Click the View button in the Entity
field. The Entity and Attribute window is displayed.
Figure 9-51 Entity and Attribute window

- You can either search for a specific Entity using the Search and Filter pane or select the checkbox adjacent to the required Entity in the Available Entities list. The list of defined Attributes for the selected entity is displayed Available Attributes list.
- You can either search for a specific Attribute using the Search and Filter pane or select the checkbox adjacent to the required Attribute in the Available Attributes list.
- Click Save. The selected Entity and Attribute is
displayed in the Add Business Hierarchy window.
Note:
Ensure that the values present in Attribute column do not contain new line characters. Because the hierarchy node descriptions in the hierarchy browser are considered as text fields and do not permit new line characters.
- Click the Add button from the Business Hierarchy tool bar.
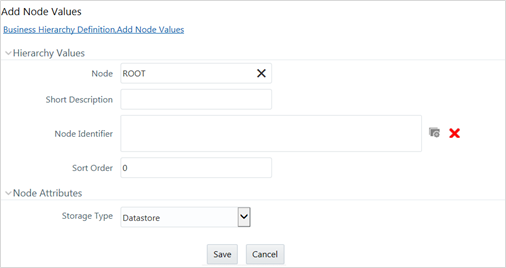
The Add Node Values window is displayed.
Figure 9-52 Add Node Values window

- Enter the details in Hierarchy Values section as tabulated.
The following table describes the fields in the Add Node Values window.
Table 9-25 Fields in the Add Node Values window and their Description
Field Description Node The Node value is auto-populated and is editable. Short Description Enter the required short description for the node. Node Identifier Click the View Attributes button and define an expression in the Expression window for the Node Identifier. For more information, see Create Expression. Sort Order Enter the Sort order in numeric value.
Note: The sort order of the default (OTHERS) node should be greater than the rest of the nodes if this hierarchy is used in RRF Filter condition.
- From the Node Attributes grid, select Storage type
from the drop-down list. There are four Storage Types as tabulated.
The following table describes the fields in the Add Node Values window.
Table 9-26 Fields in the Add Node Values window and their Description
Field Description Data Store This storage type allocates a data cell for the information to be stored in the database. The consolidated value of the data is stored in this cell. The consolidation for the node occurs during the normal process of rollup. Dynamic Calc In this storage type, no cell is allocated and the consolidation is done when the data is viewed. The consolidation for the node is ignored during the normal process of rollup. The consolidation of node occurs when you use the OLAP tool for viewing data. Dynamic Calc & Store In this storage type, a cell is allocated but the data is stored only when the data is consolidated when viewed, for the first time. The consolidation for the node is ignored during the normal process of rollup. It occurs only when you first retrieve the data from the database. Label In this storage type, a cell is not allocated nor is the data consolidated. It is only viewed.
Note: The Label storage type is specific to Essbase MOLAP. Storage type is applicable only for the Regular hierarchy type and Measure. If the user wants to specify a dynamic calc option at level members in a multi-level time hierarchy, the same is provided through OLAP execution utility.
- Click Save. The Node values are displayed in Add Business Hierarchy window.
- Enter the details in Hierarchy Values section as tabulated.
- Click Save in the Add Business Hierarchy window and save the
details.
In the Business Hierarchy toolbar, you can also do the following:
- Click the Add button to Add subsequent node(s). For
the second node or subsequent node, you can define the Hierarchy Tree and
Node Attributes details as explained below.
The following table describes the fields in the Hierarchy Browser pane.
Table 9-27 Hierarchy Browser pane Field and its Description
Field Description Add Hierarchy Node Click the View Attributes button adjacent to Child of field and select the required Member in the Hierarchy Browser window. Click OK. Consolidation Type Consolidation Type option is available to Essbase MOLAP. There are six consolidation types such as Addition, Subtraction, Product, Division, Percent, and Ignore. Select the required option from the drop-down list. - Click the Edit button by selecting the required Node level checkbox to edit the Node details.
- Click the Delete button to delete the defined Node details.
- Click the Add button to Add subsequent node(s). For
the second node or subsequent node, you can define the Hierarchy Tree and
Node Attributes details as explained below.