- Analytical Application Infrastructure User Guide
- Data Model Management
- Upload Business Model
- Model Upload Using OFSAA Data Model Descriptor (JSON) File
- Triggering the Model Upload
Triggering the Model Upload
You can trigger the Model Upload process either using command line or using the UI.
Note:
TheCopyUpload.sh
Script must have been executed successfully.
To perform Model Upload using Data Model Descriptor:
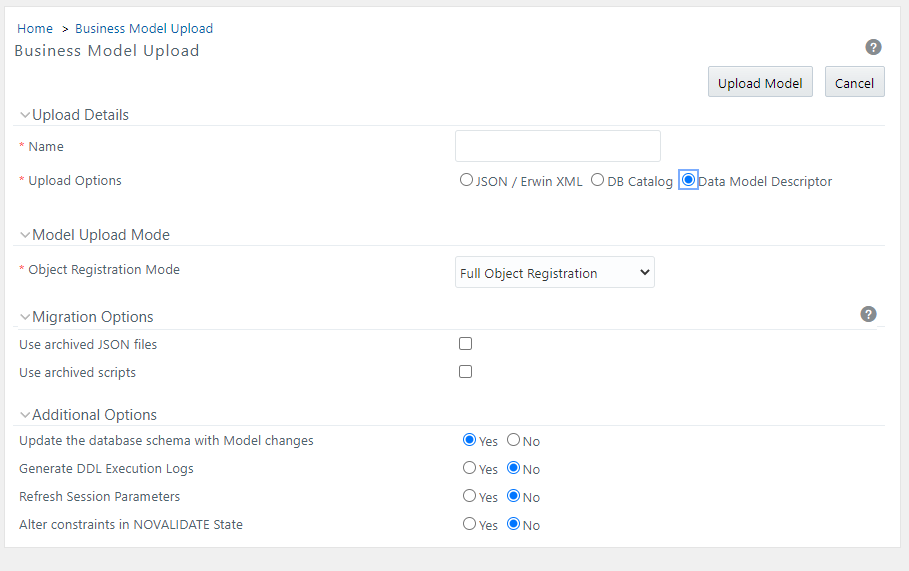
- From the Business Model Upload window, select Upload
Option as Data Model Descriptor.
Figure 7-7 Business Model Upload window for Data Model Descriptor

- Select the Object Registration Mode from the drop-down
list as Full Object Registration or
Incremental Object Registration. It is recommended to
select incremental only if the changes are minimal.
Note:
Incremental Object Registration must be opted only if the object registration on the base environment was incremental. Full Object Registration can be performed irrespective of mode opted in the base environment. - Select the Use archived JSON files check-box.
- Select the Use archived scripts check-box if the starting point of the Model Upload process is from the script execution, that is, if you have copied the DB scripts to the target environment. Otherwise, deselect the check-box.
- In the
Additional
Options grid:
- Select Yes to directly
Update
the Database Schema with Model
changes.
- Yes: The generated SQL scripts are executed at Runtime to update the model changes in the database.
- No: It restricts the system from updating the database with the data model changes and only creates the the model scripts. Later, you must execute the SQL scripts in the correct sequence to make the Infodom Schema to be consistent with the JSON files.
For more information, see Sequence of Execution of Scripts.
Additionally, when you select No, ensure:- You have a third party tool or ETL tool to manage the schema updates.
- Database consistency and schema updates are maintained manually by the Database Administrator.
Note:
Only the table scripts are created and they must be updated manually. If you choose this option for the first time and later perform an Incremental / Sliced / Complete Model Re-build, you must manually synchronize the schema with the Database Schema. - Select Yes for the
Generate DDL execution logs option if you
want execution audit information such as execution start time, end time,
and status of each SQL statements run as part of the Model Upload
process. The execution log file is available under the
ftpshare/<INFODOM>/Erwin/executionlogsfolder. - Select Yes for the Refresh Session Parameters option to use Database session parameters during the model upload process. For more information, see the Configuring Session Parameters section.
- Select Yes to directly update the Alter constraints in
NOVALIDATE State. During the Incremental or Sliced Model Upload,
alterations to the constraints consume a lot of time as the constraints
have to be validated.
- If you select Yes, an option to alter the constraints in the NOVALIDATE state is enabled and it will not check the existing data for the integrity constraint violation. It is useful when the existing data is clean. So, NOVALIDATE potentially reduces the additional overhead of the constraint validation and enhances the performance.
- By default, the option selected is
No and the Option to alter the
constraints is not enabled. It checks the existing data for the
integrity constraint violation.
Note:
Note the following points about the NOVALIDATE option.- Constraints in the NOVALIDATE state are supported only in Incremental and Sliced modes.
- The Model Upload process, irrespective of the status of success or failure, brings the constraints into the NOVALIDATE state. Hence, ENABLE VALIDATE must be done as a post-model upload activity. That is, Rollback does not validate the constraints that are non-validated during the upload activity.
- The NOVALIDATE option is not relevant for the HDFS systems.
- Select Yes to directly
Update
the Database Schema with Model
changes.
- Click Upload Model.