39.5.4 Defining Stratification Rules
Use the Stratification Rules - Tabs to define Stratification Definition.
To define Stratification Definition, follow these steps:
- Navigate to Common Object Maintenance, select
Stratification, and then select Stratification Definition.
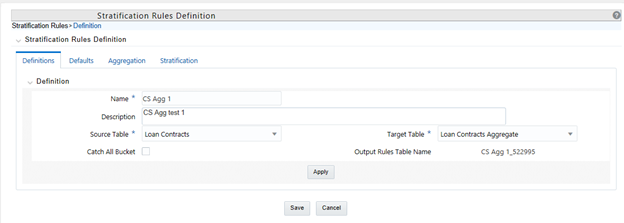
This example illustrates the fields and controls on the Stratification Rules - Definition page. You can find definitions for the fields and controls later on this page.
Figure 39-3 Stratification Rules Definition page

- Enter a unique Name and Description for the Stratification Definition rule.
- Select a Source Instrument Table. The list of values will include all seeded and properly registered instrument tables that contain account-level data records.
- Select a Target Aggregate Instrument Table. This table will be populated with the results of the Stratification.
- Specify whether or not to include a catch-all bucket in the process. This will ensure that all records from the source table are accounted for in the target table.
- Click Apply to save your inputs and navigate to the next tab.
This example illustrates the fields and controls on the Stratification Rules - Defaults Page.
Figure 39-4 Stratification Rules Definition – Defaults tab

To define Stratification Defaults, follow these steps:
- Select the Amount default. Possible selections are MAX, MIN, SUM, AVG. The recommended selection is SUM.
- Select the Date default. Possible selections are MAX, MIN, MEDIAN. The recommended selection is MEDIAN.
- Select the AlphaNumeric default. Possible selections are MAX, MIN. The recommended selection is MAX.
- Select the Rate default. Possible selections are MAX, MIN, SUM, AVG, and Weighted Average. Recommended selection is Weighted Average. If Weighted Average is selected, then additionally select the balance column to use for weighting.
- Select the Integer default. Possible selections are MAX, MIN. The recommended selection is MAX.
- Select Apply to save your inputs and navigate to the next tab.
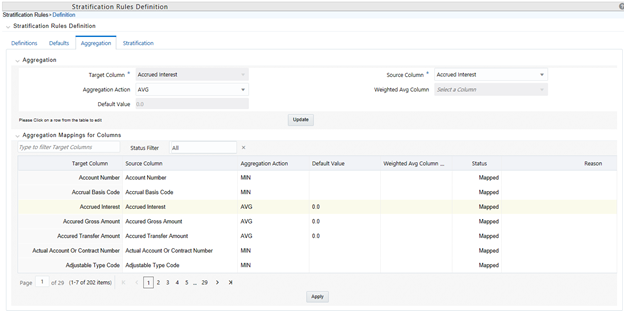
This example illustrates the fields and controls on the Stratification Rules - Aggregation Page.
Figure 39-5 Stratification Rules Definition – Aggregation tab

To define Stratification Aggregation details, follow these steps:
- Select the specific row you want to define from the bottom half of the page.
You have the option to use the default values previously input on the Defaults tab or you can input a different Aggregation Action at the top of the page.
- Use the pagination selections at the bottom of the page to address/review all columns or type the column name or a portion of the column name to navigate directly to a specific column.
- Select Apply to save your inputs and navigate to the next page.
This example illustrates the fields and controls on the Stratification Rules - Stratification Page.
To define Stratification/Group by details, follow these steps:
- Select the Column(s) and Stratification Action that you want to use for grouping the detailed records into aggregate/pooled records. Typical columns used for grouping will be dimension columns, balance or rate columns, or any other meaningful columns that you want to be unique for each pool record.
- For each Stratification column, select the Stratification Action. Options are Tier, Discrete, and Group by. Both the Tier and Discrete options require an additional Stratification Tier definition to be selected.
- Select Apply to save your inputs and remain in the rule or select Save to save your inputs and close the rule.