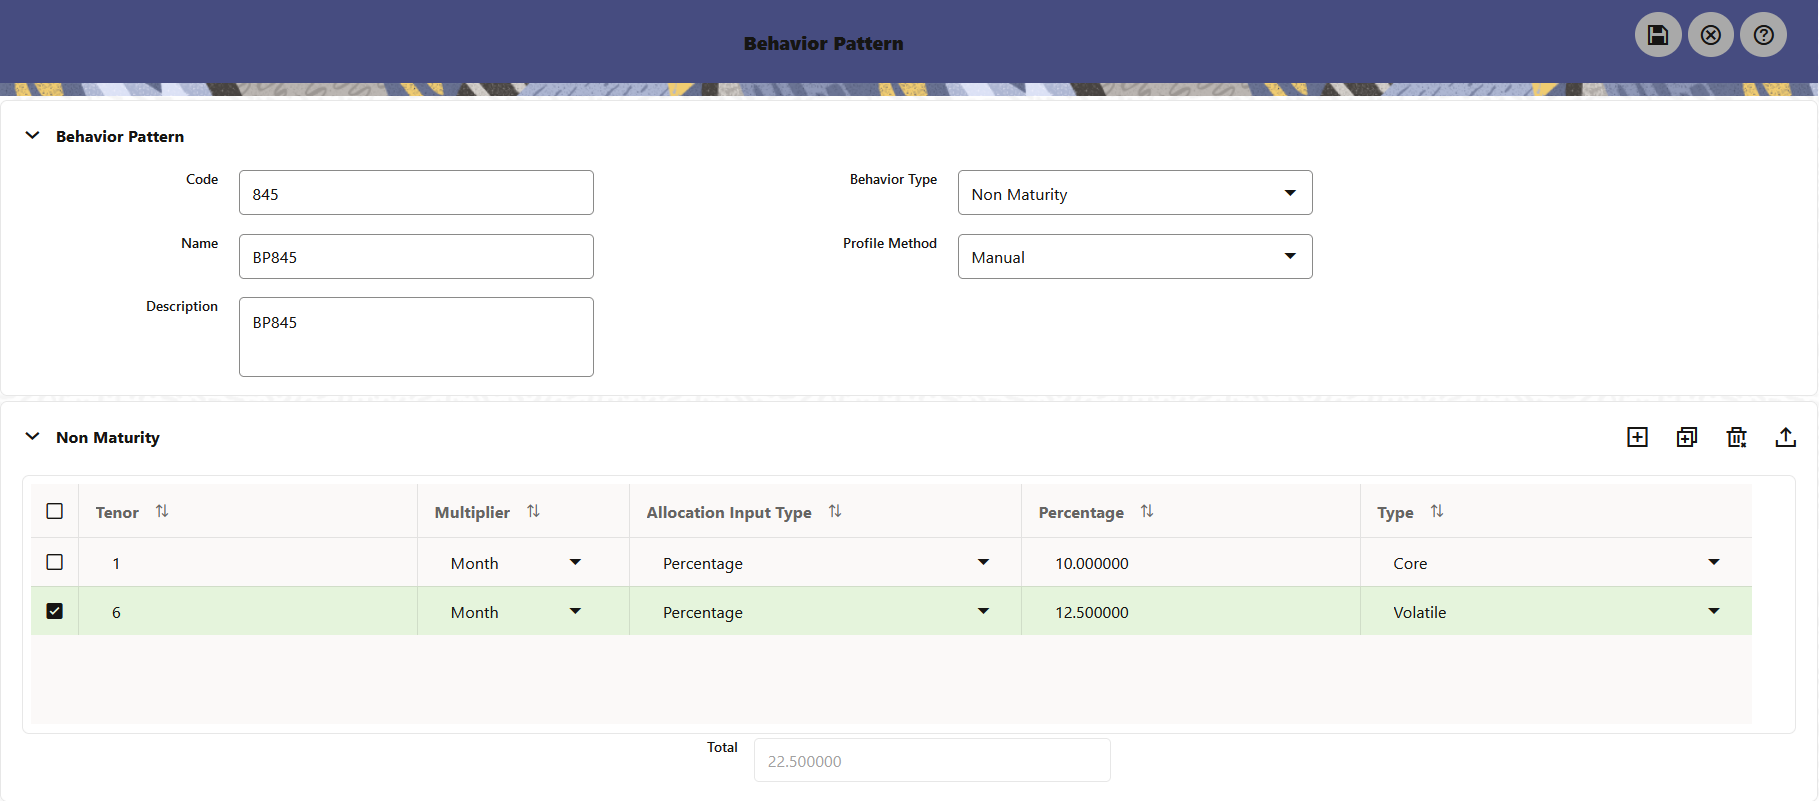
4.1.6.2.1 Defining Non-Maturity Behavior Patterns
Non-Maturity Behavior Patterns are commonly used for deposit products like Checking, Savings, and Money Market Accounts as well as for Credit Card Accounts. These account types are similar in that they do not have Contractual Cash Flows because Customers have the option to deposit or withdraw any amount at any time (up to any established limits).
When working with Non-Maturity Behavior Patterns, your percentage weights, assigned to maturity terms must add up to 100%.
To define a Non-Maturity Behavior Pattern, follow the Manual Method.
For Manual Model, you can perform the following steps:
- In the Behavior Pattern Details Page, select Non Maturity as the Behavior Pattern Type.
- Select Non-Maturity Products Profile Method as Manual.
- Enter or select the following details:
- Tenor: Used to specify the maturity term for the particular row. For example, if “1 Day” is defined, then the applicable percentage of the balance will runoff (mature) on the As-of-Date + 1 Day.
- Multiplier: The unit of time applied to the tenor. The choices are as
follows:
- Days
- Months
- Years
- Allocation Input Type: This field has a default value of Percentage for each maturity tier.
- Percentage: The outstanding balance indicating how much of the outstanding balance will mature on the specified term. Enter a number 0 and 100.
- Type: This allows you to classify the Runoff based on the appropriate type. If you select Percentage under 'Allocation Input Type', this allows you to select Core or Volatile.
- Click the Add icon to add additional payment strips to the Pattern. After
defining the initial strip as Volatile, subsequent strips are usually classified as
Core with varying maturity terms assigned.
Note:
There is no difference in behavior from a Cash Flow perspective, but the Runoff Amount will be written to a Principal Runoff Financial Element corresponding to the selected Runoff Type.
- Click Add Multiple Row icon to open a window. Enter the number of rows you want to add and click Add Rows.
- The Upload Excel icon helps you to upload the Behavior Pattern information to an Excel Sheet. This feature will be available in future.
- To delete a row, select the check box corresponding to the row you want to remove and click the Delete icon.
- Click Save.
Figure 4-10 Behavior Pattern Type as Non-Maturity

The Behavior Pattern is saved and the Behavior Pattern Summary Page is displayed.