4.4.5 Authorizing Record
You need to have DEFQMAN and SYSAUTH function roles mapped to access and authorize Forms in the DEFQ Framework. You can Authorize a single record or all the records of a selected Form within the DEFQ - Data Entry Window. You can Authorize a record in a table that has a primary key field. A primary key field in the record is indicated by “PK”. You need to have the authorization rights defined by the user who has created the record. You can also Reject or Hold inappropriate records in the table.
Figure 4-32 DEFQ - Data Entry Authorization Window
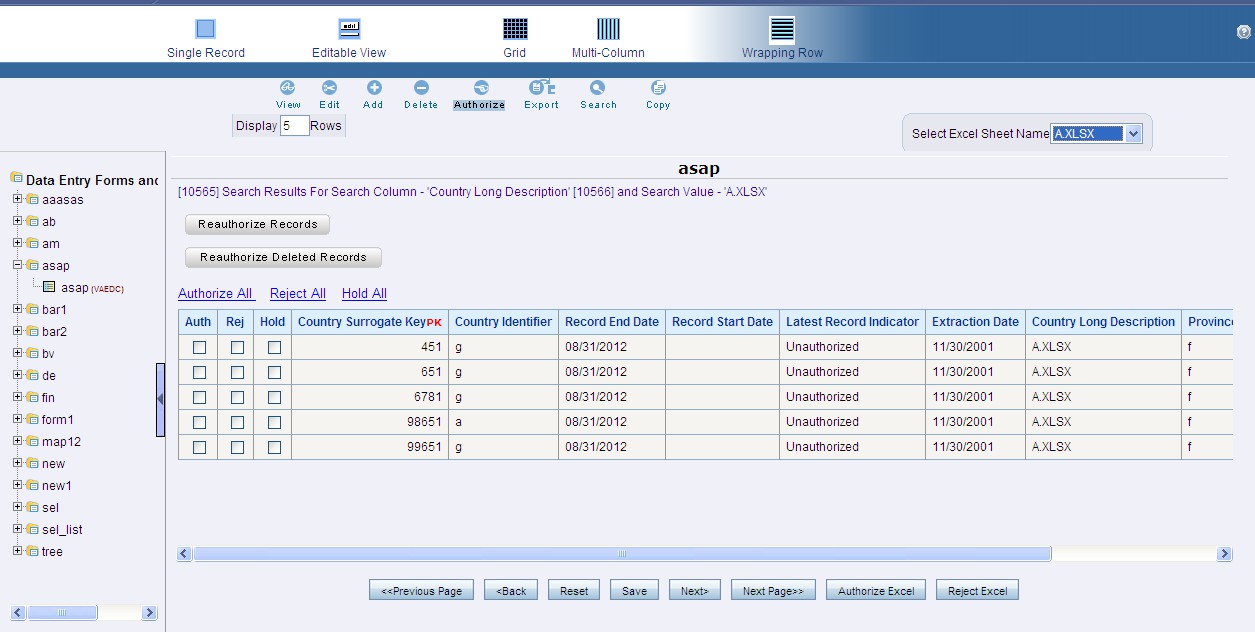
The status of each record in the table is indicated with an “AuthFlag” as indicated below:
- Unauthorized records are displayed with the status flag “ U ”.
- Authorized records are displayed with the status flag “ A ”.
- Rejected records are displayed with the status flag “ R ”.
- Modified records are displayed with the status flag “ M ”.
- Deleted records are displayed with the status flag “ D ”.
- If an Unauthorized record is on Hold , the status flag is displayed as “ H ”.
- If a Modified record is on Hold , the status flag is displayed as “ X ”.
- If a Deleted record is on Hold , the status flag is displayed as “ Z ”. To Authorize Data in the DEFQ - Data Entry Window:
- Open the required Form in view mode and click
.
Figure 4-33 Icon

The list of available records for Authorization is displayed. If there are “no records” for Authorization in the selected Information Domain, an alert message is displayed.
- Select the “Auth” check box adjacent to the required record with the status flag “ Unauthorized / Put On Hold ” and click Save . A confirmation dialog is displayed. Click OK .
You can also do a Bulk Authorization if Excel Map is selected in the Sort Fields Selection window. Select the mapped Excel Name from the “SelectExcelSheetName” drop-down list. The DEFQ - Data Entry Window displays only those records which are uploaded through the selected Excel sheet. Click Authorize Excel. A confirmation dialog is displayed. Click OK.
- To Reject a record, select the check box in the “ Rej ” column adjacent to the required record and click Save . A confirmation dialog is displayed. Click OK .
You can also Reject records in Bulk Mode if Excel Map is selected in the Sort Fields Selection window. Select the mapped Excel Name from the “SelectExcelSheetName” drop-down list. The DEFQ - Data Entry Window displays only those records which are uploaded through the selected Excel sheet. Click Reject Excel. A confirmation dialog is displayed. Click OK.
- To Hold a record and to authorize or reject at a later point, select the check box in the “ Hold ” column adjacent to the required record and click Save .
- Click Authorize All and click on Save to authorize all the records displayed on the Current Page.
- Click Reject All and click on Save to reject all the records displayed on the Current Page.
- Click Hold All and click on Save to hold all the records displayed on the Current Page.
If you have enabled the option to send alerts to the Creator of the Form in the Message Type Maintenance Window, a message is sent indicating that the records are authorized/rejected/put on hold.