9.2 Adding Rules for Rule-based Risk Assessments
To add risk parameters for rule-based risk assessments, follow these steps:
- Navigate to the OFSAA login page.
- On the KYC home page, click Behavior Detection - KYC. Click KYC Risk Assessment Configuration.
- Click the Expand icon to expand the page.
- Click Rule Based Risk Assessment. The Rule Based Risk Assessment page appears.
- To add a new rule, click Add Rule. The Add New Rule dialog box is displayed.
Table 9-3 Add New Rule Fields
Field Name Description Jurisdiction Select the jurisdiction that the parameter belongs to. All the jurisdictions that are available in the kdd_jrsdcntable display.Model Type Select the model type as Algorithm-based Risk Assessment. Rule Code Enter the rule code. This is unique for each rule. Rule Name Enter the rule name. Code Set Select the code set applicable for the rule. All the jurisdictions that are available in the kdd_code_set_trnlntable display.Customer Type Select the customer type. Based on the customer type, the rule is displayed in the Individual, Other Organization, or Financial Institution tabs. Active Flag Select Yes to enable the parameter for the current assessment. Select No to disable the parameter for the current assessment. Range Flag Select Yes to enable the length of the relationship for the current assessment. Select No to disable the length of the relationship for the current assessment. Consider For Reassessment Select Yes to whether the parameter is considered for reassessment or not.
Note:
If you select Yes, see the steps mentioned in Adding a Risk Parameter or Rule for Reassessments.Re-review Rule Name Enter the value APPLN_REREVIEW_PARAMS. Comments Enter any comments related to the rule. - To save the rule, click Save.
Note:
To close the dialog box, click Cancel. This refreshes the screen with the new rule. - Click Auto-Populate to get all the code values for the new parameter with the minimum risk score. To change the risk score, select the check box of the parameter you want to change and enter the new risk score.
Note:
After the initial preparation of the metadata, such as creating a new risk parameter, defining the risk weights, and defining the risk scores, you need to define a rule for the new risk parameter. - To define a rule, follow these steps:
- Add a business entity on top of the PARAM_RISK_SCORE_JRSDN table in IPE. For example, Country of Birth. To add a business entity, follow these steps:
- Click the Business Entities sub-menu in the Association and Configuration menu.
- Select the Entity Name as PARAM_RISK_SCORE_JRSDN.
- Click Add.
- Enter the name, processing segment, and score attribute for the business entity.
Note:
For Rule-based risk parameters, select Rule-Based Risk Assessment Model as the Processing N_RISK_SCORE as the set score attribute. Segment and N_RISK_SCORE as the set score attribute. - Click Add. The new parameter is added to the list of Business Entities on the Business Entities page.
- Add the following joins in IPE from the Inline Datasets sub-menu in the Association and Configuration menu:
- Rule-based Risk Scoring to Country of Birth (New Parameter virtual table). This is required to associate the risk parameter column of these two tables.
- Customer Processing to Country of Birth (New Parameter virtual table). This is required to associate the customer data of the new parameter to the risk score parameter table.
To create a join for Rule-based Risk Scoring to Country of Birth, follow these steps:-
- On the Inline Datasets page, click Add.
- Enter a name for the inline dataset.
- In the Start Table field, select Rule-Based Risk Assessment.
- In the End Table field, select the Country of Birth. This is the new business entity that you have added.
- Click Add.
- Select the values for the dataset condition as shown in the figure.
figure
- Click Save. The new dataset is added to the list of Inline Datasets on the Inline Datasets page.
Note:
To view the results of the newly added values, use Search.
- Add a traversal path for each join defined in the Inline Datasets sub-menu. For example, Customer Processing to Rule Based Risk Assessment through the Country of birth.
To add a traversal path, follow these steps:
- Click the Traversal Paths sub-menu in the Association and Configuration menu.
- On the Traversal Paths page, click Add.
- Enter a name for the traversal path.
- In the Start Table field, select Customer Processing.
- In the End Table field, select Rule-Based Risk Assessment.
- Click Add.
- Select the values for the traversal path flow as shown in the figure.
- Click Save. The new path is added to the list of traversal paths on the Traversal Paths page.
- Add an Expression on the risk score column of the newly created business entity which is to be scored as a risk parameter from the Expressions menu. Two expressions need to be created:
- The first expression is for the column which holds the value of the new risk parameter
- The second expression is for the calculations that are needed to derive the risk score
Note:
The business entity used in this example is the Method of Account Opening.To add an expression, follow these steps:- Click the Expressions menu.
- On the Expressions page, click Add.
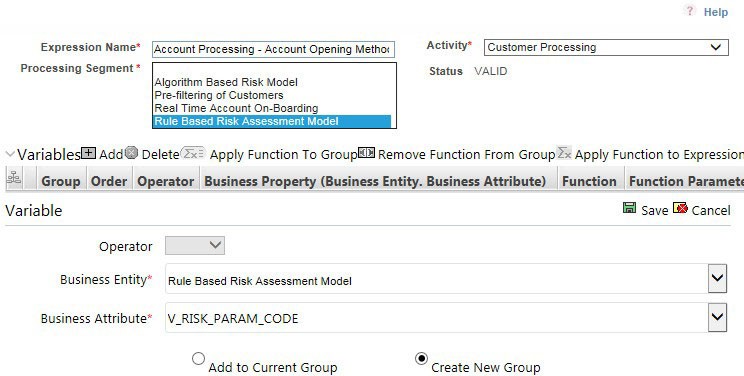
- For the first expression, enter a name for the expression and select the values as shown in the following figure.
Figure 9-9 Expressions Page – First Expression
- To add a variable for the first expression, click Add.
- Select the business entity and the business attribute where the value of the new parameter resides.
- Click Save. The variable is displayed.
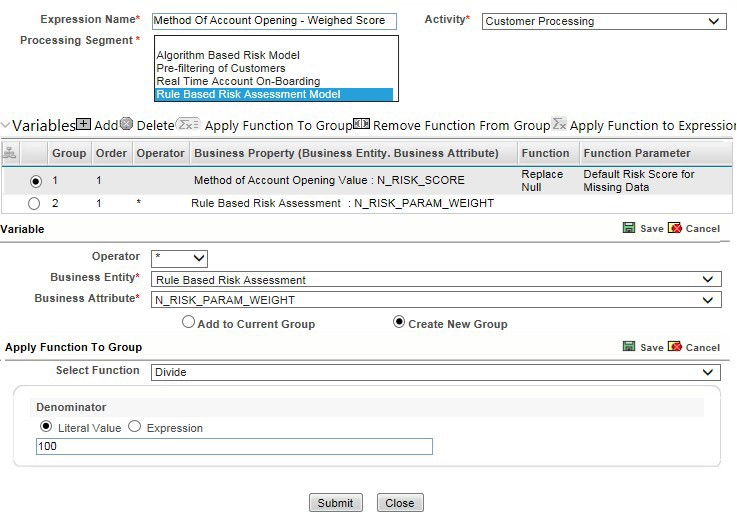
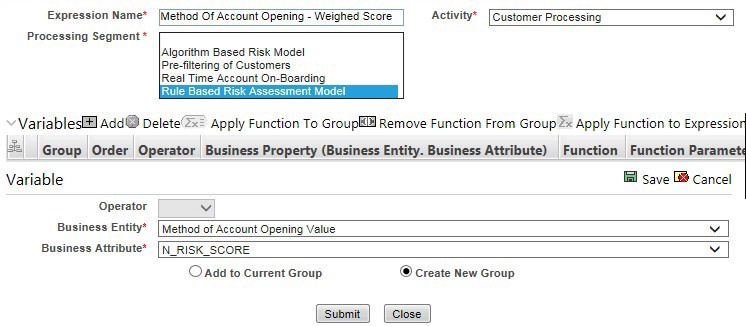
- For the second expression, enter a name for the expression and select the values as shown in the following figure.
Figure 9-10 Expressions Page – Second Expression
- To add a variable for the second expression, click Add. For the second expression, we need to add two variables: one variable is the column that holds the risk score of the parameter, and the other variable is the column that holds the risk weight for the parameter.
- For the first variable, select the values according to the Variable section in the above figure and click Save. The variable is displayed. For the second variable, select the values according to the following figure and click Save. The variable is displayed.
- Select the Group 1 radio button.
- Click Apply Function To Group.
- In the Apply Function To Group section, select the values according to the following figure and click Save.
Figure 26: Expression Function img54
Figure 9-12 Literal Value Function

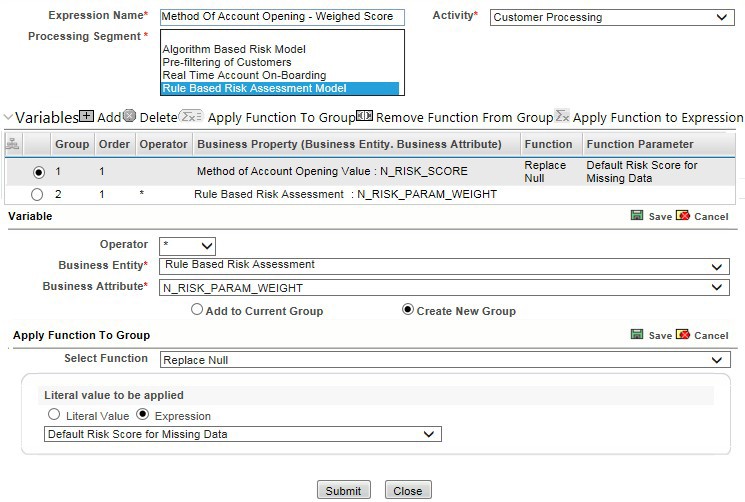
- Select the Group 1 radio button.
- Click Apply Function To Group.
- In the Apply Function To Group section, select the values according to the following figure and click Save.
- Click Submit. The new expression is added to the list of expressions on the Expressions page.
- Create an evaluation for the new risk parameter from the Evaluations Menu, with the same filter conditions as that of the other parameters, such as the filter details and the score type.
To add an evaluation, follow these steps:
- Click the Evaluations menu.
- On the Evaluations page, click Add.
- Enter a name for the evaluation.
- Select the Activity and Processing Segment field according to the following figure.
Note:
For algorithm-based risk evaluations, the join type is always left. This allows the application to provide a default risk score. - To add filters for the evaluation, click
. You need to add two filters.
Note:
Add - For the first filter, select the values according to the following figure and click Save.
Note:
In the Literal Value field, select the same value as provided in the F_ENABLE parameter of the APPLN_RB_PROCESSING excel sheet during upload. - For the second filter, select the values according to the following figure and click Save.
Note:
In the Literal Value field, select the same value as provided in the V_RB_RULE_CODE parameter of the APPLN_RB_PROCESSING excel sheet during upload. - Select the expression that you have created for the calculation of the risk score.
- Select the expression that holds the risk parameter data in the Highlights section. This is required to get the actual value for every customer.
- Click Save.
- Map the evaluation to the existing assessment of the added parameter. To do this, run the following insert script:
insert into MAP_EVAL_RISK_ASSMNT_MODEL (N_EVAL_ID, N_EVAL_VRSN_NB, N_CNTRY_ID, N_TABLE_BUS_ID, V_TABLE_PHY_NM, V_TABLE_BUS_NM, V_RISK_ASSMNT_MODEL, N_ASSMT_ID, V_AP- P_ID, V_EVAL_NM, V_ACTV_FL, V_PARAM_RULE_CODE, V_CUST_TYPE_CDThe following table shows the expected values for the above script.
Table 9-4 Expected Values
Parameter Name Expected Value N_EVAL_ID <Evaluation ID> N_EVAL_VRSN_NB 0 N_CNTRY_ID Null N_TABLE_BUS_ID Null V_TABLE_PHY_NM Null V_TABLE_BUS_NM Null V_RISK_ASSMNT_MODEL RB N_ASSMT_ID 6684 V_APP_ID OFS_KYC V_EVAL_NM <Name of the Evaluation> V_ACTV_FL Null V_PARAM_RULE_CODE <RULE CODE from APPL_RISK_RATING_PARAMS> V_CUST_TYPE_CD Null - Click Save.


