9.2.2 Workspace Creation Pre-Configuration
- Create Database Schema for the new workspace
- Add the schema to wallet in the Compliance Studio Setup
- Add the infodom in Weblogic Console
- Display the OFSAA Environment Menu in Compliance Studio UI
- Registering the OFSAA Environment Details
- Procedure to Create PPK File
- Different ways of PPK File Registration
- Configuring the Data Source
Create Database Schema for the new workspace
- Create a new database schema in the sys user. To create the new schema, run
the below script as sysdba
user:
CREATE USER <NEW SIM USER> IDENTIFIED BY <NEW SCHEMA PASSWORD> DEFAULT TABLESPACE AIF_USER_TS TEMPORARY TABLESPACE TEMP QUOTA UNLIMITED ON AIF_USER_TS; grant create SESSION to <NEW SIM USER>; grant create PROCEDURE to <NEW SIM USER>; grant create SEQUENCE to <NEW SIM USER>; grant create TABLE to <NEW SIM USER>; grant create TRIGGER to <NEW SIM USER>; grant create VIEW to <NEW SIM USER>; grant create MATERIALIZED VIEW to <NEW SIM USER>; grant select on SYS.V_$PARAMETER to <NEW SIM USER>; grant create SYNONYM to <NEW SIM USER>; grant select on sys.v_$parameter to <NEW SIM USER>; grant select on sys.dba_free_space to <NEW SIM USER>; grant select on sys.dba_tables to <NEW SIM USER>; grant select on sys.Dba_tab_columns to <NEW SIM USER>; grant create RULE to <NEW SIM USER>; grant create any trigger to <NEW SIM USER>; grant drop any trigger to <NEW SIM USER>; grant select on SYS.DBA_RECYCLEBIN to <NEW SIM USER>; grant connect, resource, dba to #new_user#; grant execute on dbms_crypto to <NEW SIM USER>; grant execute on <SIM CONFIG SCHEMA>.checkenvfordataredaction to <NEW SIM USER>; grant select on <SIM CONFIG SCHEMA>.PR2_FIRERUN_FILTER to <NEW SIM USER>; grant select on <SIM CONFIG SCHEMA>.pr2_run_object to <NEW SIM USER>; grant select on <SIM CONFIG SCHEMA>.pr2_run_object_member to <NEW SIM USER>; grant select on <SIM CONFIG SCHEMA>.pr2_run_map to <NEW SIM USER>; grant select on <SIM CONFIG SCHEMA>.PR2_FILTERS to <NEW SIM USER>; grant select on <SIM CONFIG SCHEMA>.pr2_run_execution_b to <NEW SIM USER>; grant select on <SIM CONFIG SCHEMA>.pr2_run_execution_filter to <NEW SIM USER>; grant select on <SIM CONFIG SCHEMA>.configuration to <NEW SIM USER>; grant select on <SIM CONFIG SCHEMA>.aai_wf_filter_exec_map to <NEW SIM USER>; - Run the below sql statements in newly created user:
Note:
Replace<NEW INFODOM>with the actual infodom within the single quotes.CREATE SYNONYM pr2_firerun_filter FOR <SIM CONFIG SCHEMA>.pr2_firerun_filter; CREATE OR REPLACE SYNONYM checkenvfordataredaction FOR <SIM CONFIG SCHEMA>.checkenvfordataredaction; CREATE OR REPLACE SYNONYM cssms_role_mast FOR <SIM CONFIG SCHEMA>.cssms_role_mast; CREATE OR REPLACE SYNONYM cssms_group_role_map FOR <SIM CONFIG SCHEMA>.cssms_group_role_map; CREATE OR REPLACE SYNONYM cssms_usr_group_map_view FOR <SIM COA@NFIG SCHEMA>.cssms_usr_group_map_view; CREATE OR REPLACE FORCE EDITIONABLE VIEW pr2_run_object ( v_run_id,v_infodom_name,v_object_unique_name,v_object_type_code,v_object_location_code,n_object_order,v_task_ref_unique_name, v_task_type_code,v_task_sub_type_code,v_task_ref_1_name,v_task_ref_1_value,v_task_ref_2_name,v_task_ref_2_value,v_task_ref_3_name, v_task_ref_3_value,v_task_ref_4_name,v_task_ref_4_value ) AS SELECT v_run_id,v_infodom_name,v_object_unique_name,v_object_type_code,v_object_location_code,n_object_order,v_task_ref_unique_name,v_task_type_code, v_task_sub_type_code,v_task_ref_1_name,v_task_ref_1_value,v_task_ref_2_name,v_task_ref_2_value,v_task_ref_3_name,v_task_ref_3_value, v_task_ref_4_name,v_task_ref_4_value FROM <SIM CONFIG SCHEMA>.pr2_run_object pro WHERE pro.v_infodom_name = <NEW INFODOM>; CREATE OR REPLACE FORCE EDITIONABLE VIEW pr2_run_object_member ( v_run_id,v_infodom_name,v_object_unique_name,v_member_unique_name,v_member_type_code,n_member_order ) AS SELECT v_run_id,v_infodom_name,v_object_unique_name,v_member_unique_name,v_member_type_code,n_member_order FROM <SIM CONFIG SCHEMA>.pr2_run_object_member prom WHERE prom.v_infodom_name = <NEW INFODOM>; CREATE OR REPLACE FORCE EDITIONABLE VIEW pr2_run_map ( v_run_id,v_infodom_name,v_task_ref_unique_name,v_object_unique_name,v_member_unique_name ) AS SELECT v_run_id,v_infodom_name,v_task_ref_unique_name,v_object_unique_name,v_member_unique_name FROM <SIM CONFIG SCHEMA>.pr2_run_map prm WHERE prm.v_infodom_name = <NEW INFODOM>; CREATE OR REPLACE FORCE EDITIONABLE VIEW pr2_filters ( f_is_rrf,v_dsn_name,v_execution_id,v_task_id,v_component_code,n_run_skey,v_run_code,v_rule_code,v_filter ) AS SELECT filters.f_is_rrf,filters.v_dsn_name,filters.v_execution_id,filters.v_task_id,filters.v_component_code,filters.n_run_skey,filters.v_run_code, filters.v_rule_code,filters.v_filter FROM ( SELECT 'RRF' AS f_is_rrf, pref.v_infodom_name AS v_dsn_name, pref.v_run_execution_id AS v_execution_id, pref.v_task_id AS v_task_id, pref.v_process_id AS v_component_code, pref.n_run_skey AS n_run_skey, preb.v_run_id AS v_run_code, pref.v_rule_id AS v_rule_code, '(' || CASE WHEN pref.v_process_filter IS NULL THEN '7=7' ELSE pref.v_process_filter END || ')' || ' AND ' || '(' || CASE WHEN pref.v_run_filter IS NULL THEN '8=8' ELSE pref.v_run_filter END || ')' || ' AND ' || '(' || CASE WHEN pff.v_run_filter IS NULL THEN '9=9' ELSE pff.v_run_filter END || ')' AS v_filter FROM <SIM CONFIG SCHEMA>.pr2_run_execution_b preb LEFT OUTER JOIN <SIM CONFIG SCHEMA>.pr2_firerun_filter pff ON pff.v_run_execution_id = preb.v_run_execution_id AND pff.v_infodom_name = preb.v_infodom_name JOIN <SIM CONFIG SCHEMA>.pr2_run_execution_filter pref ON pref.v_run_execution_id = preb.v_run_execution_id AND pref.v_infodom_name = preb.v_infodom_name WHERE preb.v_infodom_name = <NEW INFODOM> UNION ALL SELECT 'PR2' AS f_is_rrf,v_dsn_name,v_execution_id,NULL AS v_task_id,v_component_code,n_run_skey,v_run_code,v_rule_code,v_filter FROM <SIM CONFIG SCHEMA>.pr2_filters pf WHERE pf.v_dsn_name = <NEW INFODOM> ) filters JOIN <SIM CONFIG SCHEMA>.configuration ON upper(paramvalue) = upper(f_is_rrf) WHERE paramname = 'F_IS_RRF' UNION ALL SELECT awfem.f_is_rrf,awfem.v_dsn_name,awfem.v_execution_id,awfem.v_task_id,awfem.v_component_code,awfem.n_run_skey,awfem.v_run_code, awfem.v_rule_code,awfem.v_filter FROM <SIM CONFIG SCHEMA>.aai_wf_filter_exec_map awfem; CREATE SYNONYM AAI_WF_REQUEST_QUEUE_HIST FOR <SIM CONFIG SCHEMA>.AAI_WF_REQUEST_QUEUE_HIST; CREATE SYNONYM AAI_WF_REQUEST_QUEUE FOR <SIM CONFIG SCHEMA>.AAI_WF_REQUEST_QUEUE; CREATE SYNONYM AAI_WF_REQUEST_PARAMETER FOR <SIM CONFIG SCHEMA>.AAI_WF_REQUEST_PARAMETER; CREATE SYNONYM AAI_WF_REQUEST_PARAMETER_HIST FOR <SIM CONFIG SCHEMA>.AAI_WF_REQUEST_PARAMETER_HIST; create or replace type array_varchar as VARRAY(200) OF VARCHAR2(50);
Add the schema to wallet in the Compliance Studio Setup
- Add the database schema credentials in the wallet using the following
command:
mkstore -wrl <WALLET LOCATION> -createCredential <NEW SCHEMA>_alias <NEW SCHEMA> - After you run the command, a prompt is displayed. Enter the password
<NEW SCHEMA PASSWORD>associated with the database user account in the prompt. You are the prompted to re-enter the password and the wallet password that you entered during wallet creation. - Update the tnsnames.ora file to include the following
entry.
<NEW SCHEMA>_alias = (DESCRIPTION = (ADDRESS_LIST = (ADDRESS = (PROTOCOL = TCP)(HOST = <<IP ADDRESS>>)(PORT = <<PORT NUMBER>>)) ) (CONNECT_DATA = (SERVICE_NAME = <<SERVICE NAME>>) ) ) - Repeat the above steps for Production Database Schema if not added.
For more information, see Oracle Wallet documentation to create/manage wallets. Refer to the Compliance Studio Installation Guide to locate the wallet location.
Add the infodom in Weblogic Console
- Login into WebLogic console.
- Go to Services.
- Click Data Sources.
- Click on New button and add Data Source name as
<<Simulation Infodom>>and JNDI Name asjdbc/<<Simulation Infodom>>for the newdatabase schema details.Note:
<<Simulation Infodom>>must have 11 characters.<<Simulation Infodom>>name used while creating the work space.
Configure the infodom in tnsnames.ora in Simulation Sanctions Setup
tnsnames.ora file, see the
below sample
template:<<NEW SCHEMA>> =
(DESCRIPTION =
(ADDRESS_LIST =
(ADDRESS = (PROTOCOL = TCP)(HOST = <<IP ADDRESS>>)(PORT = <<PORT NUMBER>>))
)
(CONNECT_DATA =
(SERVICE_NAME = <<SERVICE NAME>>)
)
)
<<Simulation Infodom>> =
(DESCRIPTION =
(ADDRESS_LIST =
(ADDRESS = (PROTOCOL = TCP)(HOST = <<IP ADDRESS>>)(PORT = <<PORT NUMBER>>))
)
(CONNECT_DATA =
(SERVICE_NAME = <<SERVICE NAME>>)
)
)To enter the new infodom details in the weblogic server, see Configure Multi Data Sources section in OFS Sanctions Pack Installation and Configuration Guide
Display the OFSAA Environment Menu in Compliance Studio UI
- Click the User Icon right top corner.
- Click Identity Management. The Identity Management window is displayed. For more information on Identity Management, see OFS Admin Console User Guide.
- Click Groups. The Groups window is displayed.
- Select Workspace Administrator from the list to display the Group Details page.
- Select Mapped Roles tab. The Mapped Roles window is displayed.
- Click New Mapping. The Unmapped Roles window is displayed.
- Click Authorization View.
- Search for
OFSAA Environment Menu Access, and select OFSAA Environment Menu Access. - Click Authorize to display OFSAA Environment in the UI.
Registering the OFSAA Environment Details
- Click the User Icon and select the OFSAA Environment from the list.
- Click Register Environment. The OFSAA Environment page is displayed.
- Click Register Environment to register the new CS
Environment.
Note:
You must Register Environment for Production and Simulation. - Provide the input for the following fields:
- Name: Name of the environment Must be minimum 5 characters and maximum 20 characters
- Description: Description for the environment
- Type: Select either simulation or production
- Properties: Select the key and enter the corresponding value. For information on Key and corresponding values, see OFSAA Production Environment Key and ValueKey table and OFSAA Simulation Environment Key and Values table.
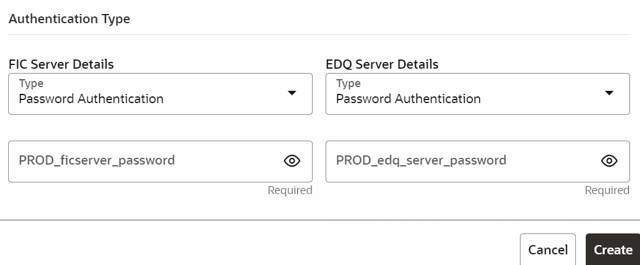
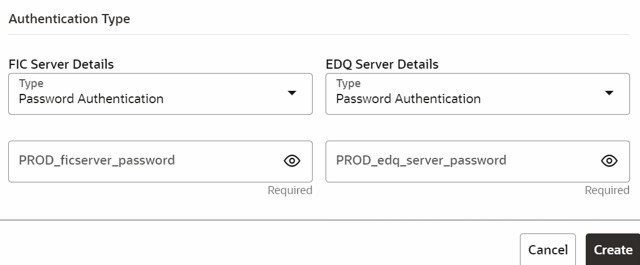
- Authentication Type: To register FIC Server and EDQ Server
details follow these steps:
There are three Authentication types:
- Password Authentication
- Putty Private Key Authentication
- Putty Private Key with Passphrase Authentication
Figure 9-3 Password Authentication

Figure 9-4 Putty Private Key Authentication

Figure 9-5 Putty Private Key with Passphrase Authentication

Note:
We have to register with any one of the three authentication types in OFSAA Registration.
- Click Create.
OFSAA Production Environment Key and ValueKey table and OFSAA Simulation Environment Key and Values table provides information about Key and Values for OFSAA Environment Registration.
Table 9-1 OFSAA Production Environment Key and ValueKey
Key Description PROD_baseUrl Sanctions application base URL.
(Example:
http://host name>:<port>/<context- name>)PROD_app_id Application ID (Example:OFS_CS) PROD_infodom infodom ID (Example: SANC812INFO) PROD_ficserver_hostname Server IP address where ftpshare is located PROD_ficserver_username ficserver user name PROD_ficserver_password ficserver password PROD_ftpshare_path ftpshare path
(Example:
/scratch/sanc812/sanc/ftpshare)PROD_edq_server_hostname EDQ server host name PROD_edq_server_username EDQ server user name PROD_edq_server_password EDQ server password PROD_edq_runprofiles_path EDQ run profiles path(Example: /scratch/ ofsaaapp/EDQ/Middleware/Oracle_Home/ user_projects/domains/base_domain/config/ fmwconfig/edq/oedq.local.home/runprofiles/)PROD_edq_autorun_directory EDQ Autorun directory (Example: /scratch/ ofsaaapp/EDQ/Middleware/Oracle_Home/ user_projects/domains/base_domain/config/ fmwconfig/edq/oedq.local.home/autorun/)PROD_edq_exportproject_directory EDQ export project directory (Example: /scratch/ ofsaaapp/test/CS/Export/) PROD_edq_jshell_jar_directory EDQ jshell and jar directory (Example: /scratch/ ofsaaapp/EDQ/Middleware/Oracle_Home/edq/ oracle.edq/) PROD_edq_management_port EDQ management port ID PROD_edq_director_username EDQ director user name PROD_edq_director_password EDQ director password PROD_edq_landingarea_path EDQ landing area path (Example: /scratch/ ofsaaapp/EDQ/Middleware/Oracle_Home/ user_projects/domains/base_domain/config/ fmwconfig/edq/oedq.local.home/landingarea/)PROD_edq_project_name EDQ project name (Example: Customer_Screening, Watchlist_Management) PROD_instanceName Instance name (Example: SIMULATION) PROD_instanceAccessToken Instance access token ID PROD_edq_baseUrl EDQ base URL (Example: http://host name>:<port>)PROD_ficdb_path ficdb directory PROD_auth_file_path FIC Server Private Key File Path (Refer section 9.2.2.8) PROD_edq_auth_file_path EDQ Server Private Key File Path (Refer section 9.2.2.8) PROD_auth_passphrase Password for FIC Server Private Key File PROD_edq_auth_passphrase Password for EDQ Server Private Key File Table 9-2 OFSAA Simulation Environment Key and Values
Key Description SIM_baseUrl Sanction application Base URL (Example: http:// host name>:<port>/<context-name>) SIM_ficserver_hostname ficserver host name SIM_ficserver_username ficserver user name SIM_ficserver_password ficserver password SIM_ftpshare_path ftpshare path (Example: /scratch/tf812dev/ san_812/ftpshare) SIM_edq_server_hostname EDQ server host name SIM_edq_server_username EDQ server user name SIM_edq_server_password EDQ server password SIM_edq_autorun_directory EDQ auto run directory (Example: /scratch/ ofsaaapp/EDQ/Middleware/Oracle_Home/ user_projects/domains/base_domain/config/ fmwconfig/edq/oedq.local.home/autorun/)SIM_edq_importproject_directory EDQ import project directory (Example: /scratch/ ofsaaapp/test/CS/Import/) SIM_edq_jshell_jar_directory EDQ jshell and jar directory (Example: /scratch/ ofsaaapp/EDQ/Middleware/Oracle_Home/edq/ oracle.edq/) SIM_edq_management_port EDQ management port SIM_edq_director_username EDQ director username SIM_edq_director_password EDQ director_password SIM_edq_landingarea_path EDQ landingarea_path (Example: /scratch/ ofsaaapp/Oracle/Middleware/Oracle_Home/ user_projects/domains/base_domain/config/ fmwconfig/edq/oedq.local.home/landingarea/)SIM_instanceAccessToken Instance access token ID SIM_instanceName Instance Name SIM_sys_admin_user System admin user ID SIM_sys_auth_user System authentication user ID SIM_edq_baseUrl EDQ base URL (Example: http://host name>:<port>)SIM_edq_runprofiles_path EDQ run profiles path (Example: /scratch/ ofsaaapp/EDQ/Middleware/Oracle_Home/ user_projects/domains/base_domain/config/ fmwconfig/edq/oedq.local.home/runprofiles/)SIM_ficdb_path ficdb directory SIM_auth_file_path FIC Server Private Key File Path (Refer section 9.2.2.8) SIM_edq_auth_file_path EDQ Server Private Key File Path (Refer section 9.2.2.8) SIM_auth_passphrase Password for FIC Server Private Key File SIM_edq_auth_passphrase Password for EDQ Server Private Key File
Procedure to Create PPK File
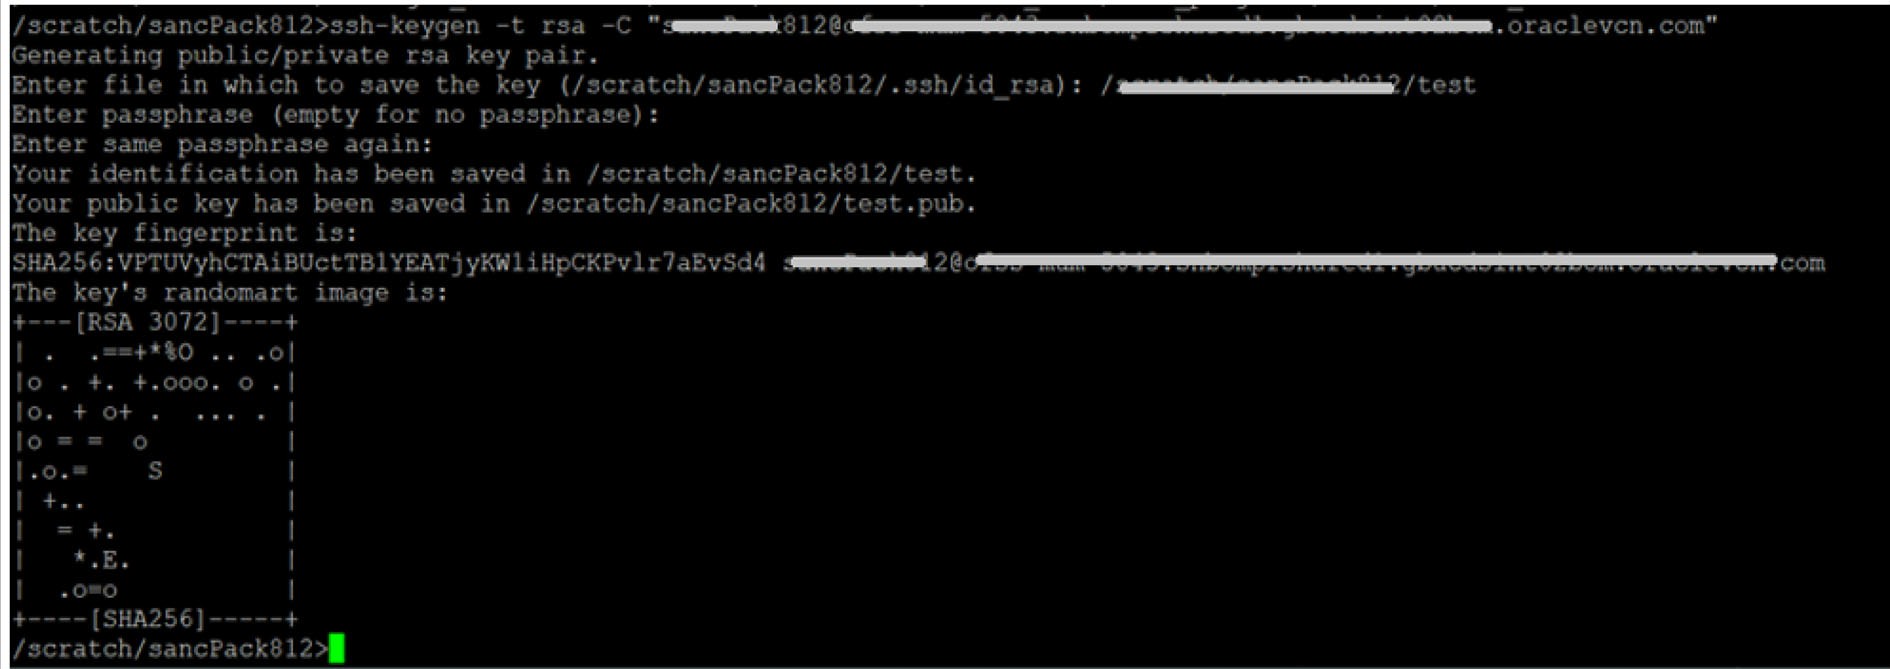
Open the putty session and run the below command:
ssh-keygen -t rsa -C "username@hostname"
Replace username & hostname with respective server details.
For reference, see below screenshot:
Figure 9-6 Procedure to Create PPK File

Different ways of PPK File Registration
- Once the PPK file is generated it will create both private Key and public Key.
- Place the public key inside authorized keys file present in ssh folder. Now
verify once connecting to winscp using the Private Key file.
In OFSAA Registration we can either give in any one of the following ways.
Method 1:- Create the PPK file individually in FIC server and EDQ server.
- Now move the PPK file generated to the simulation OFSAA FIC server deployed area. Note the path of the file here.
- Now register this path in the OFSAA registration for keys like PROD_auth_file_path,PROD_edq_auth_file_path,SIM_auth_file_path,SIM_edq_auth_file_pat h.
Method 2:- Create the PPK file only in simulation OFSAA FIC server alone.
- Now place the public key inside authorized keys file across different servers like PROD FIC Server, SIM FIC Server, PROD EDQ Server & SIM EDQ Server.
- Now place the PPK in the deployed area of the SIM OFSAA FIC server. Note the path of the file here.
- Now register this path in the OFSAA registration for all the keys like PROD_auth_file_path,PROD_edq_auth_file_path,SIM_auth_file_path,SIM_edq_auth_file_pat h.
Configuring the Data Source
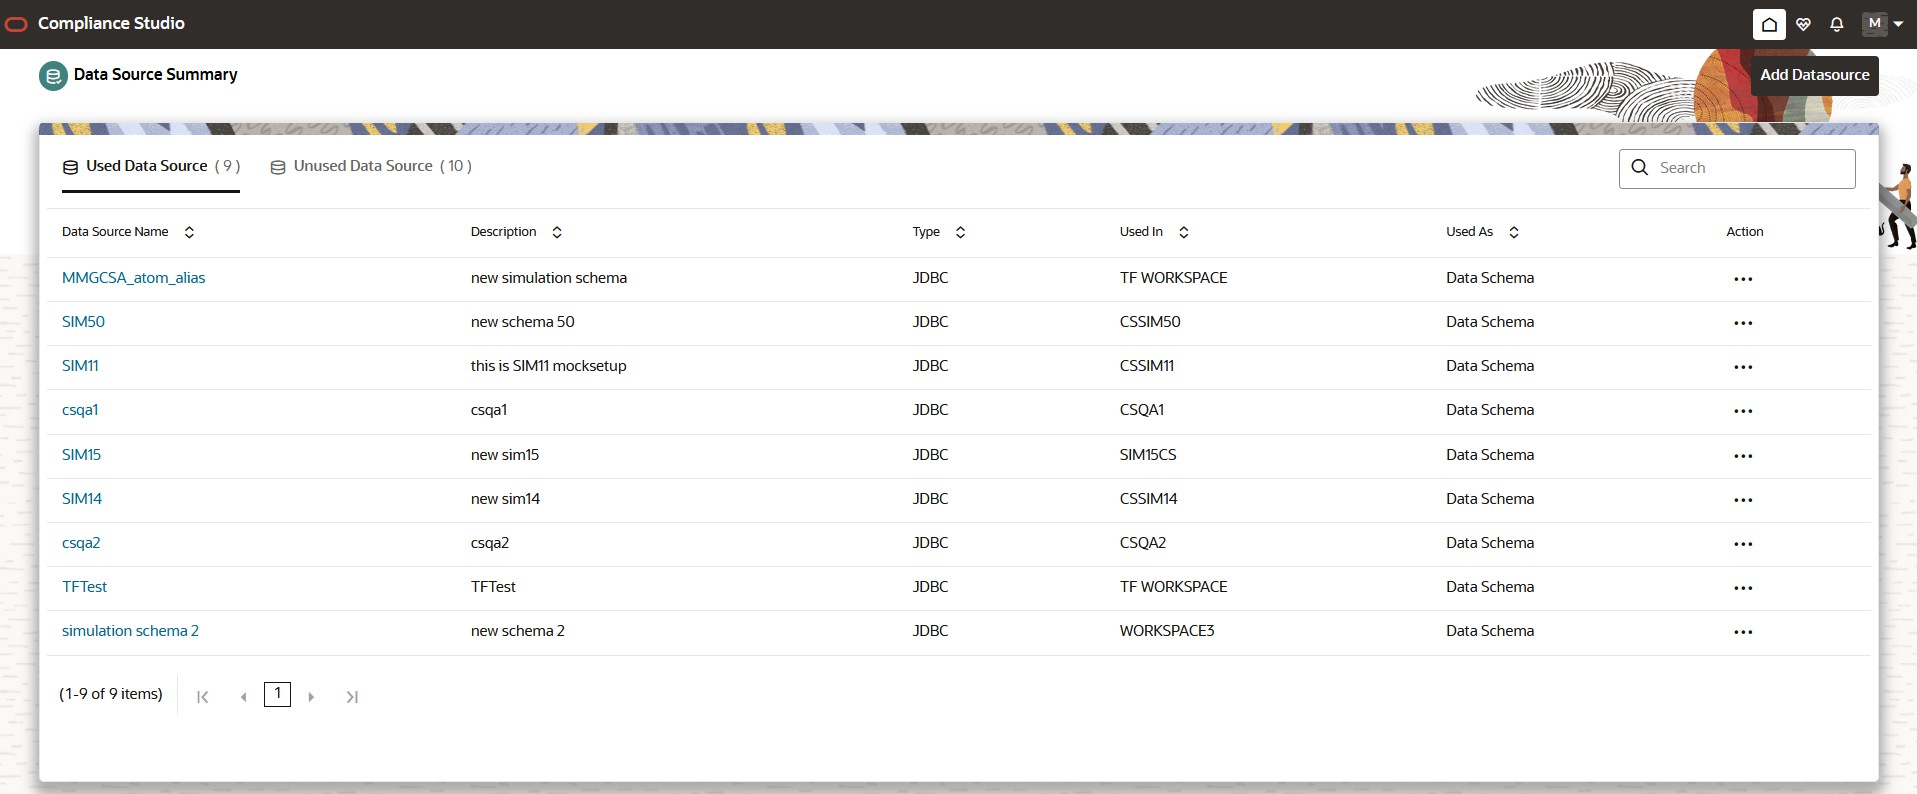
The Data Source allows you to manage the Data Schemas registered with the OFS Compliance Studio application. The Data Source Summary window shows the list of Data Schemas registered with OFS Compliance Studio. These Data Schemas can be used either for workspace or for sourcing data.
To view the Data Source details, click Action icon next to corresponding Workspace and select View.
Note:
Add the production schema data source from where the data will be moved to the Simulation schema.- Click the User Icon.
- Click Data Source. The Data Source page is displayed.
- Click Add Data Source and enter the value for the
following fields:
- Data Source Name: Enter the workspace schema name.
- Description: Enter the description of database connection.
- Type: Enter the type of the database connection.
- Database Type: Select the Database Type as Oracle.
- Wallet Alias: Enter the Wallet Alias. This value should be same as
configured using Oracle Wallet (
<NEW
                                    SCHEMA>_alias
) - Table Owner: Enter the table owner name (
<NEW
                                    SCHEMA>
).
- Click Test Connection to check the status of the connection.
- Click Create to create the Data Source or Click
Cancel to skip the changes.
Figure 9-7 Data Source Summary Page
