13 Case Allocation Assignment
The Automated Case Allocation feature assigns cases to individuals or pools at any point during the case investigation process based on the defined allocation rule.
This feature saves managers/administrators from having to go through each case and manually assign the case to team members based on the selected criteria.
Accessing Case Allocation Assignment Page
- Navigate to Enterprise Case Investigation: see the Getting Started section for more information.
- From the Enterprise Case Investigation menu, select Case Allocation
Assignment.
Figure 13-1 Case Allocation Assignment

Searching an Allocation Rule
The Allocation Search enables users to return all users and pools, based on select search criteria, who can then have a rule(s) assigned to them.
- The following criteria are available in the Allocation Search pane.
Table 13-1 Search Fields
Field Description Name This type-ahead box displays all users and pools.
Note: This supports the wild-card search using the percent sign (%).
ID This type-ahead box displays the user IDs of all users and pools Jurisdiction Displays the list of all Jurisdictions and filters the results by the business jurisdictions associated with the user/pool. Note:
The drop-down list contains only jurisdictions you are authorized to view.Business Domain Displays as all Domains and filters the results by the business domain associated with a user. Note:
The drop-down list contains only business domains you are authorized to view.Rule Displays all rules defined in the FCC_ASSGN_RULE_DEFN table. Active/Inactive This filters the results by the status of the user or pool. - Select Search to return the list of users that match the criteria.
- Select Save to save that search criteria. It will run automatically the next time the tool is accessed.
Associating a Rule
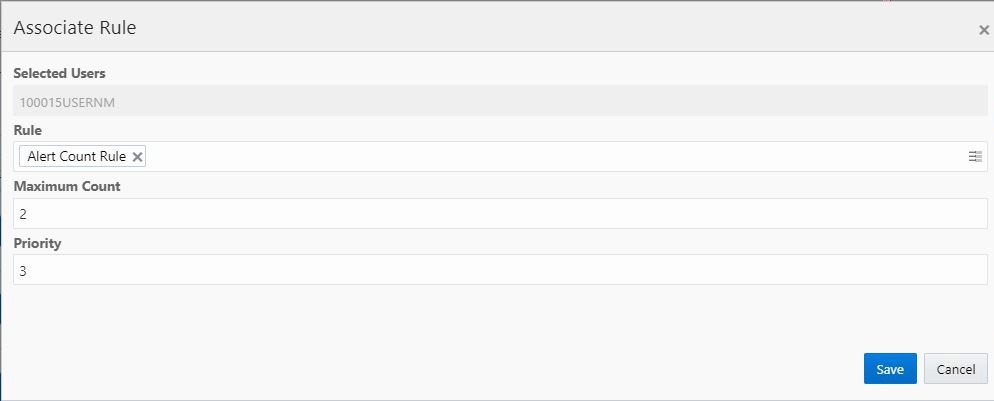
Figure 13-2 Associating a Rule

- Select the user from the Assigned Allocation list.
- Select the Associate Rule link to open the Associate Rule window.
- The following information is available:
Table 13-2 Associating a Rule
Field Description Rule This list contains all rules defined in the FCC_ASSGN_RULE_DEFN table. One or more rules can be selected. Maximum Count This value defines the maximum number of cases that can be assigned to that user at any given time for that rule(s) Priority Set the priority of the user. This value defines the priority in which the rules assigned to this individual will be run. This is done to assist with load balancing. The priority numbers must be defined in sequential order(1, 2, 3...). No two associations can have the same priority for a user. - SelectSave.
Example of Allocation Association:
Let’s assume the client has senior investigators who are to focus primarily on difficult cases but also help on easier cases when they are able. These investigators should never have more than 100 cases assigned to them at any given time. Two allocation rules would be created; one for easy cases and one for hard. A senior investigator would then have the hard allocation rule associated with them with a Maximum Amount of, for example, 75 and a Priority of 1. The easy rule would be associated with a Maximum Amount of 25 and a Priority of 2. This would ensure the investigator has mainly difficult cases but always has some easy ones.
Disassociating a Rule
Figure 13-3 Disassociating a Rule

- Select the user from the Assigned Allocation list.
- Click Disassociate Rule to open the Disassociate window.
- Select the Rule from the list of all the associated rules mapped to that user.
- SelectSave.
Setting the Out Of Office
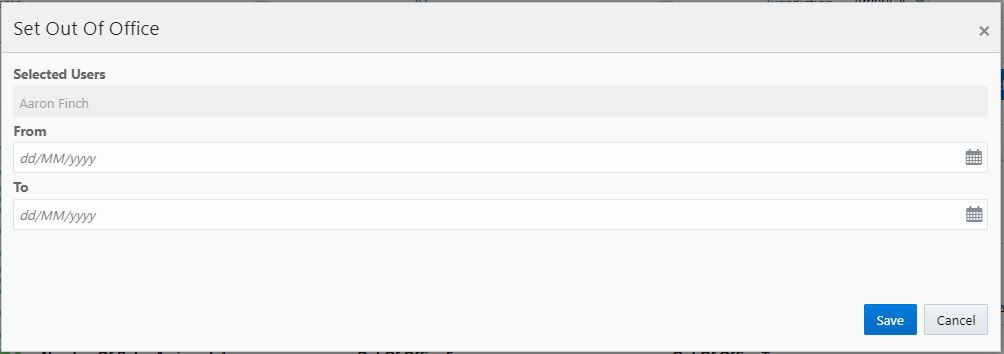
Figure 13-4 Setting the Out Of Office

- Select the user from the Assigned Allocation list.
- Click Set Out of Office.
- Enter the From and To dates in dd/MM/yyyy format.
- SelectSave.
Clearing the Out Of Office
An Administrator can clear the out of office for the selected user.
- Select the user from the Assigned Allocation list.
Figure 13-5 Assigned Allocation list

- Click Clear Out of Office.
Figure 13-6 Click Clear Out of Office

- SelectSave.
Figure 13-7 Clear Out of Office
