11.6 Implementing the ECM PMF Workflow
This section describes how to implement the ECM PMF Workflow.
PMF provides many features that can be used to create various types of case investigation workflows. Thissection guides the basic steps that are required to create a new workflow in PMF. For more details, refer to the AAI user guide.
Defining Metadata
- Define ALL actions (status changing and non-status changing) in the
KDD_ACTION table as described below:
Note:
The status changing actions in this table which are left over from earlier versions are also displayed. These will be cleaned up over time. The status changing actions will have the OBS category, so these will not appear on the UI.Table 11-7 KDD_ACTION Table
Column Name Description Is column applicable to status-changing action? Is column applicable to non-status- changing action? ACTION_ID Unique identifier of the action which can be performed on a case. X X ACTION_CATEGORY_CODE A category within which this action is displayed on the Take Action window. For example, in OOB the action “Send Email” is displayed within a category called “Email”. Action category is just a way to segment actions into logical groups for easy reading on the UI. This does not impact the action in any way. This field references the KDD_ACTION_CAT_CD column in the ACTION_CAT_CD table. X X ACTION_CD Unique code that identifies the action. E.g. CA123. This code is not displayed on the UI. X X ACTION_DESC Action name that is displayed on the Audit History tab. X X ACTION_NM Action name that is displayed on the UI except the Audit History tab. X X ACTION_ORDER Order used to display status and non-status changing actions on the Take Action window. X X DFLT_DUE_DT_LM Enter the number of days. When this action is saved on the case, the system will automatically assign a due date to case = System Date + Number of days defined here. X X REQ_DUE_DATE_FL With the introduction of the Validation Framework, this column is no longer required and need not be populated. LAST_ASSIGN_REQ Flag used to assign the case back to the last assignee. That is if a user recommended a closing action but the action was rejected, the case may need to be reassigned to the user who recommended closure. This column is not used OOB post 805. Use the STATUS_CD from KDD_STATUS NEXT_REVIEW_STATUS_CD This column is used to record the resulting status of this action. Even though we now define the resulting status of a status changing action in PMF, this data should still be populated because ECM needs it for processing information other than just the case workflow. It is recommended that the resulting status defined here should be the same that is defined in PMF. X REG_TYPE_CD Unique identifier for the regulatory report type associated with an action (where applicable). Only for CRR actions Only for CRR actions RESOLUTION_ACTION_FL This value is required to mark which actions are resolution actions. Based on that we store some information in the KDD_CASES table. X REQ_CMNT_FL With the introduction of the Validation Framework, this column is no longer required and needs not to be populated. REQ_REASN_FL With the introduction of the Validation Framework, this column is no longer required and need not be populated. REQ_REASN_OWNER_FK With the introduction of the Validation Framework, this column is no longer required and need not be populated. EXPORT_DIR_REF Directory path on the server where the Export to the XML file is stored. Since we don’t have that action anymore, this column is no longer required and need not be populated. LAST_UPDATED_BY User ID of the person who last updated this action. Not required but good to provide for auditing purposes X X LAST_UPDATED_DT The date on which this action was last updated. Not required but good to provide for auditing purposes X X CMMNT_TX Comments added while adding this action. Not required but good to provide for auditing purposes X X - Define all statuses in the KDD_STATUS table as follows:
Table 11-8 KDD_STATUS
Column Name Description Is column applicable to status-changing action? Is column applicable to non-status- changing action? STATUS_CD Unique code for this status. This code is not displayed on the UI. X STATUS_NM Status name displayed on the UI. X CLOSED_STATUS_FL Indicator of whether this status is considered a "closed" status. X CAN_NHRIT_FL In previous releases, this column was used to indicate whether a case could be inherited when it is in this status. This is now handled by VBO in PMF. It is recommended that this value should be populated in sync with what’s defined in PMF. X VIEWD_BY_OWNER_ACTVY_TYPE_CD In previous releases, this column was used to record the action code for the VBO action. This action would be recorded on a case with this status when the case was viewed by a user with privileges to own the case. This information is now defined in PMF. However, it is recommended that this value should be populated in sync with what’s defined in PMF. X VIEWD_RESULT_STATUS_CD In previous releases, this column was used to record the resulting status of the VBO action. This information is now defined in PMF. How- ever, it is recommended that this value should be populated in sync with what’s defined in PMF. X - Define which non-status changing action will be available for which user
role in KDD_ROLE_ACTION_MAP table as follows:
Table 11-9 KDD_ROLE_ACTION_MAP
Column Name Description Is column applicable to status-changing action? Is column applicable to non-status- changing action? CASE_ROLE_ACTION_MAP_SEQ Unique Sequence Identifier for this record. X ROLE_CD Unique code assigned to this user role. This field references the V_ROLE_CODE column in the CSSMS_ROLE_MAST table. X ACTION_CD Unique code that identifies the action. This field references the ACTION_CD column in the KDD_ACTION table. X - Define which non-status changing action will be available in which case
status in KDD_STATUS_ACTION_MAP table as follows:
Table 11-10 KDD_STATUS_ACTION_MAP table
Column Name Description Is column applicable to status-changing action? Is column applicable to non-status- changing action? CASE_STATUS_ACTION_MAP_SEQ Unique Sequence Identifier for this record. X STATUS_CD Unique code for this status. This field references the STATUS_CD column in the KDD_STATUS table. X ACTION_CD Unique code that identifies the action. This field references the ACTION_CD column in the KDD_ACTION table. X - Define which non-status changing actions will be available for which case
type in KDD_CASETYPE_ACTION_MAP table as follows:
Table 11-11 KDD_CASETYPE_ACTION_MAP table
Column Name Description Is column applicable to status-changing action? Is column applicable to non-status- changing action? CASE_CASETYPE_ACTION_MAP_SEQ Unique Sequence Identifier for this record. X CASE_TYPE_SUBTYPE_CD Case Type Identifier. This field references the KDD_CASE_TYPE_SUBTYPE column in the CASE_TYPE_SUBTYPE_CD table. X ACTION_CD Unique code that identifies the action. This field references the ACTION_CD column in the KDD_ACTION table. X - Add all statuses to AAI_WF_STATUS_B and AAI_WF_STATUS_TL tables in the
Config schema.
- AAI_WF_STATUS_B table:
- Contains the status code and package map.
- In STATUS_ID enter the status code used in KDD_STATUS.STATUS_CD.
- The package ID should be OFS_NGECM if this workflow is for use with ECM.
- AAI_WF_STATUS_TL:
- Contains the status name and package map.
- Enter the Status ID, Status Name, and Status Description as you entered them in KDD_STATUS. (The Description should be the same as the Name).
The package ID should be OFS_NGECM if this workflow is for use with ECM.
- AAI_WF_STATUS_B table:
Creating the Workflow in PMF
- Adda new workflow: from the Process Modeler landing page. This creates a blank workflow and the system will navigate the user to a Process Modeler page. This page contains several tabs (Process Flow, Definition, Application Rules, and so on.) that will be used to create the workflow. Below are some of the basic things you will need to define to create a workflow in PMF.
- Define the “Application Rules”.
- An “application rule” is a rule that is executed with an activity or atransition.
- Several rules can be created in PMF (Stored Procedure, Attribute
Expression, JavaAPI, and so on) - all these rules need to be
categorized as one of the three main types of rules:
- Execution Rule – this is the business logic executed by the activity. For example, the OOBAML workflow includes an execution rule called “Case Audit”. This rule is used by all activities where the action leading to that activity is going to be recorded on the case audit history.
- DecisionRule - this rule returns a “True/False” value that is used in decision making during a transition.
- For actions that will be displayed on the Take Action window, an “Attribute Expression” decision rule should be created. This is how PMF will know which action should be displayed on the Take Action window for which user role and in which case status. To create an attribute expression on the Application Rule tab.
- Click on the Add button (on the top-left side of the tab) to open a
menu. Select “Attribute Expression” from this list. “Rule Details” window is
displayed.
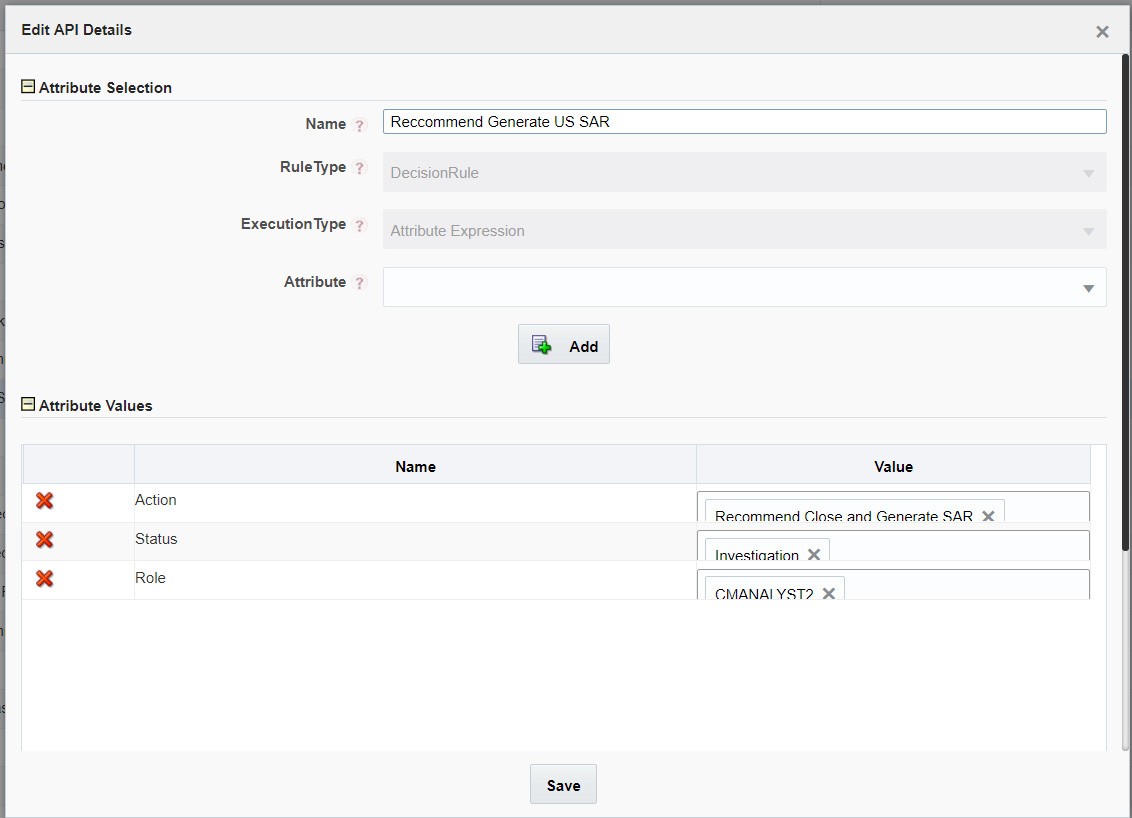
On the Rule Details window, enter the name of this attribute expression.
Select “Action” in the Attribute drop-down and click Add. This will add a record in the Attributes Values section. In the Attributes Values section, the “Value” drop-down shows all the actions defined in KDD_ACTION. Select the action(s) you want to associate with this rule.
Select “Status” in the Attribute drop-down and click Add. This will add another record in the Attributes Values section. The Value drop-down displays all the statuses defined in KDD_STATUS. Select the status(es) you want to associate with this rule.
Now select “Role” in the Attribute drop-down and click Add. This will add another record in the Attributes Values section. The Value drop-down shows you all the roles defined for ECM. Select the role(s) you want to associate with this rule.
- Click Save.
Figure 11-14 Attribute Expression details
- ECM uses the “attribute expression” decision rules to determine
which actions to display on the Take Action window. If an action is
associated with an attribute expression, that action will be
displayed on the Take Action window. Any status changing action that
is not displayed on the take action window (e.g. Close and Merge
from the Relationship tab) should be associated with an “Expression”
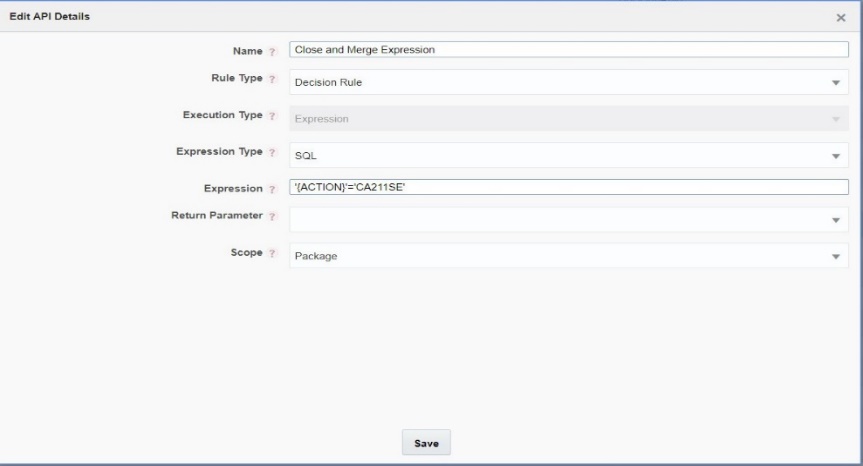
decision rule instead of an attribute expression rule. Expression
rules are simple rules like “If action code = X, move the case to
the next status”. If there is a need to show this type of action
only for specific user roles, use masking to achieve that.
Figure 11-15 Expression Details
- Selection Rule - this rule fetches some value, useful to get value dynamically from a table or other source. OOB ECM does not use selection rules.
- Define application rules on the “Application Rules” tab within Process Modeler before drawing activities and transitions on the Process Flow tab.
- Workflow logic determines which types of rules need to be created. OOB ECM only uses execution and decision rules.
- For more information about application rules, refer to the AAI user guide
- ECM uses the “attribute expression” decision rules to determine
which actions to display on the Take Action window. If an action is
associated with an attribute expression, that action will be
displayed on the Take Action window. Any status changing action that
is not displayed on the take action window (e.g. Close and Merge
from the Relationship tab) should be associated with an “Expression”
decision rule instead of an attribute expression rule. Expression
rules are simple rules like “If action code = X, move the case to
the next status”. If there is a need to show this type of action
only for specific user roles, use masking to achieve that.
- Draw the “activities” (i.e. case statuses) on the “Process Flow” tab:
- An“activity” means a case status. From the Left-Hand-Side menu, add
the applicable type of “activity” to the canvas.
- Select a “Human Task” if human action is required to move the case to the next status. This is what will be used most of the time as almost all case workflows require a user to take any action that moves the case to the next status.
- Select a “Service Task” if an automatic activity is going to move the case to the next status.
- Select a “Sub Process” if you want to call another Process/ Workflow from your current workflow.
- After selecting an activity and adding it to the canvas, double click on the activity to open a window (that has many tabs) to enter details about this activity.
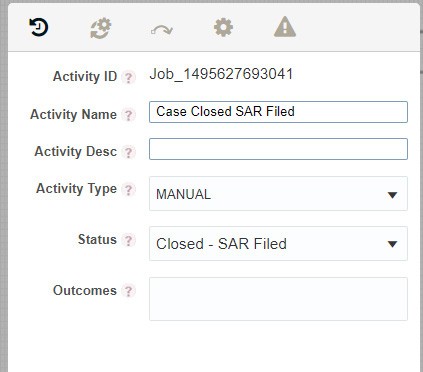
- On the first tab of this window, enter “Activity Details” as
follows:
- Activity Name =name of status. This name is just for use in PMF – ECM UI displays the status name defined in KDD_STATUS.
- Activity Description = description of this status for use in PMF.
- Activity Type = pre-populated based on the type of activity selected from the LHS menu (human, service, and so on) but can be changed asneeded.
- Status = associate this activity with a status defined in the database. This drop-down list displays the values in the AAI_WF_STATUS_B table.
-
Outcomes=OOB workflows do not use this setting. For
more details about this setting, refer to the AAI user
guide.
Figure 11-16 Activity Details tab
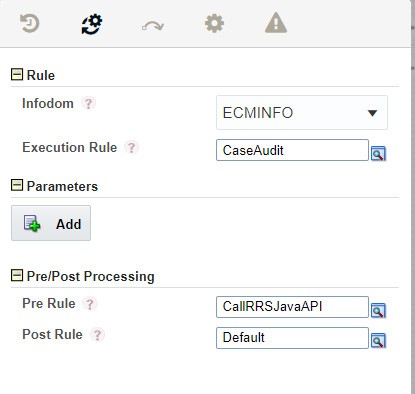
- After defining “Activity Details”, define rules on the second tab
(IMPL) and as follows:
- Execution Rule = this is the business logic executed by the activity. For example, the OOBAML workflow includes an execution rule called “Case Audit”. This rule is used by all activities where the action leading to that activity is going to be recorded on the case audit history.
- Pre-rule and Post-rule = select the API rule that needs to be run before reaching the activity (pre-rule) or while exiting that activity (post rule). “Exiting that activity” means that when you move out of this status this rule will be called. As an example: the OOB AMLworkflow uses an Execution Rule called “CallRRSJavaAPI” to call the RRS API for the “Close and Generate SAR” action.
- To view/editthe OOB rules OR define a new rule, navigate to
the “Application Rule” tab in Process Modeler.
Figure 11-17 IMPL tab
- On the same window where users can enter activity details and
execution rules, there are three more tabs with settings that can be
defined for activities but we have not needed those for OOB
workflows. For more information about these settings, refer to the
AAI user guide.
Note:
That even though transitions leading out of that status can be defined on the “Transitions” tab of this window, it is better to draw them directly on the canvas.
- An“activity” means a case status. From the Left-Hand-Side menu, add
the applicable type of “activity” to the canvas.
- Draw the “transitions” (i.e. case actions) on the “Process Flow” tab
within Process Modeler:
- After adding activities to the canvas, add “transitions” between these activities.
- A “transition” is an action that takes the case from one activity to another (that is, from one status to another).
- From the left-hand-side menu on the Process Flow tab, add the applicable type of “transition” to the canvas.
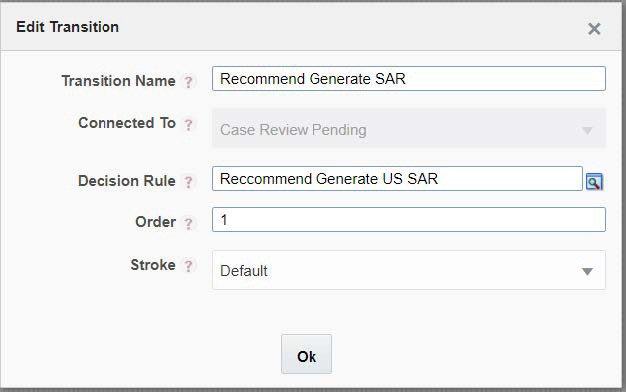
- Double click on the transition to open the “Edit Transaction” window
and enter transaction details as follows:
- Transition name: name of transition. This name is just for use in PMF; ECM UI displays the action name defined in KDD_ACTION.
- Decision Rule: every transition should be linked to a decisionrule.
- For actions that will be displayed on the Take Action window, select an “Attribute Expression” rule from this drop-down list.
- For actions that will not be displayed on the Take Action window (e.g. Close and Merge on Relationship tab), an “Expression” decision rule should be created.
- Details of how to define decision rules expression areincluded.
- Order: If multiple transitions have to run
sequentially between 2 activities, this is the order in
which the Decision rules for this transition will be
executed.
Note:
The order in which actions are displayed on the Take Action window is defined in the KDD_ACTION table, not in PMF. - Stroke: this is the style in which the transition
will be displayed on the Canvas (Process Flowtab). That is,
users may choose to display some transition lines as
“dotted” lines and some as “dashed” lines to make it easier
to read the workflow diagram.
Note:
Use a Connector when making multiple transitions between statuses. It makes the workflow diagram easier to read. Also, draw a circular transition on every status. Create a transition that circles back on the same status and name it “Other Actions”. Associated this transition with a “default” decision rule and give it a high order number. When ECM calls the PMF workflow, if there is no transition available for that Case, PMF considers the workflow completed for that case and the status will not change any further. If the circular transition is defined, it takes that path and waits for the next action.Figure 11-18 Edit Transition window
- Data Fields.
- Data Fields allow PMF to access and store information from the ECM application. Data Fields are passed from the ECM UI to PMF as part of an action and are used in application rules. E.g. when a user takes an action that moves the case to “Investigation” status, if an application rule has been defined that requires a specific transaction amount to be greater than a specific value before a case can be moved to that status; ECM will need to send that transaction amount as a Data Field to PMF. The application rule will use this data field to conduct the calculation and move the case to the next status only if the application rule returns True.
- For more information about Data Fields refer to the AAI user guide.
Creating new data fields is possible in PMF but passing the value from ECM to PMF required a code change.
- Save the Workflow.
- Following two buttons on the Process Flow tab to save the workflow:
- Save button– use this form of saving if you are creating a brand new workflow OR editing an existing workflow and do not need to maintain the previous version of that workflow. This button overwrites the workflow being edited. As a result, all cases (in-flight and closed) using that workflow will follow the modified workflow as soon as the changes are saved in PMF. New cases (of the Case Type(s) using this workflow) will also use this modified workflow.
Save as New Version button – use this form of saving if you are editing an existing workflow and do not want to change the version which you selected to edit. Thisbutton saves the modifications as a new version of the workflow and leaves the previous version unchanged. The version number assigned to this new version = parent workflow’s version number + 1.
For example: If the parent workflow had a version number 4, this new version will have a version number 5. But just saving a new version of a workflow does not have any impact on any case unless this new version is mapped to a Case Type in Case Designer. When the Case Type-Workflow mapping is updated in Case Designer, all cases of that Case Type created after the update will use the latest workflow mapped to the Case Type. All older cases of that Case Type continue on the version they were using previously. The moment a case type is mapped to a different workflow, new cases will start using the new workflow (but old cases will not be impacted).Note:
In the Case of Designer you can associate any version of a workflow with a Case Type. Case Designer does not have any restrictions around which version of a workflow can be linked to a Case Type.
Mapping of Workflow to a Case Type(s) in Case Designer
- For ECM to use a workflow, that workflow must be linked to one Case Type.
- One workflow may be linked to more than one case type.
- Case Designer provides the ability to link Case Types to PMF workflows as a part of the case type definition.
Customizing the Checklist functionality in ECM
- Use case: A checklist has to be completed when a case has reached a pre-closing status (e.g. Decision Preparation). Only after a user has selected all items on the checklist can the case move to a different status.
- Steps to accomplish:
- Define each “item” on the checklist as a non-status changing action in KDD_ACTION.
- Since the checklist actions are non-status changing actions, a user is expected to save all the checklist actions before taking a status changing action that closes the case.
- Define this status-changing action (in KDD_ACTION) that the user will save AFTER the checklist actions have been saved on the case.
- Define metadata for these actions so that ECM knows when to display these actions and add the status changing action to the PMF workflow.
- Define a validation in the validation framework for this status-changing action to check if all the checklist actions have been recorded on the case. If they have, the system will allow the user to save the status-changing action and close the case. If not, the system will not allow the user to close the case.
Configuring CRR Workflows in PMF
- Navigate to the Process Modeller window.
- Go to Case Management-AML. A new window with workflow will open.
- To create a new rule, click the Application Rule tab. Click Add and select Attribute Expression from the drop-down.
- Enter the following details in Attribute expression:
- Name: User-specific details such as generate GO AML and so on.
- Attribute: Select Action from Attribute drop-down and click Add. Select user-specific actions such as Generate GO STR, Generate CA STR, and so on.
- Attribute: Select Role from Attribute drop-down and click Add. Select CMSUPRVISR
- Attribute: Select Status from Attribute drop-down and click Add. Select status that youwant to be posted such as new, Investigation, and so on.
- Click Ok to save.
- Go to Process Flow. Select the pipeline coming from ‘Investigate case’ to ‘Case closed SAR Filed’ and double click on it.
- Edit Transition window will display. In Edit Transition, provide the Transition name of STR such as generate GO AML. Select the rule that was created in step 3 from Decision Rule.
- Click Ok.
- Click Save.
Configuring Change Case Type Action in PMF
Note:
- When the user selects from the list of case types they view all case types they have permission to see.
- When the user selects from the list of statuses available in the target case type the list displays all statuses in the target workflow. If the target workflow is not configured to allow the case to be landed in that status then it will default to the ‘New’ status once the case type is changed.
- Configuring the Source Workflow:
- Create a new Attribute Expression to define each change case type action, who can take that action and in which statuses it should be available. This will result in a new expression for each status where the user can change the case type.
- The Action attribute must have the value of ‘Change Case Type’ defined (code 1007).
- For the NextStatus attribute if you want to have every status in the workflow allow the change case type action then do not define the NextStatus attribute. This expression can then be reused for all transitions.
- In the Process Flow:
- Add a manual task and name it something like ‘Change Case Type’. This is the dummy portal task and nothing else needs to be defined.
- Draw a transition from each status where the Change Case Type should be displayed pointing to portal status.
- In the properties of the transition, select the Attribute Expression created for that status (from #1 above).
- The portal status should also have a self-transition loop to ensure that the workflow doesn’t end at that status.
- Configure the Target Workflow. In all the workflows for the case types which
the user can select, perform the following tasks:
- Create an attribute expression for each status where the user can
land in the target workflow.
- The attribute expression only needs to have the NextStatus attribute added and the value should be the status where it can land.
- It is best to name the expression as one that is related to changing the case type.
- In the Process Flow add a Service Task.
- From Start draw an arrow so it only goes to the Service Task. WHAT DO I NEED TO DEFINE HERE?
- From the Service Task draw a transition to all the statuses in which the user can land.
- In the properties of those transition select the NextStatus attribute expression for that status (as created in #3a).
- Draw a transition from the Service Task to the New status (or
whatever status indicates it is a new case).
This transition will not have any rule defined but the order should be a large number. This is because, if the workflow cannot find a route to the status the user selected it will default to land it in New.
- Create an attribute expression for each status where the user can
land in the target workflow.
- If the users can change back to the source workflow from the target:
- In the Target workflow, create and draw the transitions and portal status as defined above.
- In the Source workflow, from the portal status draw transition to
each of the statuses the case can land back in. These transitions
should only have the NextStatus attribute.
Note:
Once the Change Case Type action is available in the Take Action page, you can make selections from the Case Type and Status dropdowns.
You can select from the Case Type dropdown and Status will be displayed based on the workflow of the selected Case Type.
You can further filter the Status by Case Type and User Role.
You can configure which Statuses of the selected CaseType should be displayed in the Status dropdown.
You can filter the cases statuses based on Case Type and User Role and display them in the Status dropdown. To filter the statuses, you must configure the kdd_casetype_param_config and kdd_role_status_map tables.
You can configure the kdd_casetype_param_config table specifying comma separated statuses with respective to required case types.
For example:
The V_PARAM_CD column requires to be specified as STATUS as shown below:
Table 11-12 KDD_CASETYPE_PARAM_CONFIG Table
| V_PARAM_CD | V_CASE_TYPE | V_PARAM_VALUE |
|---|---|---|
| STATUS | AML_SURV | PNDRFI,CCNSAR |
| STATUS | AML_DD | INV,PNDRFI,CCFSAR |
You can configure the kdd_role_status_map table to filter the dropdown based on user roles as shown below.
Table 11-13 KDD_ROLE_STATUS_MAP Table
| ROLE_CD | STATUS_CD |
|---|---|
| CMANALYST2 | CCNSAR |
| CMANALYST2 | INV |
| CMSUPRVISR | CCFSAR |
| CMSUPRVISR | CCM |
| CMSUPRVISR | INV |
| CMSUPRVISR | NW |
Note:
You can configure both tables, either one of them or none of them, as required. If none of these two tables are configured, the Status dropdown will function as usual.Note:
You must apply Patch # 8.1.2.8.1 for the CA-STR functionality.To use the CA-STR functionality, you must first move data from BD to ECM Business, then to Case tables.
- Attach BD_CONDUCTOR_PROCESS (Oracle Behavior Detection to CA Conductor Process) in the BD_MISCELLANEOUS (Oracle Behavior Detection Miscellaneous Data Load) process available inside the Oracle_BD_Event_Processing batch.
- Add the T2T_CONDUCTOR Data Transformation task in the
BD_CREATE_CASE process available inside the
Oracle_BD_Event_Processing batch.
As per CA_STR mandate you must gather additional details of Director, Power of Attorney (POA),Shareholders, Employers along with Address, Phone Number, and Email irrespective of the Conductor being an Entity or Individual. See the following table for reference.
Table 11-14 T2T_CONDUCTOR
V_PARAM_CD V_CASE_TYPE V_PARAM_VALUE Comments CondEntRelationship AML_SURV DIRECTOR, POA, SHHLD If the Conductor is an entity, the DIRECTOR, POA, and SHHLD relationship information is fetched. CondIndRelationship AML_SURV EMPLOYER If the Conductor is an individual, Employer information is fetched. CondPercOwnership AML_SURV 25 Fetch details of shareholders with ownership of => 25% of shares. - Execute the BD_ECM batch.
You can configure which case types should display the CA-STR fields in the UI (Customer and Transaction Add/Edit popups).
To display the CA_STR fields in the ECM UI, the value for V_PARAM_VALUE must be set as Y shown below in the KDD_CASETYPE_PARAM_CONFIG table.
Table 11-15 KDD_CASETYPE_PARAM_CONFIG Table (Single Case Type)
| V_PARAM_CD | V_CASE_TYPE | V_PARAM_VALUE |
|---|---|---|
| CONDUCTORSECREQ | AML_SURV | Y |
You can configure the KDD_CASETYPE_PARAM_CONFIG table with multiple rows for each of the required case types. as shown in the following table.
Table 11-16 KDD_CASETYPE_PARAM_CONFIG Table (Multiple Case Types in Separate Rows)
| V_PARAM_CD | V_CASE_TYPE | V_PARAM_VALUE |
|---|---|---|
| CONDUCTORSECREQ | AML_SURV | Y |
| CONDUCTORSECREQ | AML_DD | Y |