4 Deploying FCCM Analytic Reports
This section describes how to deploy Analytics on Oracle Business Intelligence Enterprise Edition (ORACLE ANALYTIC SERVER (OAS) version 25) and integrate FCCM Analytic Reports in the OFSBD UI.
Installing OAS Version 25
Installing OAS Version 25 Windows Administration Client
Disabling Cache Feature in OAS Version 25
Change Default Repository Password
Configuring OAS Version 25 Connection Pool
Deploying OFS ECM Report Analytics
Disabling Single Sign On
Enabling Table Authentication in OAS Version 25
Viewing KYC Reports as an Investigation User
To install the ORACLE ANALYTIC SERVER (OAS) version 25:
- Download the software from ORACLE ANALYTIC SERVER (OAS) 25 server.
- After installation, get the Enterprise Manager URL, User name,
Password, and ORACLE ANALYTIC SERVER (OAS) version 25 installed directory from
your System Administrator.
Note:
- Any ECM User who want to create/edit reports should be mapped to BI Admin Reporter Role with Atomic Schema.
- The BI Admin Reporter Role must be mapped to ECM group having Admin privileges for ECM Application and FCCM Analytics Reports Application (for example, CASESUPERVISOR).
Download and install OAS Client tool for 25.
This section describes how to disable the Cache feature in the Oracle Analytic Server (OAS) version
- To disable the Cache feature:
- Login to the Enterprise Manager.
- Click the Target Navigation icon.
- Expand the Business Intelligence section and then click bi instance.
- Click the Configurationtab.
- Click the Lock icon and then click Lock & Edit to enable the Cache Enabledcheck-box.
- Under the Performancetab, in the Enable Bi Server Cache section, reselect the Cache Enabled check-box and make the required changes.
- Click the Lock icon and then click Release Configuration to save the changes made.
Copy the FCCM81210.rpd from
$FIC_HOME/ORACLE ANALYTIC SERVER (OAS)25/Repository to the
Windows machine where the Oracle Analytic Server (OAS) 25 Windows Administration
Client is installed.
To change the default password for the repository:
- Open the Repository using the OAS Windows Administration client from Windows machine.
- From the File menu, select Open, and click Off line.
- Browse to the Repository on Windows machine.
The Oracle BI Administration Tool - FCCM81210.rpd window is displayed.
- Enter default Repository password: FCCM$81210.
To change the default password:
- From the File menu, choose Change Password.
- Enter the new password and clickOK.
This section describes how to configure the Oracle Analytic Server (OAS) version 25 Connection Pool.
To configure the Connection Pool of the repository:
- Open the same Repository (as in the previous step) on the Windows
machine.
The Oracle BI Administration Tool - FCCM81210.rpd window is displayed.
- Expand the
FCCMfolder in the Physicalsection. - Double-click Connection Pool to open the Connection Pool Propertieswindow.
- Enter the following in the Data Source Name text box of the
Connection Pool Properties window after modifying
<Database Server Host Name> and <Database Name> Data Source Name = (DESCRIPTION=(ADDRESS=(PROTOCOL=TCP)(HOST=<Database Server HostName>)(PORT=1521))(CONNECT_DATA=(SERVER=DEDICATED) (SERVICE_NAME=<DatabaseName>))). - Enter the Atomic Schema user name and password in respective fields.
- Click OK.
- Expand the folder.
- Right-click on any one table name and select View Data.
- Perform similar changes in the Connection Pools for all
remaining folders in the Physical Layer by providing the following schema
details for all Connection Pools:
KYC Analytics > Atomic SchemaNote:
Both the initial block and the connection pool must point to the Atomic Schema.UIC_73 > CaseMng Connection Pool >Atomic SchemaUIC_73 > Security Connection Pool > Atomic SchemaTA > Atomic SchemaCTRBI > Atomic SchemaORCL > Atomic SchemaFCCM > Atomic Schema
- From the File menu, select Save.
A confirmation message is displayed.
- Click Yes.
The message: Consistency check didn’t find any errors, warning or best practices violations. is displayed.
- Click OK.
- Change the value in the System Settings Analytic Content of DV
Console. Go to Evaluate Support Level and select 2 instead
0 from the
drop-down.
Change from
EVALUATE_SUPPORT_LEVEL = 0toEVALUATE_SUPPORT_LEVEL =2. - Copy
FCCM81210.rpdinto the working directory. - Navigate to the working directory and execute the following
script:
<Oracle Analytic Server (OAS) 25_home>/user_projects/domains/bi/ bitools/bin/datamodel.sh uploadrpd -I FCCM81210.rpd -SI ssi -U <user> -P <password> - Restart the Oracle Analytic Server (OAS) 25 from Enterprise
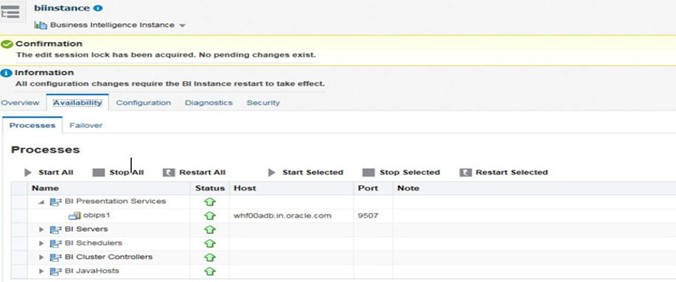
Manager by following these steps:
- Click the Target Navigation icon.
- Expand the Business Intelligence section and then click bi instance.
- Click the Availability tab.
- Click Stop All.
- Execute the
command:
./importarchive.sh ssi <working location>/FCCM_ANALYTICS81210.bar encryptionpassword='FCCMAnalytics$81210' - Click Start All.
Figure 4-1 Restarting Oracle Analytic Server (OAS) 25
- Execute the following
command:
2. Update the<Oracle Analytics Server 25_Home>/commemoration/common/bin/wlst.sh disableBISingleSignOn('<Oracle Analytics Server 25_Home>/ user_projects/domains/bi')instanceconfig.xmlfile available in<Oracle Analytics Server 25_Home>/user_ projects/domains/bi/config/fmwconfig/biconfig/OBIPSlocation as:Add or replace the following script inside
For example:<ServerInstance> </ServerInstance><ServerInstance> <Security> <InIFrameRenderingMode>allow</InIFrameRenderingMode> </Security> </ServerInstance>Note:
While accessing the Statement View report, ensure that the protocol is the same as the one used in OAS.
To enable the Table Authentication feature:
- Navigate to
<DOMAIN_HOME(OAS Server
                        Domainhome)>/config/fmwconfig/
                        biconfig/OBIPS/incubation.properties
(if this file does not exist, create it). - Add/update the
incubation.propertiesfile with the following line:oracle.bips.auth.nextGenAuth=false - Restart the OBIPS process(es).
For example:
<DOMAIN_HOME>/bitools/bin/stop.sh
                                    -iobips1
<DOMAIN_HOME>/bitools/bin/start.sh -iobips1
To view KYC reports as an Investigation User:
- Log into Application as
sysadmin. - Navigate to Function-Role Map.
- For KYCINGATOR role, map the function Reports.
