4.6.2 Creating a Database View

To create a database view, follow these steps:

  1. Navigate to the Database View Summary page.
  2. Click the Add button.
    The Basic Information panel is displayed.
  3. Enter the following details in the Basic Information panel:
    • Name : Enter a unique, logical name for the view (for example, test123).
    • Physical View Name : Enter the physical view name. The prefix PBSM_View_ is applied automatically; you only need to enter the remaining suffix (for example, entering pbsm_doc_view results in the physical view name PBSM_View_pbsm_doc_view).
    • Description : Optionally enter a brief description of the view.

    Figure 4-49 Basic Information panel
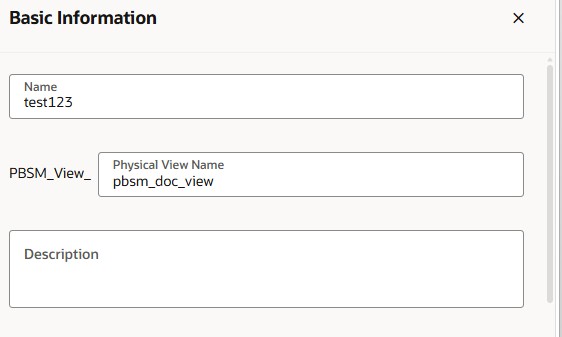

    Basic Information panel

  4. Enable the Register View toggle if this view should be classified and made available for selection as a source in consuming modules.

    Note:

    Register View is the trigger for classification-based behavior. Only when Register View is enabled does the Primary Classification field appear, and only then is the view's classification code (and the associated table UDP → view UDP mapping) applied.
  5. With Register View enabled, select the Primary Classification from the dropdown. T
    he available values are: Instrument , Management Ledger , Portfolio , and Transaction Summary .
  6. Select the Primary Table from the dropdown. The list of tables is filtered based on the Primary Classification selected in the previous step (for example, selecting Instrument populates tables such as FSI_D_LIABILITY_AGGR).
  7. Click Apply to confirm the Basic Information and primary table selection, or Cancel to discard your entries and close the panel.

    Figure 4-50 Register View
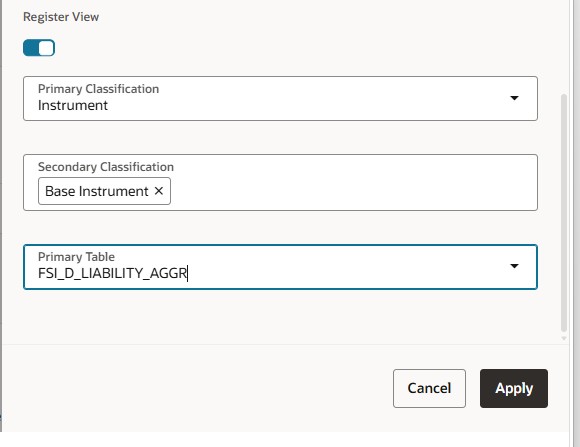

    Register View

  8. If secondary tables are required (for example, to self-join or bring in additional data), add them in the Tables Selection section:
    1. Click Add in the Tables Selection section.

      The Add Tables window is displayed.

    2. Select the required table(s).

      The primary table can also be reselected here as a secondary table to support a self-join.

    3. Click View Selected to confirm, then click Ok .
    4. Edit the Table Alias as required.
  9. Enter the required columns in the Columns Selection section: a.
    1. Click Add to select columns from the chosen table(s), or click Add Expression to define a derived/computed column.
    2. Select the Table Name, Table Alias, and Column Name(s).
    3. Enter a Column Alias and Column Display Name for each selected column.
  10. Update the Other Details section with the required table join conditions if more than one table is selected.
  11. Click Save .