31.1 Create a Standard Transfer Pricing Process
Create a Standard Transfer Pricing Process:
- To define and execute Transfer Pricing Processing Requests.
- To calculate Transfer Rates, TP Rate Adjustments (TP Add-on Rates), and related charge or credit amounts.
- To propagate Transfer Rates or Adjustment Rates for any Applicable Instrument Table from a prior period.
- To migrate charges or credits, for funds provided or used, to the Management Ledger Table.
- To Calculate the All-in Transfer Rate.
- To Calculate Economic Value of the Portfolio.
- To calculate and/or migrate Rate Lock Option Costs.
- To calculate and/or migrate Breakage Charges.
- To select alternate columns to Output Transfer Rate or Adjustment Calculation Results for each record in an instrument table for a Transfer Pricing Process Run.
- To generate Audit Trail Output for Assumption Rule or for All Data.
The prerequisites for defining and executing the Standard Transfer Pricing Processing Requests are:
- Performing basic steps for creating or editing a Transfer Pricing Rule
- Performing basic steps for creating or editing an Adjustment Rule
To create and execute the Standard Transfer Pricing Process:
- From the LHS menu, select Funds Transfer Pricing, select
FTP Processing, and then select Standard
Process.
Figure 31-2 FTP Processing - Standard Mode summary page
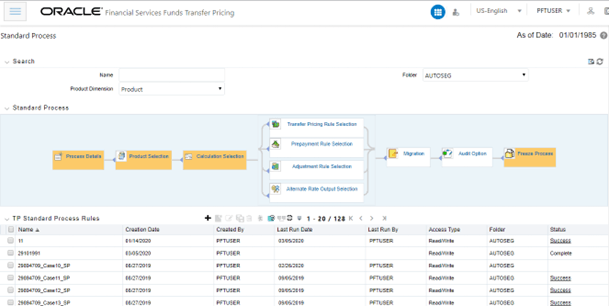
The following table describes the key terms used for this procedure:
Table 31-1 Fields and Descriptions from the FTP Processing – Standard Mode summary page
Term Description Product Hierarchy Displays the selected product hierarchy. The Product Hierarchy allows you to select Product Members to include in the Process. Note, you have two methods for selecting data that will be included in the process. You can select Parents / Children from a hierarchy or you can use Source selection. Source Allows you to select one or more source tables to include in your process. If sources are selected directly then the Product Hierarchy will be disabled and selections made within the hierarchy will be lost. Users can utilize one method or the other to define data that will be included in the process, but not both methods at the same time. Filter Filters allow you to restrict your data selection based on any attribute that exists within an instrument table. You define filters under Common Object Maintenance and reference your filter within the Product Selection block of your Process.
The supported Filter Types are Attribute Filter, Data Filter, Hierarchy Filter, and Group Filter.
Transfer Pricing rule This LOV allows you to select a Transfer Pricing rule. The Transfer Pricing rule provides the application with assumptions that are applied to products to calculate their transfer rates and option costs. Prepayment Rule This LOV allows you to select a Prepayment rule. The Prepayment rule provides the application with prepayment assumptions that you want to apply to products in conjunction with cash flow transfer pricing methods. Adjustments Rule This LOV allows you to select an Adjustments rule. The Adjustments rule lets you apply transfer pricing add-on rates to an instrument record for purposes of determining specific charge and credit amounts. Alternate Rate Output Mapping Rule This LOV allows you to select an Alternate Rate Output Mapping rule. The Alternate Rate Output Mapping rule lets you select the alternate columns to output transfer rate, and adjustment calculation results for each instrument record in an account table for a standard transfer pricing process run. This functionality allows you to output more than one transfer rate, or adjustment calculation result for each record in the instrument table through multiple transfer pricing process runs. Calculation Method Within the Calculation Selection block, there are two calculation options: Standard or Remaining Term. Standard is the most commonly used method and applies traditional transfer pricing logic. The remaining Term allows you to assign Transfer Rates based on current period rates. Interpolation Method A calculation selection parameter, the Interpolation Method allows users to decide between Linear, Cubic Spline, or Quartic Spline interpolation methods. This selection affects how to rate lookups happen for terms that fall between anchor points on your Interest Rate Curves. Charge Credit Method A migration block parameter, the Charge Credit Method selection determines how the Ledger Level TP Charge or Credit is calculated during the migration process. There are two options available:
- Instrument Level: With this method, the instrument level charges and credits that were posted during the Transfer Pricing process are added and posted to the Ledger table, together with the weighted trarate.
- Ledger Level: with this method, the balance of the instrument (average, ending, or other) to arrive at a weighted average transfer rate weights the instrument level transfer rates. The weighted average transfer rate is migrated to the Ledger table and multiplied by the corresponding Ledger Balance (average or ending) to arrive at the charge or credit amount.
Charge/Credit Accrual Basis Select the Charge/Credit Accrual Basis on the Transfer Pricing Process Migration block or, define the Accrual Basis as an attribute for each Product dimension member in the Dimension Management – Members screen. In case no selection is made, a default Accrual Factor of Actual/Actual should be applied.
Charge/Credit Accrual Basis denotes the basis on which the Ledger level interest accrual is calculated. You need to select the accrual factor to be applied when calculating the Ledger Level cost of funds. For instrument-level charges and credits, the accrual basis from the instrument record is always used.
When the Ledger Level charge/credit method is selected, the cost of funds is calculated using the following formula:
Cost of Funds = Balance x Assigned Transfer Rate x Charge/Credit Accrual Factor
Note:
The type of balance is determined by the TP Charge Credit Balance selection made within TP Application Preferences. Choices include Average Balance, Ending Balance, or Other Balance.Oracle Funds Transfer Pricing offers the following accrual basis options:
- 30/360: This is the default Charge/Credit Accrual Basis option. It applies the accrual basis calculation of 30 days divided by 360 days.
- Actual/360: Applies the accrual basis calculation of the number of days in the month divided by 360 days.
- Actual/Actual: Applies the accrual basis calculation of the number of days in the month divided by the number of days in the year.
- 30/365: Applies the accrual basis calculation of 30 days divided by 365 days.
- 30/Actual: Applies the accrual basis calculation of 30 days divided by the number of days in the year.
- Actual/365: Applies the accrual basis calculation of the number of days in the month divided by 365 days.
- Business/252: Applies the accrual basis calculation of the number of business days in the month divided by 252 days. A Holiday calendar selection is required if the business/252 accrual basis is selected. If the holiday calendar is not selected, the engine considers Accrual type ACT/ACT as a default for calculation.
Accrual Type A Calculation Selection Parameter and Migration Block Parameter. Users have the option to choose between Monthly and Daily charge/credit accrual. The default selection is Monthly. If Daily is selected, a holiday calendar is also required to determine the number of days to accrue. For example, on weekdays (Monday - Thursday), 1 day of accrual will be posted and on weekends (Friday), 3 days of accrual will be posted at Friday's rate. When additional holidays are encountered on any other day of the week, similar logic is applied to extend the number of accrual days accordingly. Currency Output A migration block parameter, allows you to select the output currency. Oracle Funds Transfer Pricing offers you the following currency output options:
- Entered and Functional Currency
- Functional Currency Only
For example, a bank's loan may have Yen as entered currency. However, the bank might use the US dollar to display its consolidated annual results. In this case, the US dollar is the functional currency. In other words, the currency in which an organization keeps its books is its functional currency.
Migration Dimensions Dimensions for which you want to migrate charges or credits, for funds provided or used, to the Management Ledger Table. Oracle Funds Transfer Pricing provides you with a Shuttle Control component to specify migration dimensions. Available Dimensions One of the two Shuttle Control windows, it contains the names of the dimensions available, in addition to the selected Product, for inclusion during the migration process. The dimensions available are:
- Common Chart of Account
- Organizational Unit
- GL Account
- Product
- Legal Entity
Note:
Only the Management Table processing key dimensions are available for inclusion during the migration process.Selected Dimensions One of the two Shuttle Control windows, it contains the names of the dimensions, in addition to the selected Product dimension that has already been selected for migration. Audit Options Within the Audit Options block, you have the option to output detailed cash flows. Select the checkbox to enable this option and define the number of instrument records for which you would like to output details. Note, the Administrator can limit the maximum number of instruments for which you can compute cash flows because this can be a time-consuming process. In any case, the maximum allowable value is 10,000 instruments.
In addition, the Enable FTP Audit Trail Output option allows you to select the relevant option to either reading the Audit Preference from the TP or Adjustment assumption rule or generating Audit Trail for all data. If you select the check box Enable FTP Audit Trail Output, then it is mandatory to select one of the options for the Audit Trail. When you select the Enable Audit Trail Output option, by default Read Audit Preferences from Assumption Rule is selected.
Freeze Process The freeze process block allows you to finalize the assumptions made in the Process definition flow or to clear all assumptions. - Complete standard steps for this procedure.
- Additional Steps to Specify Standard Transfer Pricing Process Parameters.
- Product Selection Block:
Figure 31-3 Standard Process Edit Mode
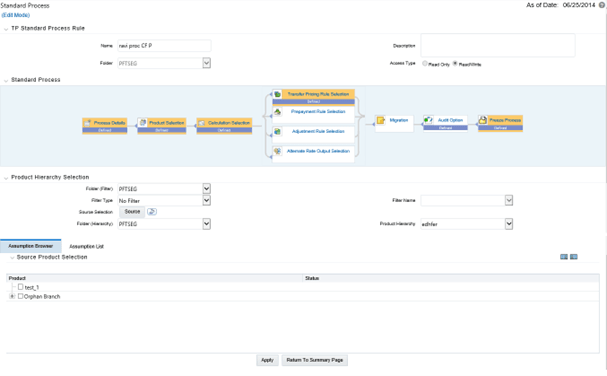
- Select a Product Hierarchy and select the nodes from the hierarchy corresponding to the data you want to include in the process, OR
- Alternatively, select the Source Selection button, and select the instrument tables corresponding to the data you want to include in the process.
- Select a Filter (optional), to constrain the data to be
included in the process. Filters work as a secondary constraint, applied
after the data set is determined based on Product Hierarchy member selection
or Source Selection.
Tip:
Before using the product hierarchy approach for selecting data to include in your process, there is a procedure that must be run (“PRODUCT TO INSTRUMENT MAPPING”). This procedure can be executed from the Batch Scheduler – Run - interface.The purpose of the Product to Instrument mapping procedure is to scan all instrument tables (FSI_D_xxx) and populate the mapping table (FSI_M_PROD_INST_TABLE_MAP) with a listing of the product dimension members that exist within each instrument table. When you select Products (parents or children) within an ALM or FTP process definition, the process refers to this mapping table to identify the instrument tables to include in the process.
It is recommended that you establish an internal process whereby this procedure is executed after every data load to ensure that mappings are up to date. For more information on the Product to Instrument mapping procedure, see OFS Data Model Utilities User Guide.
- Select Source from Source Selection.
You can select both Ledger Stat and New Management Ledger Table at the same time. You can select only one Ledger Table per FTP process, either Ledger Stat or the Management Ledger. Multiple Instrument tables are allowed as usual. The engine is using the selected Ledger Table for both Direct Transfer Pricing of Ledger Balances and Ledger Migration. Therefore, the engine will work only on one Ledger Table, not on multiple within any single FTP Process.
- Select Apply.
- Calculation Selection Block:
Figure 31-4 Calculation Selection
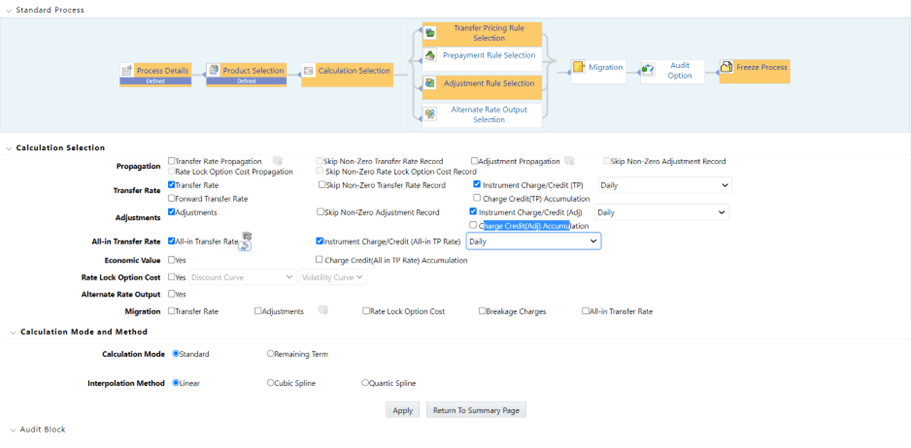
- Select one or more calculation elements required for the process. You must select at least one calculation item from Transfer Rate, Adjustments, Propagation, Economic Value, or Migration.
- Choose Skip Non-Zero rates (optional) if you have already populated Transfer Rates or Adjustments through a separate process.
- Implied forward rates are used for Transfer Pricing forward starting
instruments when the "Forward Transfer Rate" calculation selection is
checked. Additionally, two conditions in the data must be met for implied
forward rates to be used:
Commit Start Date <= As-of-Date
Origination Date > As-of-Date
- If the Output Forward Rates option is selected in the Audit Block, the Forward Rates are written to an Audit table FSI_IMP_FWD_RATES_AUDIT.
- Choose the Charge/Credit Calculation (optional), to calculate and output the
Instrument level TP charges and credits. If you select the Instrument
Charge/Credit Option, you must also choose between Monthly and Daily
charge/Credit Accrual. The default selection is Monthly. If Daily is
selected, a holiday calendar is also required (defined within the TP rule
for each applicable product/currency) to determine the number of days to
accrue. For example, on weekdays (Monday - Thursday), 1 day of accrual will
be posted and on weekends (Friday), 3 days of accrual will be posted at
Friday's rate. When additional holidays are encountered on any other day of
the week, similar logic is applied to extend the number of accrual days
accordingly.
A checkbox is also available for Charge Credit accumulation only for daily accrual; it will propagate yesterday’s accumulated Charge Credit to today's run based on the Holiday Calendar defined in TP/Adjustment rule if any. Today’s Charge Credit will be added to yesterday’s accumulated Charge Credit and populate the final value to today’s accumulated Charge Credit. If this accumulation flag is not selected, then the accumulated Charge Credit Column would just take today's Charge Credit Value, there would not be any accumulation using yesterday's accumulated Charge Credit.
Charge Credit accumulation is available for all types of (TP, Adjustment, and All_in_TP Rate) Migration of Accumulated Charge Credit to Management Ledger is not supported.
Users can define the Holiday Calendar in TP or the Adjustment Rule for each Product/Ccy combination. For conditional assumption, Holiday Calendar defined at Node Level will only be considered for accumulation; rather than the one provided at Conditional Assumption level.
- Choose Transfer Rate Propagation/Adjustment Propagation (optional) after
selecting Transfer Rate, to pull forward rates from a prior period based on
the Propagation Pattern definition.
If you select one or both of the "Instrument Charge/Credit" options for either Transfer Rate or Adjustments, together with Propagation, the process will additionally compute the Account Level Charge/Credit Amounts for the account records, which have propagated rates.
Note:
The Propagation process is independent of the Transfer Pricing and Skip non-zero selections. If you select the combination of Propagation + Transfer Pricing and skip non-zero in a single process, the propagation process will execute first pulling forward all rates for eligible instruments. If an instrument already has a TP Rate or Adjustment Rate, the Propagation Process will overwrite the existing value, unless you select the “Skip Non Zero” option on the Propagation line. After Propagation runs, then the remaining instruments will be Transfer Priced and the skip non-zero condition, from the Transfer Rate Line, is applied during this step. The same behavior applies to Adjustment Rate Propagation and calculation.When Adjustment calculation is selected together with Transfer Rate and TP Rate Propagation, then due to TP Propagation and TP Rate Calculation, the skip non-zero on the TP Rate column is implicitly applied. In this case, during calculation processing, the TP engine skips all records that have a Transfer Rate, even in the context of the Adjustment Rate calculation the Adjustment rate calculations may be missed. That means, when the TP Rate calculation and Adjustment Rate calculation options are selected together, the TP engine will process both assumptions in a single pass (to optimize performance To avoid this issue, users may need to create two separate Transfer Pricing Processes, one each for the Transfer Rate Calculation and another for the Adjustment Rate(s).
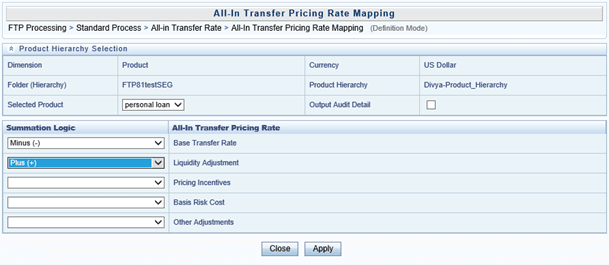
- Choose All-in Transfer Rate (optional) if you want the TP process to
calculate and post the All-in Transfer rate for each instrument record. This
option allows you to define the aggregation logic for combining any Add-on
Rates with the base Transfer Rate. When you select the search icon, you can
define for each product the rates to include in the calculation and the
related signage for each rate.
Figure 31-5 All-In Transfer Pricing Rate Mapping - Definition Mode
Note:
If you select the Output Audit Trail checkbox, the engine reads this option and generate the output audit data (ALL_IN_TP_RATE) at the time of processing. By default, this checkbox will be unchecked. - Choose Economic Value to calculate the Economic Value for each instrument
record. By default this optional calculation is unchecked.
- The user can choose to select 'Economic Value' individually or together with other calculation options.
- If the user selects only the 'Transfer Rate' calculation item, then in the 'TP Rule Selection' block, all TP rules, will be displayed.
- If the user selects only 'Economic Value', then in the 'TP Rule Selection' block, only TP rules where Economic Value Calculation inputs are defined (EV_INPUTS_DEFINED flag is on), will be displayed.
- If the user selects both 'Transfer Rate' and 'Economic Value', then in the 'TP Rule Selection' block, only TP rules where Economic Value Calculation inputs are defined (EV_INPUTS_DEFINED flag is on) will be displayed.
- It is also possible to select Economic Value together with Adjustments, Migration, Propagation, Alt Rate Output.
- Choose Rate Lock Option Cost to calculate the Option Cost for Rate Lock options. Rate Locks are commonly granted to users when they apply for mortgage loans and carry a term of 30, 60, or 90 days. These rate locks fix the interest rate on the loan for the duration of the lock period. Many times, lenders also offer a one-time option for borrowers to take a lower rate if market rates drop during the commitment period. The cost of this option can be calculated and should be charged by the treasury back to the line of business as an internal cost. See Chapter 30 for a full description of this functionality.
- Choose Alternate Rate Output Mapping (optional), to assign TP results to alternate columns.
- Choose Migration options (optional), if you want to include migration of your Transfer Pricing results, Breakage Charges, or Rate Lock Option Costs to the Management Ledger table.
- Choose the Calculation Mode. The default selection is Standard, which
applies traditional transfer pricing logic within the process. This entails
transfer pricing fixed-rate instruments from the Origination Date (or TP
Effective Date if provided) and transfer pricing adjustable-rate instruments
from the Last Repricing Date. If the remaining term is selected the
effective date for Transfer Pricing all instruments will be the current
“As-of-Date”.
Note:
If you are calculating Breakage Charges, using the Economic Loss Method, you must select the "Remaining Term" option, to generate the correct cash flows for the funding liability. - Choose the Interpolation Method to specify between Linear (default), Cubic Spline, and Quartic Spline methods.
- Select Apply.
Note:
On selecting a calculation element, you will notice the corresponding assumption rule blocks become mandatory (shaded blue).
- Rule Selection Block:
Figure 31-6 Standard Process - Rule Selection Block
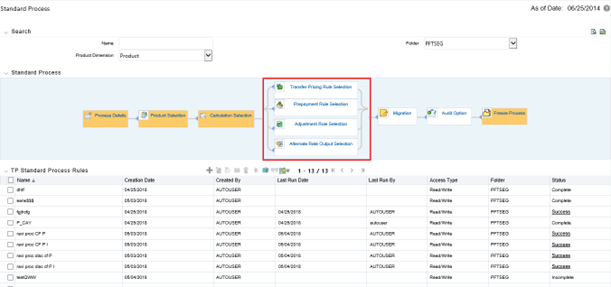
- Select the assumption rules corresponding to each calculation element. The blocks shaded blue are mandatory and the blocks shaded grey are optional.
- After selecting an assumption rule for each process block, select Apply to move on.
- Select Apply.
- Select Migration Parameters:
Figure 31-7 Standard Process - Migration Parameters
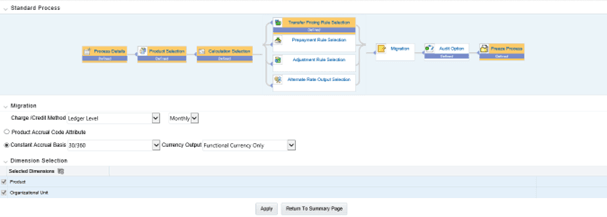
- Select the Migration Charge / Credit Method. Choose either Account Level or Ledger Level.
- Choose between Monthly and Daily charge/Credit Accrual. The default
selection is Monthly. If Daily is selected, a holiday calendar is also
required to determine the number of days to accrue. For example, on weekdays
(Monday - Thursday), 1 day of accrual will be posted and on weekends
(Friday), 3 days of accrual will be posted at Friday's rate. When additional
holidays are encountered on any other day of the week, similar logic is
applied to extend the number of accrual days accordingly.
Note:
The Accrual Type selection is only available for Account Level migration when the "Daily" accrual option is also selected on the Calculation Selection page. - If the Ledger Level Charge / Credit method is selected, then also specify the Accrual Basis source as either the Product dimension attribute or constant value.
- Select the Currency Output option. Choose either Functional Currency Only or Entered and Functional Currency.
- Select the Migration Dimensions.
On selecting the Dimension Selection button (see above), Oracle Funds Transfer Pricing provides you with a Shuttle Control component to select the dimensions for the migration process. The two areas of the Shuttle Control are Available Dimensions and Selected Dimensions. You can move dimensions from Available Dimensions into Selected Dimensions and vice versa by using the Move, Move All, Remove, and Remove All buttons.
- Select Apply.
- Audit Options:
Figure 31-8 Standard Process - Audit Options

- Select the Detailed Cash Flows option to output cash flow details for instrument records. This option is used for audit purposes when users want to validate the cash flows being generated by the cash flow engine for certain types of instruments.
- Select the Number of Records to include in Detail Cash Flows. This input is constrained by the FTP Application Preference setting and controlled by the Administrator. The selection of a large number of instrument records to include in detail cash flow output can result in a very time-consuming process. Within Transfer Pricing, the maximum value for the Number of Records input is 10,000.
- Select additional parameters for Detailed Cash Flows. The default values for the number of records is “Total Number” and “First n Rows”. It is also possible to specify the Number of Records per Product ID and Random selection as opposed to the First n.
- Select Implied Forward Rates to Output Relevant Rates to an Audit table.
This check box is active only when:
- The Forward Transfer Rate option has been selected in the Calculation Selection block.
- The Detailed Cash Flows check box is selected in the Audit block.
Implied Forward Rates will be output only for relevant forward starting instrument records, which apply to the ''Detailed Cash Flows'' selection. Therefore, the ''Number of Records'' input box is used for both ''Detailed Cash Flows'' and ''Implied Forward Rates''. It is recommended that users apply a data filter that will highlight specific instrument records that users would like to analyze via Audit output.Note:
Implied Forward Rates are output only for instrument records that have an Origination Date > As-of-Date. In this way, the Number of Records that have implied Forward Rates will always be <= the Number of Records included in Detail Cash Flow output. - Select Enable FTP Audit Trail Output to generate the Audit Data at the time of processing. You can select the relevant option for generating audit data for all the data or to read the audit preference from the assumption rule. When Audit Trail output is enabled, details will be written to the FSI_O_FTP_AUDIT_TRAIL table.
- Select Apply.
- Freeze Process:
Figure 31-9 Standard Process - Freeze Process

- Select Freeze to complete the process.
Note:
Embedded objects like Transfer Pricing, Prepayment or Adjustment Rules can be viewed or edited from the TP process UI itself. - Select Reset to erase all selections made previously within the Process Definition Flow.
- Select Confirm.