- User Guide
- Operations
- ECL and Amortization Processes
- ECL and Amortization Process Summary Page
- Create an ECL and Amortization Process
Create an ECL and Amortization Process
Perform the following steps to add an ECL and Amortization Process:
- On the ECL and Amortization Process Summary page, click the
Add icon to open the ECL and Amortization
Process window.
 This window contains four tabs that must be configured for a new ECL and Amortization Process:
- Process Details
- Source Data
- Calculation Elements
- Cash Flow Characteristic
- ECL Methods Mapping
- Populate the Process Details form as tabulated:
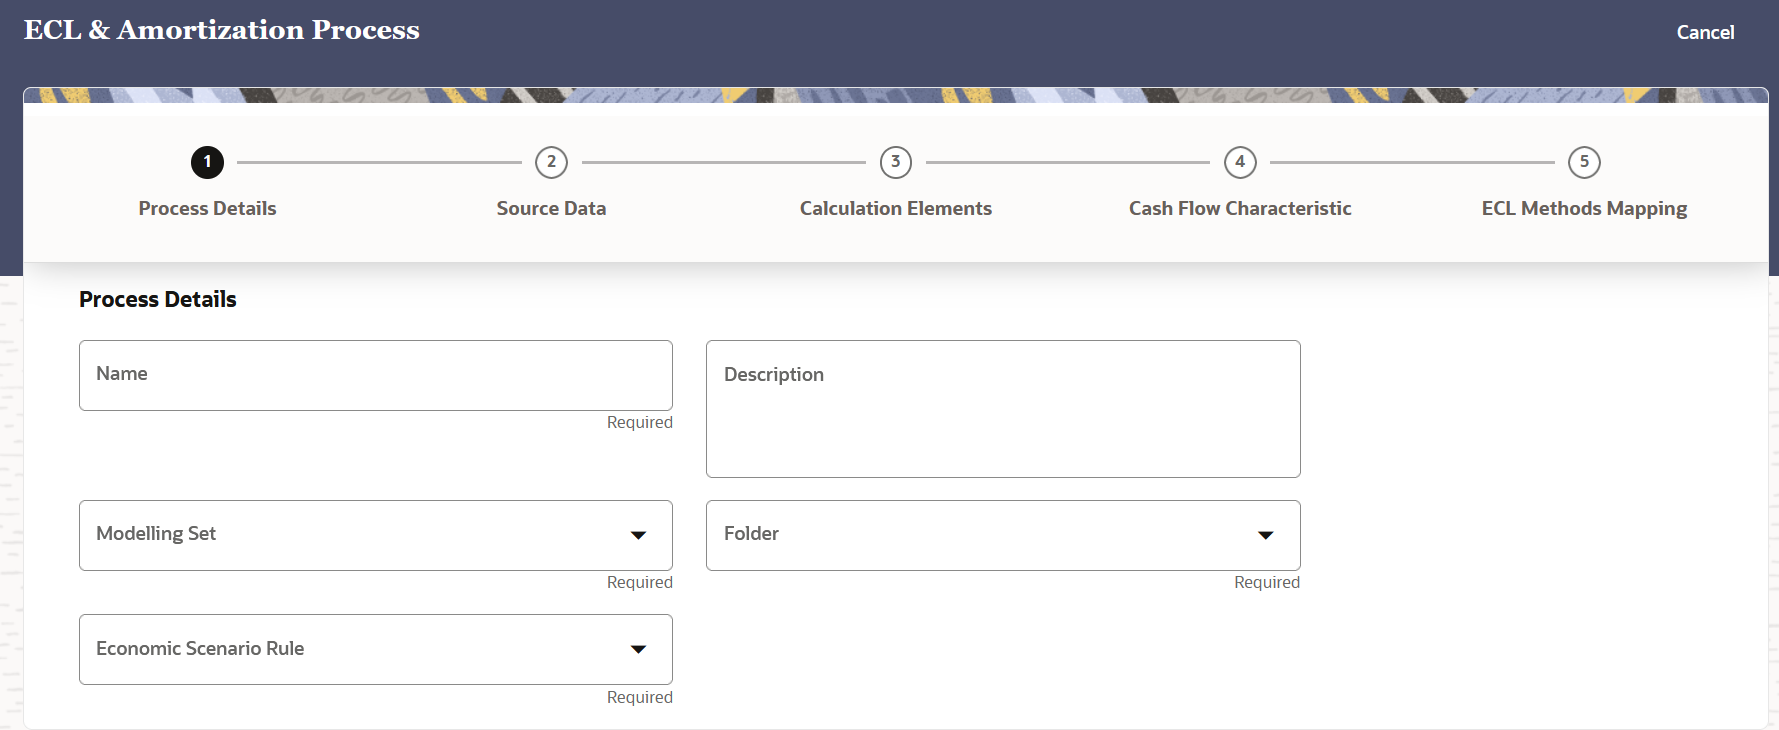
Option Description Name Enter a name for the ECL and Amortization Process definition. This is a mandatory field. Description Enter a description for the ECL and Amortization Process definition. Folder Select a folder from the drop-down list.This is a mandatory field. Modelling Set Select a Modelling Set from the drop-down list. This is a mandatory field. Economic Scenario Rule Select an Economic Scenario Rule from the drop-down list. This is a mandatory field. - Click Source Data.
- Populate the Source Data form as tabulated:
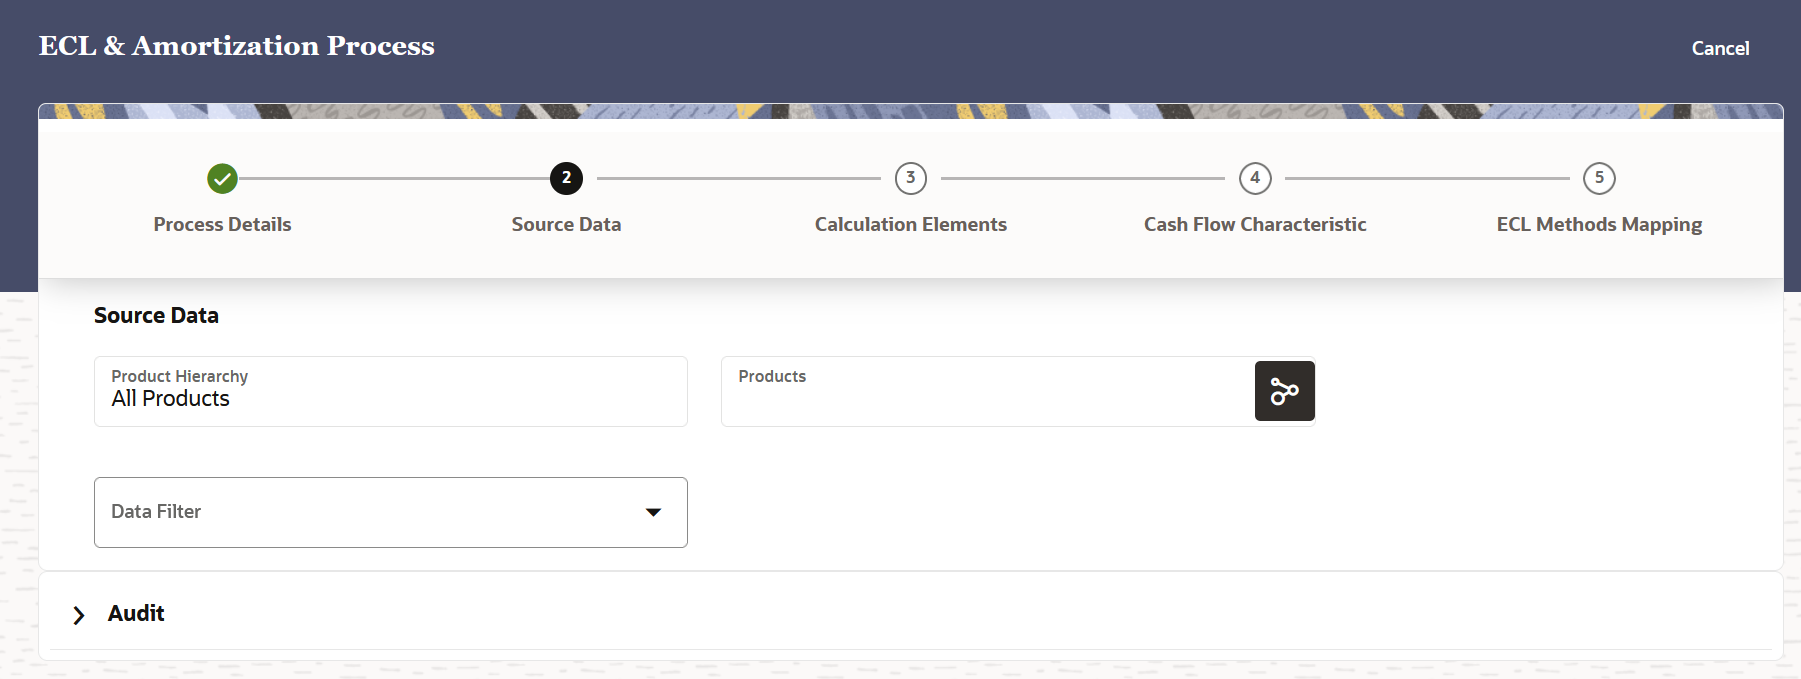
Option Description Product Hierarchy The product hierarchy is selected by defalut. Products Click the Products icon to open the Hierarchy Browser window. In this window select a member from the Avaliable Members section and then click OK. Note:
While defining CFE rules, we define the rule by using a product hierarchy. The same product hierarchy must be selected while defining the modelling set which is used in the ECL and amortization process. This step is mandatory in order for the rule to be available in the ECL and amortization process.Data Filter This field allows you to select a subset of data for processing by selecting a filter that was previously created. Select a data filter from the drop-down list. Note:
This service supports only the Data Element Filters. - Click Calculation Elements.
- Populate the Calculation Elements form as tabulated:

Option Description Compute EIR Enable this feature if you want to compute the EIR for the ECL and Amortization Process. Calculate Amortization Enable this feature if you want to calculate the ECL and Amortization for the ECL and Amortization Process. If this feature is disabled, then the EIR Computation Type section appears with the Origination Date and As of Date sliders.
Amortization Select an ECL and Amortization from the drop-down list. Origination Date Click the slider to disable or enable this field. This field is enabled by default. This field appears only if the Calculate Amortization field is disabled.
As of Date Click the slider to disable or enable this field. This field is enabled by default. This field appears only if the Calculate Amortization field is disabled.
- Click Cash Flow Characteristic.
- Populate the Cash Flow Characteristic form as tabulated:
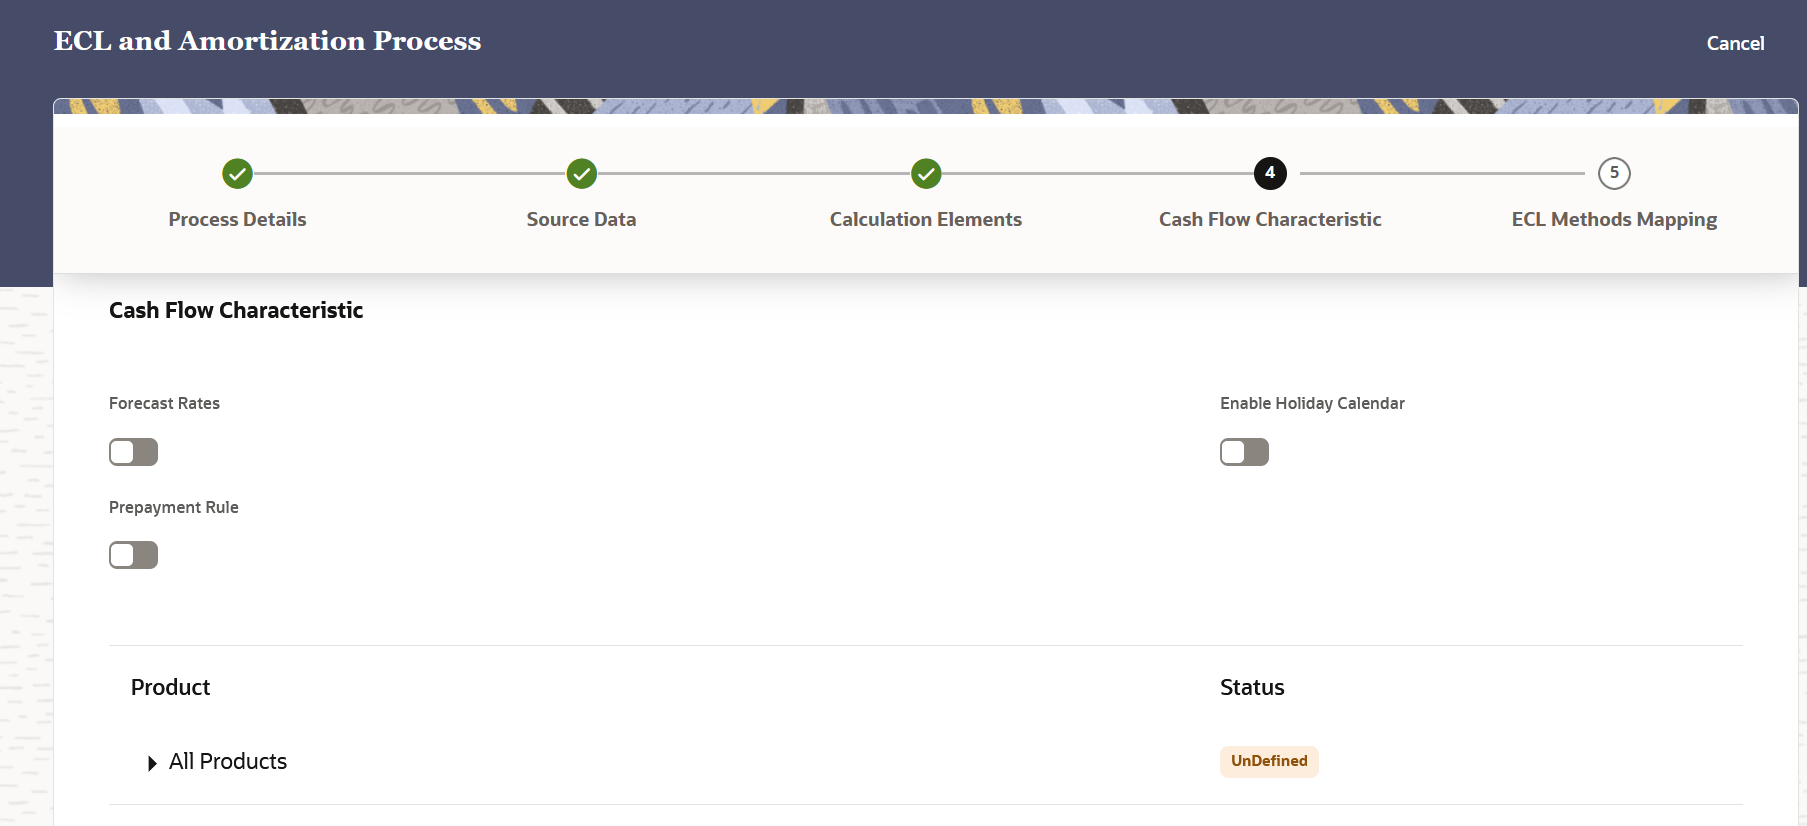
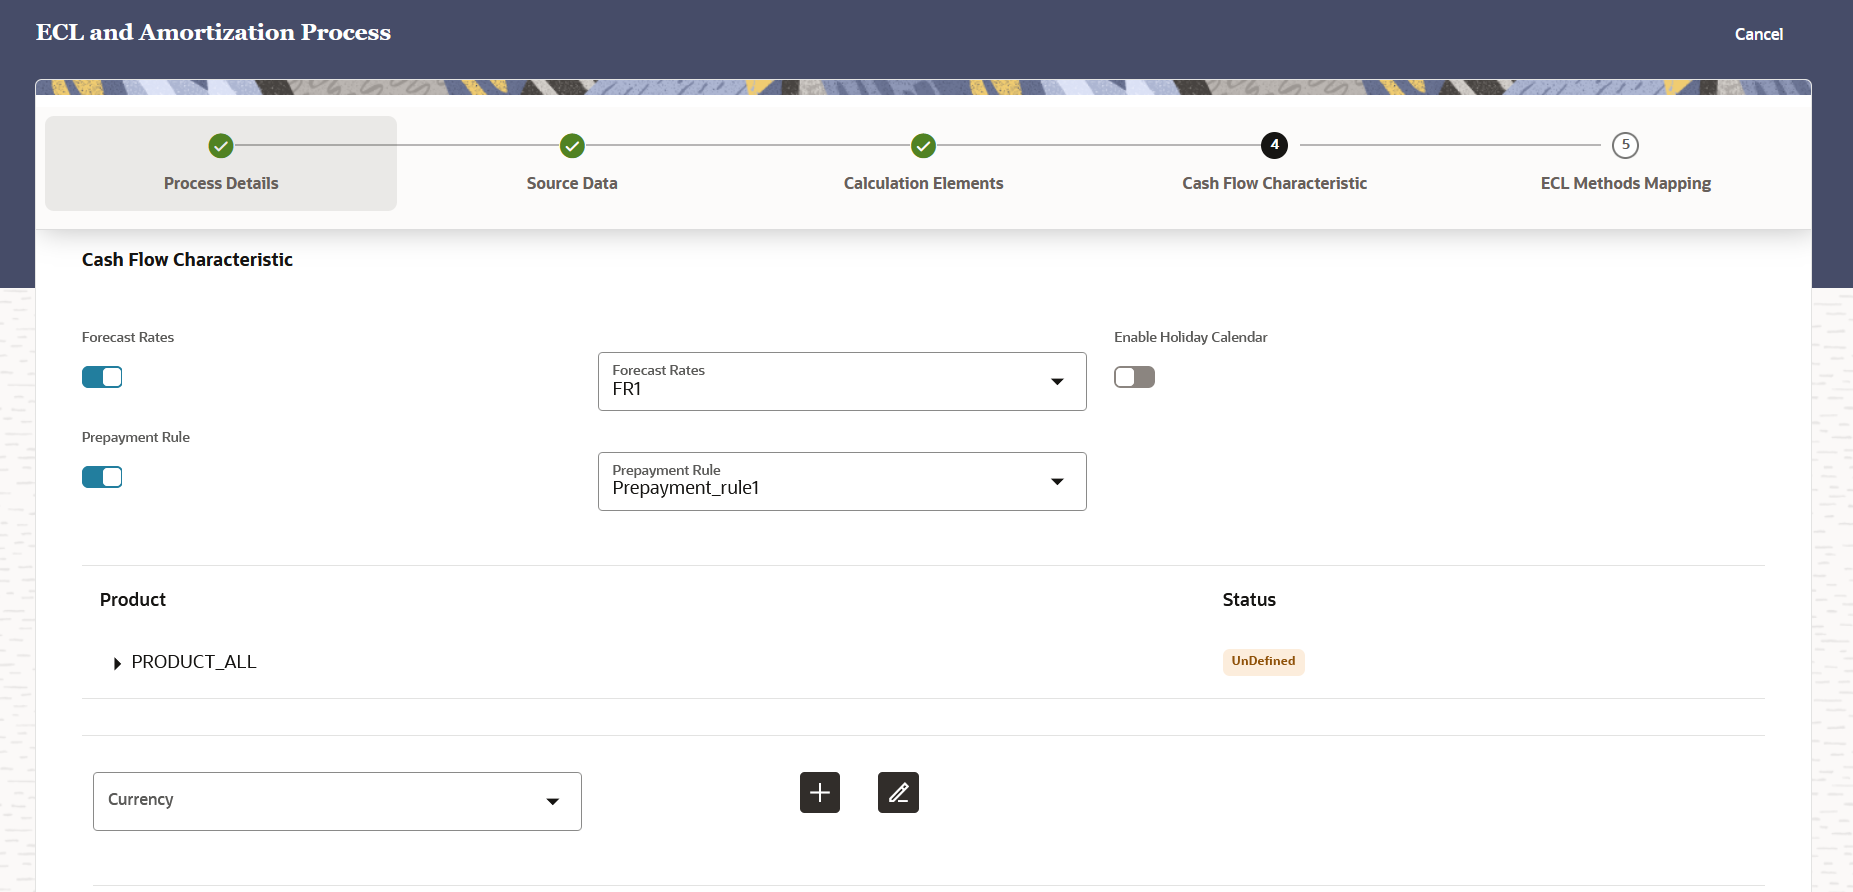

Option Description Forecast Rates Enable this feature if you want to enable the Forecast Rates. Forecast Rates (Drop-down) Select a forecast rate from the drop-down list. This field only appears if the Forecast Rates field is enabled.
See the Forecast Rate Scenarios to set up the rate scenarios. This is an optional step.
Enable Holiday Calendar Enable this feature if you want to enable the Holiday Calendar. By default, this field is disabled. If this field is enabled, then the cash flow dates falling on a holiday get adjusted as per defined conventions. You can also select the holiday calculation option, calendar, and business day convention at the product-currency level. See Holiday Calendar to set up a Holiday calendar scenario. This is an optional step.
Prepayment Rule Enable this feature if you want to enable the Prepayment Rule. Prepayment Rule (Drop-down) Select a prepayment rule from the drop-down list. This field only appears if the Prepayment rule field is enabled.
Products In this pane, click the Expand icon to view the list of all the products. Click the Expand icon adjacent to each product to define it in the Currency field. Currency (The label of this drop-down changes depending on the selected product from the Products field.) Select a Currency from the drop-down list. Click the Add icon after defining the Include Accrued Interest, Interest Credited, and Model with Gross Rates fields. Include Accured Interest Select either Yes or No as the status of Include Accrued Interest. It is the basis on which the interest accrual on an account is calculated.
Interest Credited Select either Yes or No as the status of Interest Credited. This option shows the interest payments to be capitalized as principal on simple or non-amortizing instruments.
Model with Gross Rates Select either Yes or No. If the institution has outsourced loan serving rights for some of the assets (most typically mortgages), the rates paid by customers on those assets (gross rates) are greater than the rates received by the bank (net rates). For these instruments, both a net and gross rate is calculated within the cash flow engine and both gross and net rate financial elements are the output. The gross rate is used for prepayment and amortization calculations. The net rate is used for income simulation and the calculation of retained earnings in the auto-balancing process.
Holiday Calendar Option Select a value from the drop-down list. The available options are: - Shift Dates Only
- Recalculate Payment
This option is only available if the Enable Holiday Calendar slider is enabled.
Holiday Calendar Select a value from the drop-down list. This option is only available if the Enable Holiday Calendar slider is enabled.
Holiday Rolling Convention Select a value from the drop-down list. The default value is Unadjusted and is enabled, only when Holiday Calendar is selected. This field can have the following values: - Unadjusted: Payment on an actual day, even if it is a non-business day.
- Following business day: The payment date is rolled to the next business day.
- Modified following business day: The payment date is rolled to the next business day unless doing so would cause the payment to be in the next calendar month, in which case the payment date is rolled to the previous business day.
- Previous business day: The payment date is rolled to the previous business day.
- Modified previous business day: The payment date is rolled to the previous business day unless doing so would cause the payment to be in the previous calendar month, in which case the payment date is rolled to the next business day. Many institutions have month-end accounting procedures to use this.
This option is only available if the Enable Holiday Calendar slider is enabled.
Add Click this button to add the defined currency for a product to the table below. Update Additionally, click the Update icon to see the updates in the table based on changes. delete Click this icon to delete a currency entry.
The defined products appear in the list.
- Click ECL Methods Mapping.
- Populate the ECL Methods Mapping form as tabulated:
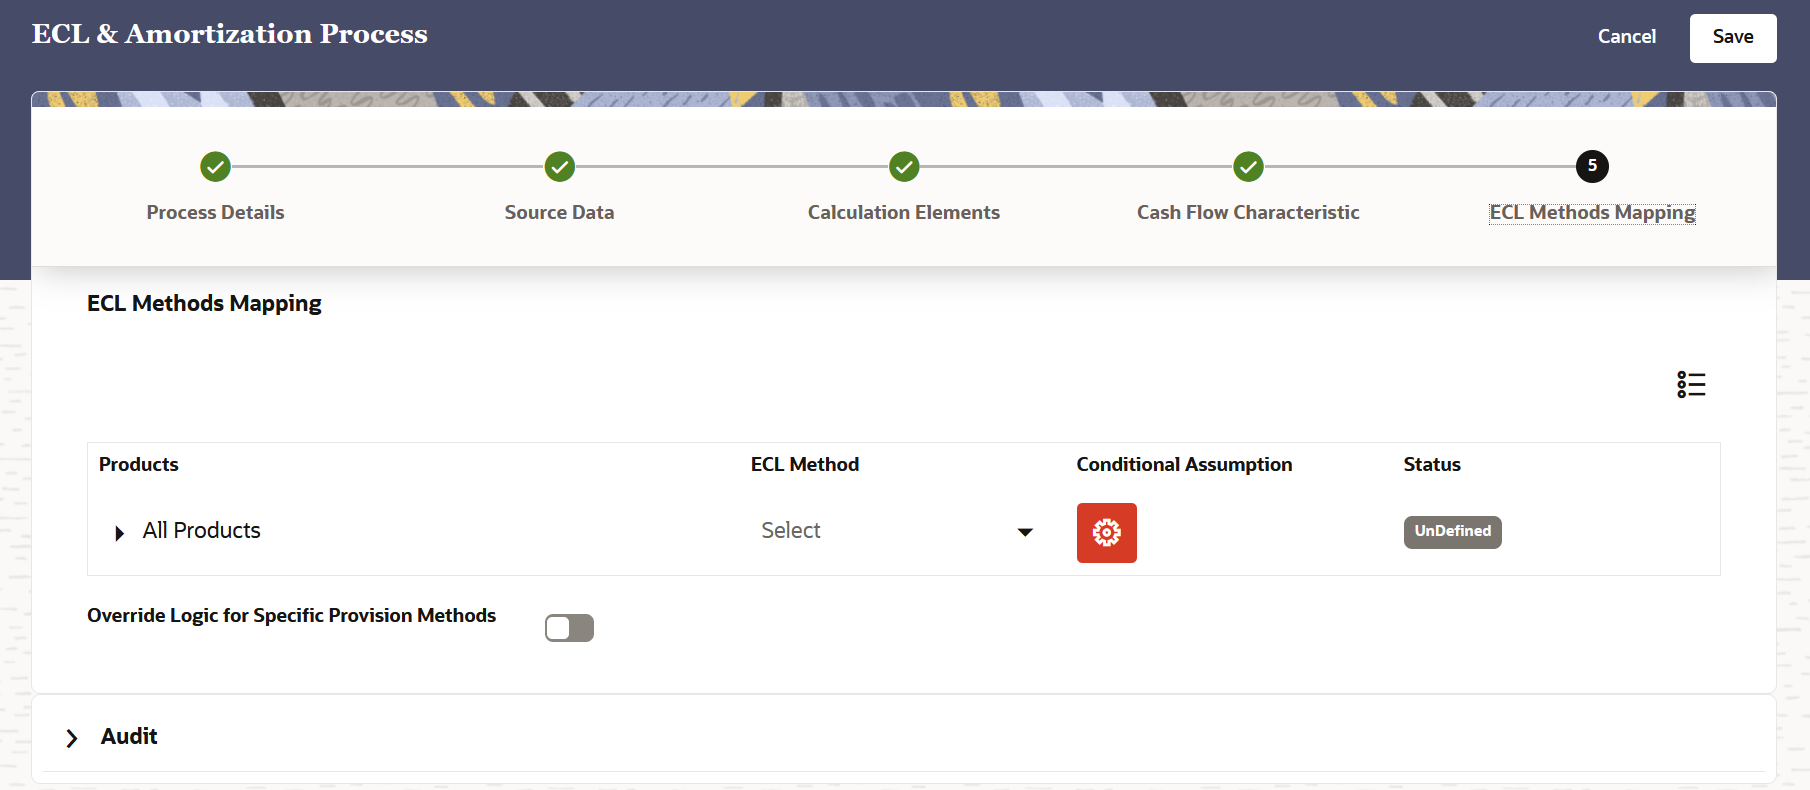
Option Description All Products Select the arrow adjacent to this label to expand the list of products. ECL Method Select an ECL Method from the drop-down list. Conditional Assumption Click the Conditional Assumption icon to open the Conditional Assumption window. Configure the conditional assumptions: - Select a customer type from the Customer Type drop down
list.
The customer type table is automatically populated with the selected customer type.
- Select a method from the ECL Method drop-down list.
- Select the arrow adjacent to the customer type to
display the industry and ECL method that you want to define for
this conditional assumption.
A grid is displayed with the the dimension that was selected in the Modelling Set and ECL Method columns.
- Select the dimension that was selected in the Modelling Set. For example if Industry was selected, then select a value from the Industry drop-down list drop-down list.
- Select an ECL method from the ECL Method drop-down list.
- Additionally click the Add icon to add and configure
additional industries and ECL methods for the conditional
assumption.
To delete an entry, select the desired rows and then click the Delete icon.
- Click Apply.
The status of this row changes to 'Defined'.
Override Logic for Specific Provision Methods Click this slider to enable the override logic for a specific provision method. The accounts that fall under the categories defined under the override logic for a specific provision method, will get the Lifetime PD %, 12 Months PD % and Undrawn Amount values overridden as specified on this UI.
- Select a Stage from the IFRS 9 Stage
drop-down list.
The default stage is Stage 3. Multiple stages can be added to this field.
- Enable the POCI Account slider if you want to add the override logic for POCI Accounts.
- You can modify the values in the Lifetime PD
%, 12 Months PD % and Undrawn Amount (in
%) fields.
Note:
If the percentages are changed in the Lifetime PD %, and 12 Months PD % fields, the values will be overridden with the % provided. For the Undrawn Amount (in %) field, if a percentage is added, then the undrawn amount is overridden with that percentage of the original value of the undrawn amount. For example, if 0% is provided in undrawn amount as a value then 0% of the undrawn amount is considered for the ECL calculation.
- Select a customer type from the Customer Type drop down
list.
- Click Save.