Run or Execute the Batches
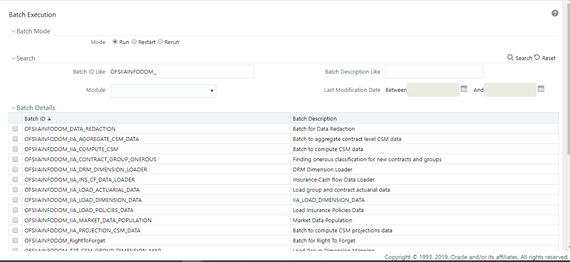
- In the Batch Mode pane, select Run
to open the Batch Details pane.
Figure 14-1 The Batch Details pane

- Select the checkbox adjacent to the Batch ID that has to be executed. You must
execute the following batches in the sequence specified in the following
table:
Table 14-1 The Sequence to execute the Batches
Execution Order Run Name or Batch Id 1 <INFODOM>_IIA_DRM_DIMENSION_LOADER 2 <INFODOM>_IIA_LOAD_DIMENSION_DATA
After you load this batch, to map the insurance scenario number used in your STG table to the required insurance scenario type, you must perform the following steps:
- Navigate to Common Object Maintenance, select Dimension Management, and then Member.
- In the Dimension drop-down, select Insurance Scenario and then click Edit.
- Map the Insurance Scenario with the required Insurance Scenario Type Attribute.
- Click Save.
The Insurance Scenario is mapped with the Insurance Scenario Type Attribute.
3 After you complete the preceding steps, continue executing the following batches.
<INFODOM>_IIA_FISCAL_PERIOD_DATA_LOADER
This batch moves the data into DIM_FISCAL_PERIODS from FSI_FISCAL_PERIOD_SETUP.
4 <INFODOM>_T2T_CSM_GROUP_DIMENSION_MAP 5 <INFODOM>_IIA_INS_CF_DATA_LOADER 6 <INFODOM>_IIA_LOAD_POLICIES_DATA 7 <INFODOM>_IIA_MARKET_DATA_POPULATION 8* <INFODOM>_INPUT_VARIABLE_CALC_<LIABILITY_CALCULATION_ID>
This batch only appears in the Batch Execution screen once a Liability Calculation Definition is created in the application.
9* <INFODOM>_IIA_CALCULATION_<LIABILITY_CALCULATION_ID>
This batch only appears in the Batch Execution screen once a Liability Calculation Definition is created in the application.
Note:
If your template contains multiple FIC_MIS_DATEs, then the batches <INFODOM>_INPUT_VARIABLE_CALC_<LIABILITY_CALCULATION_ID> and <INFODOM>_IIA_CALCULATION_<LIABILITY_CALCULATION_ID> must be executed in the following sequence:
- For the first FIC_MIS_DATE, execute the <INFODOM>_INPUT_VARIABLE_CALC_<LIABILITY_CALCULATION_ID> batch and then the corresponding FIC_MIS_DATE <INFODOM>_IIA_CALCULATION_<LIABILITY_CALCULATION_ID> batch.
- If the OFS PFTI application has been installed, then for the first FIC_MIS_DATE, execute the <INFODOM>_INPUT_VARIABLE_CALC_<LIABILITY_CALCULATION_ID> and then trigger the allocation rule for the same FIC_MIS_DATE
- For the second FIC_MIS_DATE, execute the second FIC_MIS_DATE <INFODOM>_INPUT_VARIABLE_CALC_<LIABILITY_CALCULATION_ID> batch and then execute corresponding second FIC_MIS_DATE <INFODOM>_IIA_CALCULATION_<LIABILITY_CALCULATION_ID> batch.
- If the LC contains versions, the original batch is applicable for both (<INFODOM>_INPUT_VARIABLE_CALC_<LIABILITY_CALCULATION_ID> and <INFODOM>_IIA_CALCULATION_<LIABILITY_CALCULATION_ID>) all versions.
- In the Batch Details pane, click
Schedule Batch to define a new batch or modify a
pre-defined Batch Schedule.
For more information, see the Batch Scheduler section in the OFS Analytical Applications Infrastructure User Guide.
- In the Task Details toolbar, click
Exclude or Include to exclude
or include a task, or click Hold or
Release to hold or release a task before executing
the batch.
For more information, see the Modify Task Definitions of a Batch section in the OFS Analytical Applications Infrastructure User Guide.
- Specify the Information Date (mandatory) by
clicking the calendar icon. The specified date is
recorded for reference.
Note:
You can also modify the required task parameters of the selected Batch and include the changes during the Batch Rerun. For more information, see the Specify Task Details in the OFS Analytical Applications Infrastructure User Guide. - Click Execute Batch and then select
OK to confirm the batch execution.
An information dialog appears indicating that the batch execution was successful. Repeat steps 2 to 6 for all the batches mentioned in step 2.