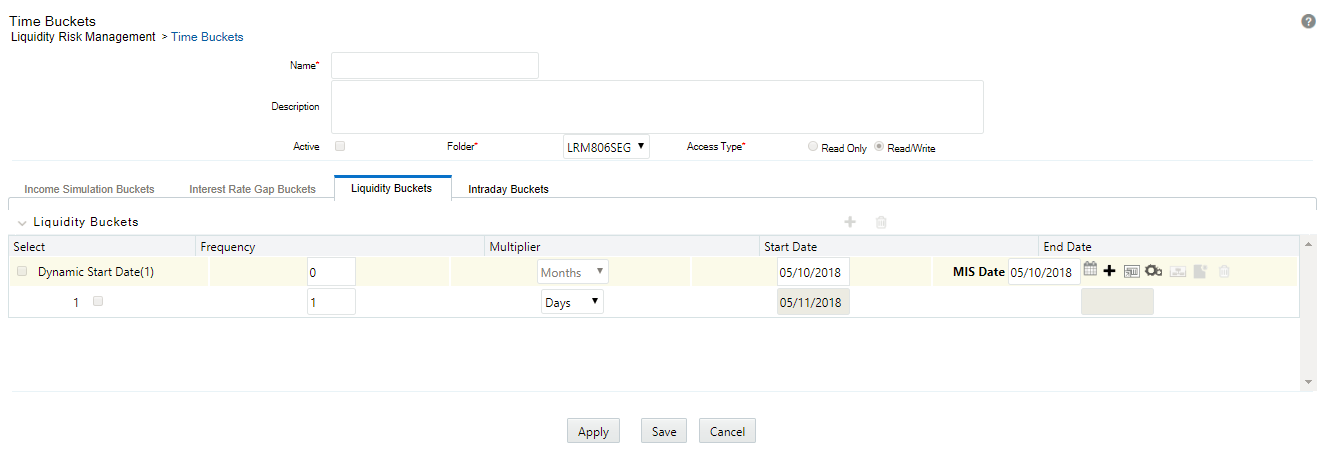
7.1.5 Defining a New Time Bucket
- In Oracle Financial Services Analytical Applications Infrastructure home screen select, Financial Services Liquidity Risk Management.
- To open the Time Buckets window, select Liquidity Risk Management, then select Time Buckets on the Left-Hand Side (LHS) menu.
- Click the

button. The Time Bucket Details – New window is displayed. Perform the following steps:
- Enter the time bucket definition Name.
- Enter the time bucket Description.
Note:
Active option and dynamic start date selection is disabled for LRM users. - Select the Folder from the drop-down list.
- Define the Frequency (number of days) and Multiplier (Dates/Months/Years).
Note:
The time buckets tab name must be Liquidity Buckets for the purpose of defining time buckets used in LRM. - Click the

icon to select the Start Date from the MIS Date format. - You are allowed to add the bucket rows in the following ways:
- Click

icon to add individual bucket rows and specify the frequency and multiplier.Or,Add multiple bucket rows by clicking

icon. Clicking the
icon displays
where you can select 3, 5 or 10 pre-specified bucket rows to be added or add a custom number of rows by specifying the number and clicking
. In this case, frequency and multiplier must be specified by the user individually for each bucket row added.Or,
- Specify multiple time buckets of varying lengths by clicking

icon. It opens up a window that allows you to specify multiple time buckets in a single instance as a combination of number of buckets, frequency and multiplier as illustrated below.Figure 6-1 Time Bucket Liquidity Buckets

- Click
- Click the

icon to add new rows. Each row allows you to specify the number of buckets of a particular size to be generated. In the above example, you can define 10 one day buckets by specifying the number of buckets as 10, the bucket size frequency as 2 and bucket size multiplier as ‘days’. The application automatically generates 10 rows of time buckets, each with a bucket size of 2 days as part of the level 0 bucket definition. - Click OK. The application saves the bucket definition and the defined time bucket appears in the time bucket summary window.
Once you define Level 0 time buckets, you are allowed to create multiple levels for this definition up to a maximum of 5 levels inclusive of level 0 buckets. This is optional. The time bucket definition is still saved with one level.
- Once you define Level 0 time buckets, to define multiple bucket levels click Apply. The Time Bucket Grouping icon is now enabled to create less granular time bucket levels.
- Click

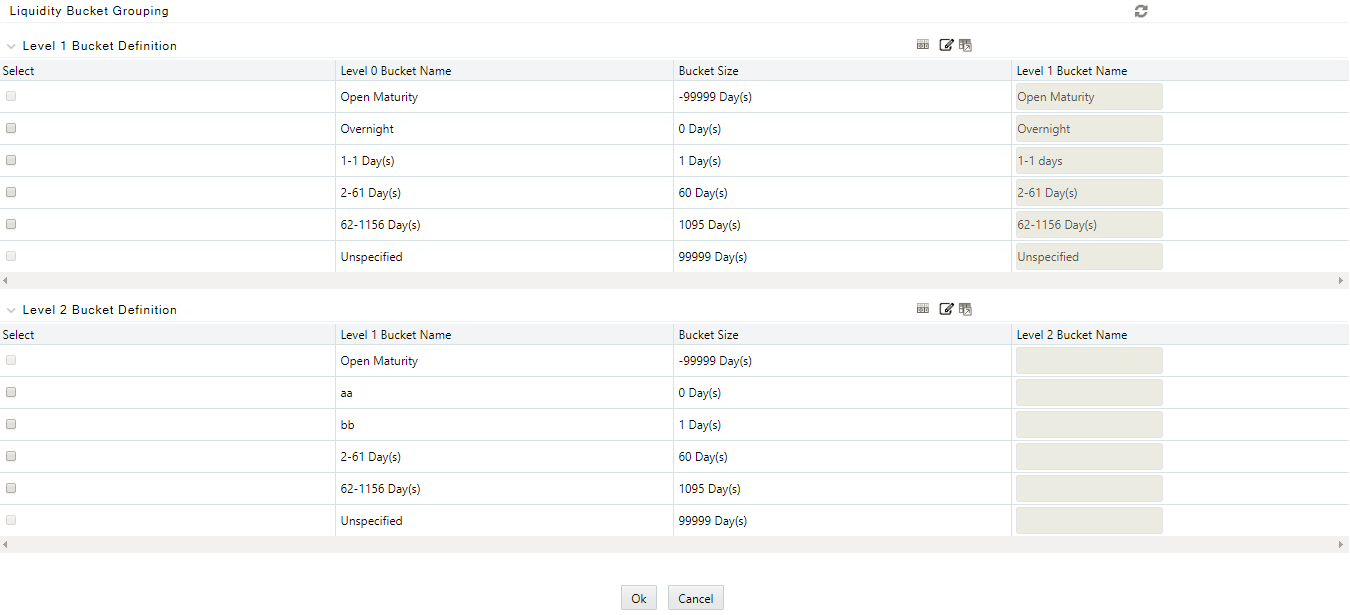
icon. The Liquidity Bucket Grouping window is displayed.Figure 6-2 Liquidity Bucket Grouping

- Click

against a time bucket and click
to group the time buckets. You can select multiple time buckets which form a single higher level bucket at a single instance by clicking the last time bucket. A dialog box is displayed to define the Level 1 Bucket name that is, a user-specified name for the higher level time bucket is created. - Enter the Node Name and then click OK. Repeat steps 10 and 11 to group the other level 0 buckets into level 1 bucket.
- Click

icon to reset all the levels defined for the time bucket definition. - Once all level 0 buckets are grouped, click the

icon to save the grouping. On clicking the
icon, the level 1 grouping is displayed in a new section named Level 2 Bucket Definition.The process of grouping level 1 bucket to level 2 buckets is similar to that detailed in points 10 through 12. - Once you have defined your multi-level time buckets, click OK to save the definition. The hierarchy for the specified time bucket definition is now created and can be used for further computations.
Note:
- The application supports up to five levels.
- Multi-level time bucket definition is optional. Users are allowed to save the time bucket with level less than or equal to five.
- You cannot modify an intraday bucket to a liquidity bucket or vice-versa. You can only define one bucket at a time.