8.3.1 Defining a Contractual Run
The Run Management window allows you to define a new Run or create a new Run definition.
Figure 8-14 Run Definition - Contractual Run
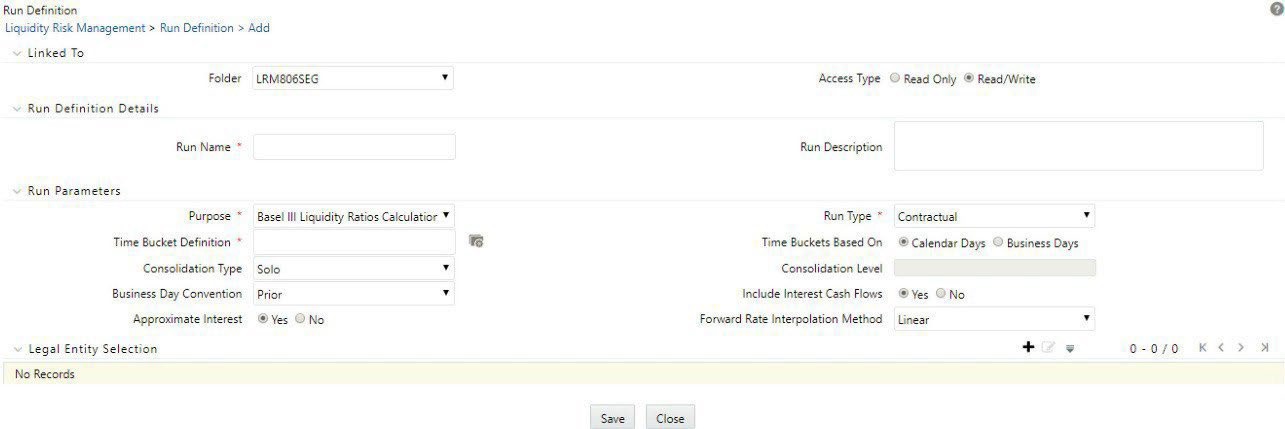
To define a Contractual Run, follow these steps:
- When the Run type is selected as Contractual and the purpose is selected as Basel III Liquidity Ratios Calculation or Long Term Gap Calculation follow these steps:
Figure 8-15 Run Definition – Contractual Run
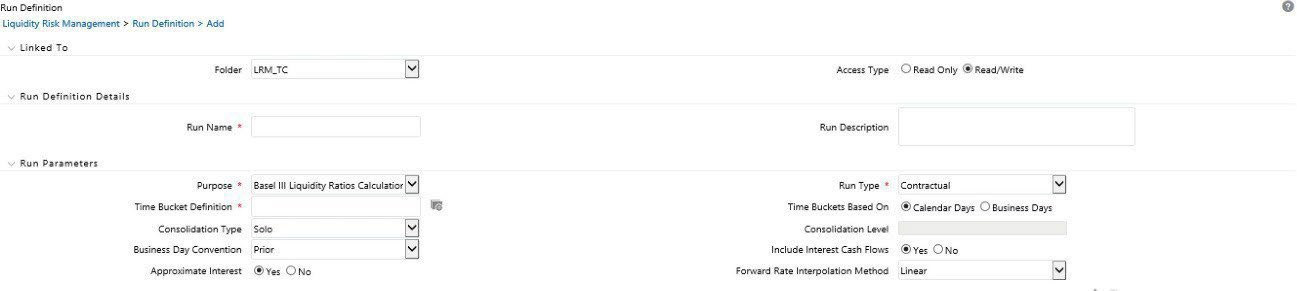
- In the Time Bucket Definition field, click to select the time bucket definition. The Time Bucket Definition browser displays the list of computational time buckets defined as part of the Time Bucket screen. Select the required time bucket definition and then click OK.
- In the Time Bucket Definition Based On field, select either Calendar Days or Business Days.
- Select Consolidation Type from the drop-down list. It is either Consolidated or Solo .
If you have selected Consolidation Type as Consolidated, in the Consolidation Level field, click the Copy Attribute icon to launch the Legal Entity browser for selecting the consolidation level. Select a legal entity, at which the consolidated liquidity risk measures are to be calculated, from the list of legal entities available in the Legal Entity browser.
This selection is applicable only when the Run Type is selected as Contractual Run and Consolidation Type is selected as Consolidated or Hybrid. If you have selected the Consolidation Type as Solo, then the Consolidation Level field is disabled.
- Select the Business Day Convention from the drop-down list. The drop-down list displays the following:
- Prior
- Conditional Prior
- Following
- Conditional Following
- No Adjustment
This is applicable only when Run Type is selected as Contractual Run.
- Select the Include Interest Cash Flows as either Yes or No.
Note:
- The Approximate Interest field is disabled if you select Include Interest Cash Flows as No.
- Select the Forward Rate Interpolation Method from the drop-down list. It is either Linear or Log Linear. This is applicable only when the Run type is selected as Contractual.
- When the Run type is selected as Contractual and the purpose is selected as FR 2052a Report Generation or FR 2052b Report Generation, follow these steps:
Figure 8-16 Run Definition – Business Assumption Selection
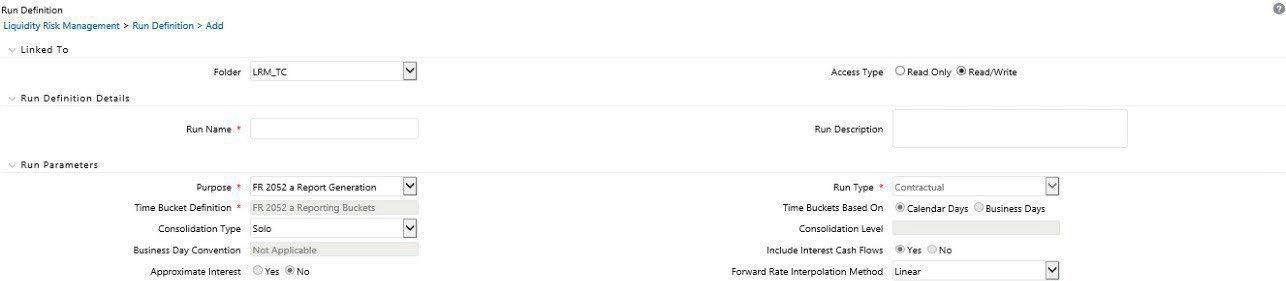
- Select the Consolidation Type from the drop-down list. It is either Consolidated or Solo .
- If you have selected Consolidation Type as Consolidated, in the Consolidation Level field, click the Copy Attribute icon to launch the Legal Entity browser for selecting the consolidation level. Select a legal entity, at which the consolidated liquidity risk measures are to be calculated, from the list of legal entities available in the Legal Entity browser. This is selection is applicable only when the Run Type is selected as Contractual Run and Consolidation Type is selected as Consolidated.
- If you have selected the Consolidation Type as Solo, then the Consolidation Level field is disabled.
- Select the Include Interest Cash Flows as either Yes or No
.
Note:
- The Approximate Interest field is disabled if you select Include Interest Cash Flows as No.
- Select the Forward Rate Interpolation Method from the drop-down list. It is either Linear or Log Linear. This is applicable only when the Run type is selected as Contractual.
- When the Run type is selected as Contractual and the purpose is selected as Intra-Day Metrics Calculation, follow these steps:
Figure 8-17 Run Definition – Save and Approval
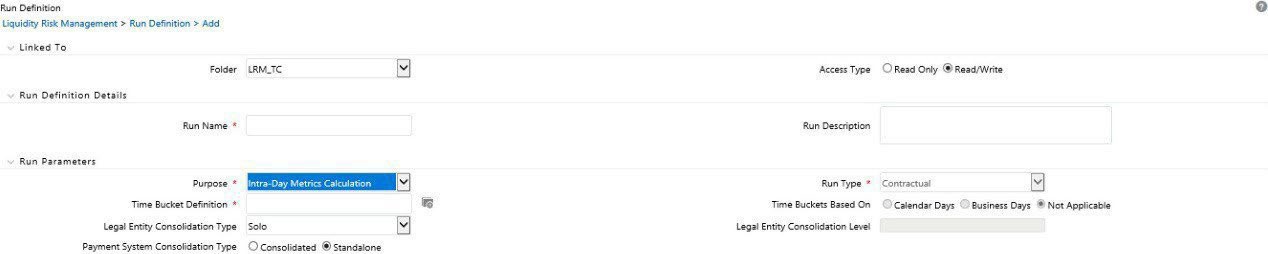
- In the Time Bucket Definition field, click the Copy Attribute icon to select the time bucket definition. The Time Bucket Definition browser displays the list of computational time buckets defined as part of the Time Bucket screen. Select the required time bucket definition and then click OK .
Note:
Only intraday buckets are listed under the list time bucket definitions section. - Select the Legal Entity Consolidation Type from the drop-down list. It is either Consolidated or Solo.
- If you have selected Legal Entity Consolidation Type as Consolidated, in the Legal Entity Consolidation Level field, click the Copy Attribute icon to launch the Legal Entity browser for selecting the consolidation level. Select a legal entity, at which the consolidated liquidity risk measures are to be calculated, from the list of legal entities available in the Legal Entity browser.
This selection is applicable only when the Run Type is selected as Contractual Run and Legal Entity Consolidation Type is selected as Consolidated. If you have selected the Consolidation Type as Solo, then the Legal Entity Consolidation Level field is disabled.
- Select Payment System Consolidation Type as either Consolidated or Standalone . By default, Standalone is selected.
- In the Time Bucket Definition field, click the Copy Attribute icon to select the time bucket definition. The Time Bucket Definition browser displays the list of computational time buckets defined as part of the Time Bucket screen. Select the required time bucket definition and then click OK .
- When the Run type is selected as Contractual and the purpose is selected as EBA Delegated Act Liquidity Ratio Calculation or Regulation YY Liquidity Risk Calculation or U.S Fed Liquidity Ratio Calculation, BOT Liquidity Ratio Calculation, BNM Liquidity Ratio Calculation, MAS Liquidity Ratio Calculation, or Minimum Liquid Asset Calculation follow these steps:
Figure 8-18 Run Execution Parameters Window
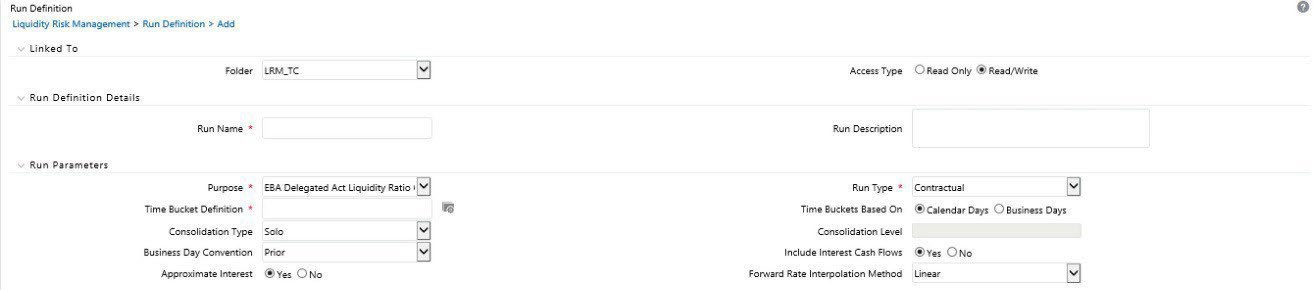
- In the Time Bucket Definition field, click to select the time bucket definition. The Time Bucket Definition browser displays the list of computational time buckets defined as part of the Time Bucket screen. Select the required time bucket definition and then click OK .
- In the Time Bucket Definition Based On field, select either Calendar Days or Business Days .
- Select the Consolidation Type from the drop-down list. It is either Consolidated or Solo .
- If you have selected Consolidation Type as Consolidated, in the Consolidation Level field, click the Copy Attribute icon to launch the Legal Entity browser for selecting the consolidation level. Select a legal entity, at which the consolidated liquidity risk measures are to be calculated, from the list of legal entities available in the Legal Entity browser.
This selection is applicable only when the Run Type is selected as Contractual Run and Consolidation Type is selected as Consolidated. If you have selected the Consolidation Type as Solo, then Consolidation Level field is disabled.
- Select the Business Day Convention from the drop-down list. The drop-down list displays the following:
- Prior
- Conditional Prior
- Following
- Conditional Following
- No Adjustment
This is applicable only when Run Type is selected as Contractual Run.
- Select the Include Interest Cash Flows as either Yes or No .
Note:
The Approximate Interest field is disabled if you select Include Interest Cash Flows as No. - Select the Forward Rate Interpolation Method from the drop-down list. It is either Linear or Log Linear. This is applicable only when the Run type is selected as Contractual.
- When the Purpose is selected as U.S Fed Liquidity Ratio Calculation , select Include Forward Date Calculations as either Yes or No . In case you select Yes , the following options are enabled:
- The Forward Balance Method Mapping Rule displays LRM - Balance Method Reclassification – Forecast selected as default.
- The Forward Cash Flow Method Mapping Rule displays LRM – Cash Flow Method Reclassification – Forecast selected by default.
- Select the Exclude Holidays as either Yes or No .
- Select the Balance Sheet Adjustment as either Yes or No .
- When you select Balance Sheet Adjustment as Yes, the Balance Sheet Adjustment Method option is enabled. Select one of the following from the drop-down list:
- Current Profile Based Increase
- Current Profile Based Decrease
- Cash Adjustment, Manual Adjustment
- The Balance Sheet Adjustment Rule displays LRM - Manual Balance Adjustment – Forecast is selected by default when the Balance Sheet Adjustment Method is selected as Manual Adjustment.
- Select the Fixed Interval Forward Date as either Yes or No .
- In First Forward Day Interval field , enter a value in terms of days.
- In the Forward Date Frequency field, enter a value which is a whole number greater than 0. From the drop-down list choose Days, Months or Weeks.
- In the Number of Forward Calculations field , enter a value which is a whole number greater than 0.
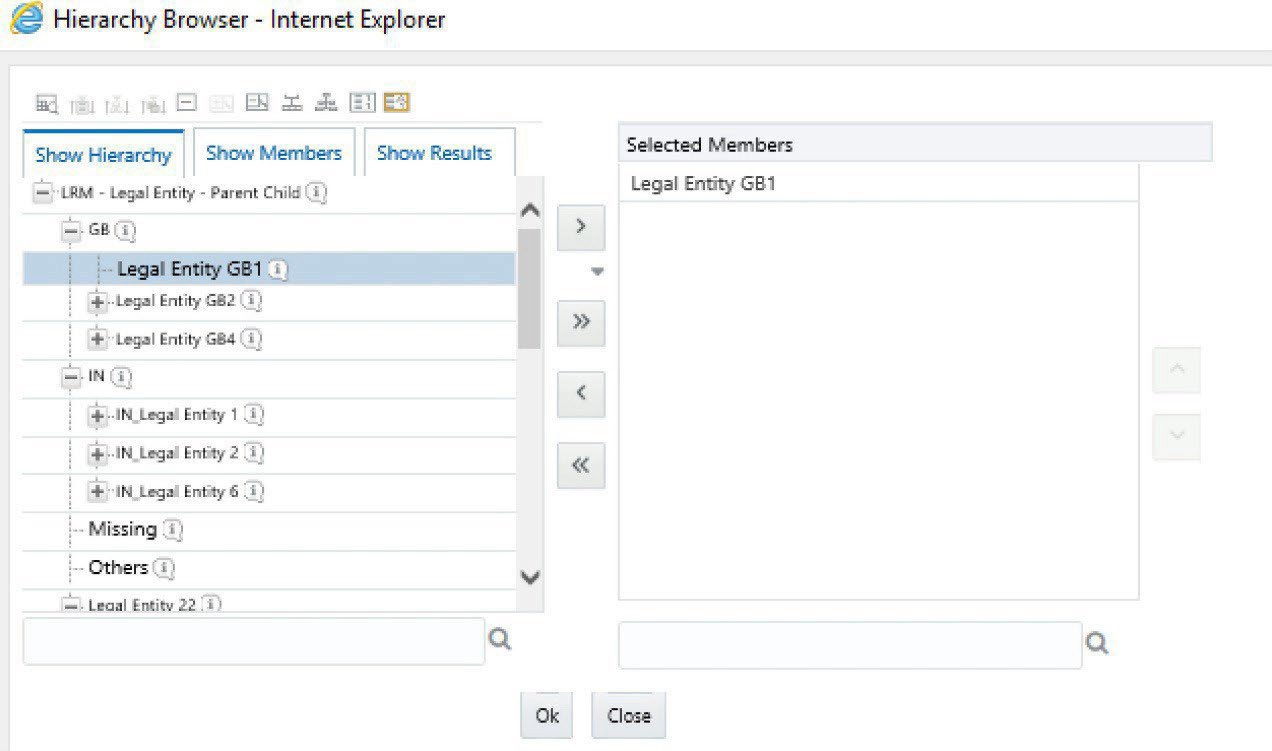
If you have selected consolidation type as Solo, in the Legal Entity Selection section, click the Add icon to select one or multiple legal entities from the Hierarchy browser and then click OK. The selected legal entities are listed under the Legal Entity Selection section. If you wish to add or edit thel egal entities click the Edit icon.
Figure 8-19 Run Definition – Hierarchy Browser
- When the Purpose is selected as EBA delegated Act Liquidity Ratio, the field Time Bucket Type is displayed. Select either Actual or Calendar Based.
- When the Purpose is selected as U.S Fed Liquidity Ratio Calculation or BIS III Liquidity Ratio Calculations and you have included the Include Forward Date LCR Calculations, perform these additional steps:
- When the Fixed Interval Forward Date is selected as No , the Ad Hoc Forward Date Selection section is available for selection. Follow these steps:
- Click the Add icon to add one or multiple dates.
- Click the Calender icon to select the calendar dates.
Note:
This section is enabled only when the Fixed Interval Forward Date is selected as No
- When Include Forward Date Calculations is selected as Yes, and all the other parameters are selected the Forward Cash Flow Calculation Business Assumptions section is available for selection. Follow these steps:
- Click the Add icon to select one or multiple business assumptions from the Business Assumptions browser and then click OK. The selected business assumptions are listed under the Forward Cash Flow Calculation Business Assumptions section. If you wish to add or edit the business assumptions click the Edit icon.
Figure 8-20 Run Execution Summary
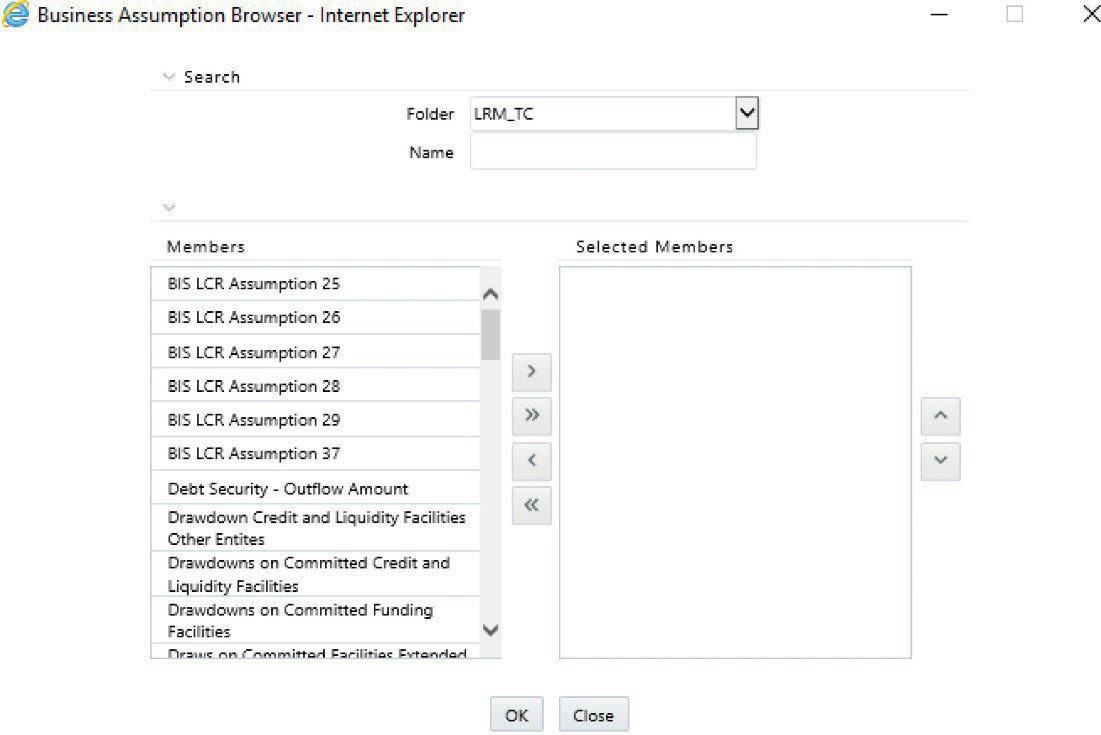
- Click the Add icon to select one or multiple business assumptions from the Business Assumptions browser and then click OK. The selected business assumptions are listed under the Forward Cash Flow Calculation Business Assumptions section. If you wish to add or edit the business assumptions click the Edit icon.
- When the Fixed Interval Forward Date is selected as No , the Ad Hoc Forward Date Selection section is available for selection. Follow these steps: