6.3 Understanding the Time Buckets Summary
- To open the Time Bucket Summary window, select Liquidity Risk Management, then select Time Bucket Summary on the Left-Hand Side (LHS) menu.
Figure 6-7 Time Buckets Summary
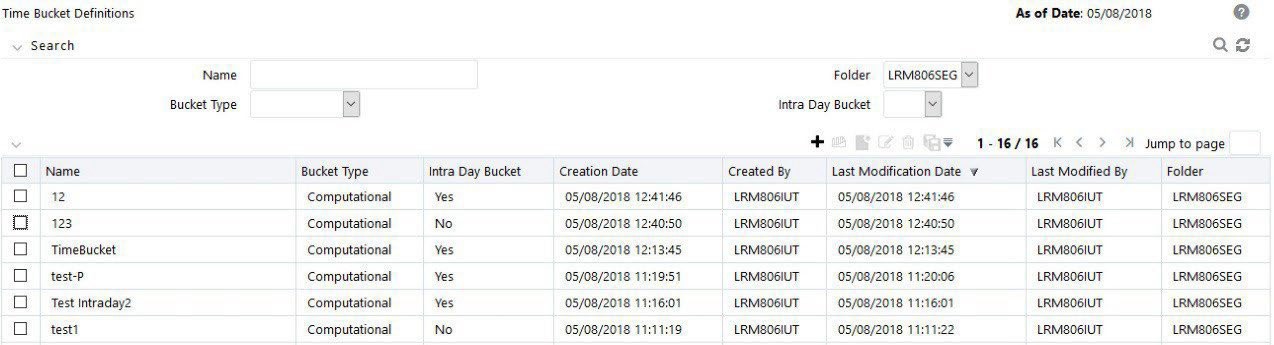
The Time Bucket Summary window displays the following fields. The definitions based on the search criteria are listed under the list of Time Buckets.
This is the search section, which contains multiple parameters. You can specify one or multiple search criteria in this section. When you click Search, depending upon the search criteria, it filters and displays the relevant search combination parameters under the Time Bucket summary as a list.
Table 6-5 Time Bucket Fields and Descriptions
Field or Icon Description Search This icon allows you to search the time buckets based on the search criteria specified. Search criteria include a combination of the Time Bucket Name, Folder, and Bucket Type. The time buckets displayed in the list of time bucket tables are filtered based on the search criteria specified before clicking this icon. Reset This icon allows you to reset the search section to its default state that is, without any selections. Resetting the search section displays all the existing time bucket definitions in the list of time buckets table. Name This field allows you to search the pre-defined time bucket definitions based on the time bucket name. Enter the time bucket name. Folder This drop-down list allows you to search for the predefined time bucket definitions based on the selected folder you have access. The selection of a folder from the drop-down list displays only those time buckets that have been defined within the selected folder or segment in the List of Time Bucket table. Bucket Type This drop-down list allows you to select either Computation and Reporting. Intra Day Bucket This drop-down list allows you to search for Intraday buckets, Non-intraday buckets, and both. If a ‘Yes’ is chosen, only Intraday buckets are searched and displayed. If a ‘No’ is chosen, Non- intraday buckets are searched and displayed. By not selecting from this drop-down list in the search criteria, the Application searches and lists both Intraday and Non-intraday buckets. Table 6-6 Time Buckets Summary
Time Buckets Icon Name Icon Description Add Figure 6-8 Add icon

This icon allows you to define a new time bucket set. Create Reporting Bucket Figure 6-9 Create Reporting Bucket icon

This icon opens the Reporting Time Bucket window. The Level 0 buckets of the reporting time are the same as the selected time bucket. View Figure 6-10 View icon

This icon allows you to view the selected time bucket definition. Edit Figure 6-11 Edit icon

This icon allows you to edit the selected time bucket definition. Delete Figure 6-12 Delete icon

This icon allows you to delete the selected time bucket definition. Copy Figure 6-13 Copy icon

The icon allows the selected definition to be copied and resaved as a new definition. Note:
It is not possible to switch from Intraday buckets to non- intraday buckets and vice versa from the Time Bucket Summary window.