B.3 Post-installation Steps
After the installation of OFS PCD, follow these post-installation steps:
- Deploy war and test data execution:
- Deploy the war file and restart the servers.
- Create new user by logging in as sysadmn and authorize using sysauth user.
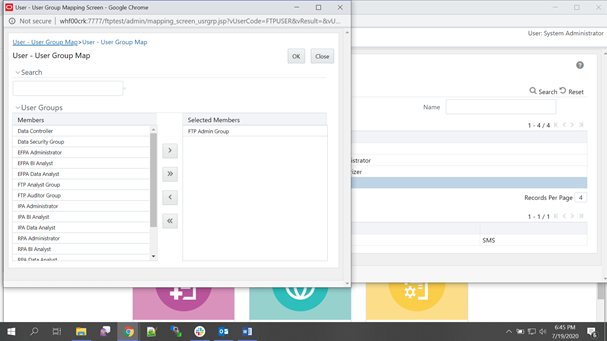
- Map the FTP admin group to new user and authorize using sysauth user.
Figure B-1 User Group Mapping
- Navigate to the deployed path
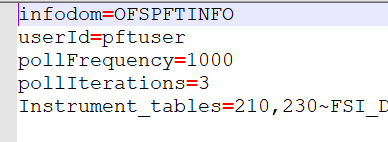
/WEB-INF/classesfolder and update the Infodom name and userId inofsaaws.propertiesfile.Path example: /scratch/pmuser/apache-tomcat-8.5.31/webapps/ofsaapcd/WEB-INF/classes
Figure B-2 ofsaaws.properties File
- After above configuration, restart the Tomcat server.
- Execute the products and IRC files in FTP Atomic Schema.
- If FTP OFSAA instance is present in different Host, you have to add the
following entry in the
web.xmlpresent at$CATALINA_HOME/webapps/<FTP context>/web-inf/web.xmlfolder.<filter> <filter-name>FilterServlet</filter-name> <filter-class>com.iflex.fic.filters.FilterServlet</filter-class> <init-param> <param-name>AllowOrigin</param-name> <param-value>http://<PCD_HOST_NAME>:<PORT></param-value> </init-param> </filter> Example <filter> <filter-name>FilterServlet</filter-name> <filter-class>com.iflex.fic.filters.FilterServlet</filter-class> <init-param> <param-name>AllowOrigin</param-name> <param-value>http://whf00crk:8080</param-value> </init-param> </filter>
- Product hierarchy creation:
- Login with New User (like FTPUSER).
- Navigate to Common Object Maintainance, select
Dimension Management, and then select
Hierarchies.
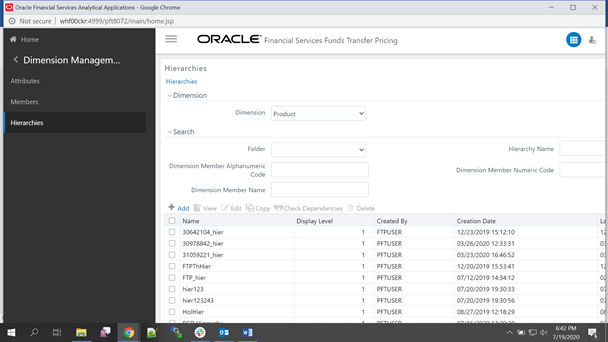
- Select the Product under Dimension drop-down.
Figure B-3 Hierarchies
- Click Add.
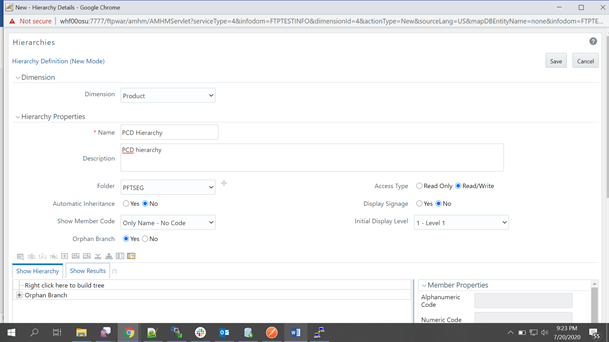
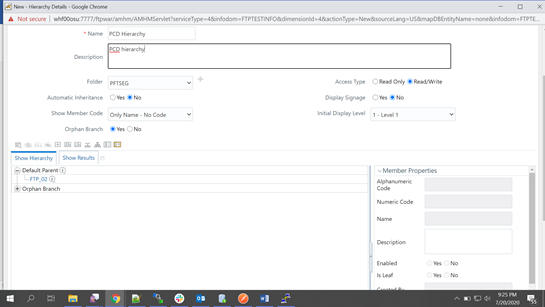
- Enter the Name like PCD Hierarchy, enter the description,0 and then
select folder.
Figure B-4 Hierarchy Definition
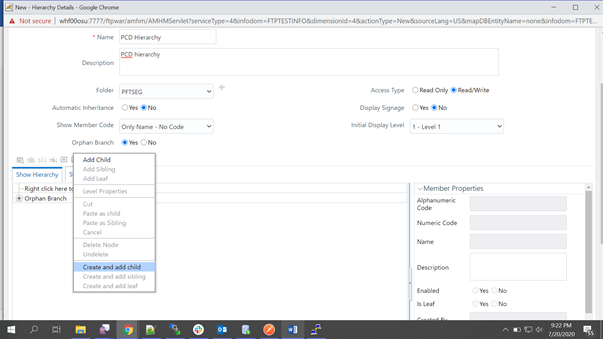
- Right-click below the Show Hierarchy section and click
Create and add child.
Figure B-5 Hierarchy Definition
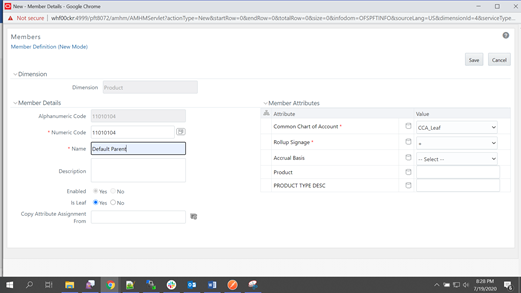
- Fill the mandatory fields like numeric code and Name like Default
Parent. Click Generate Numeric Code icon for
Numeric code to generate and click Save.
Figure B-6 Member Definition
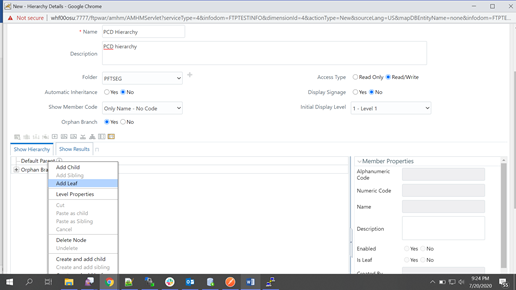
- The Parent Hierarchy will be displayed like Default Parent.
Right-click on that and select Add leaf.
Figure B-7 Member Definition
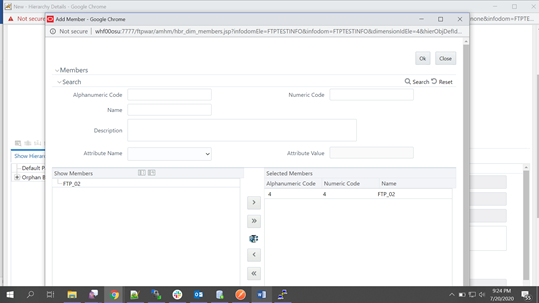
- Move the products from LHS to RHS and click on
Ok.
Figure B-8 Add Member
- The mapped products will be listed under the newly created
hierarchy. Then click Save.
Figure B-9 Member Definition
- Select the Product under Dimension drop-down.
- Default Hierarchy: Navigate to Fund Tranfer Pricing and
select Application Preferences.
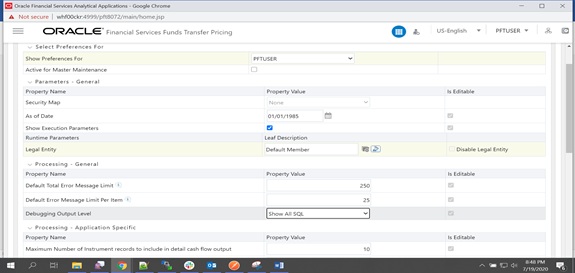
- Select the newly created hierarchy as default hierarchy and click Apply. In this example, PCD Hierarchy is the default Hierarchy.
- Select debugging Output level drop-down as show All SQL and select Legal
entity as default member and click Apply.
Figure B-10 Application Preferences
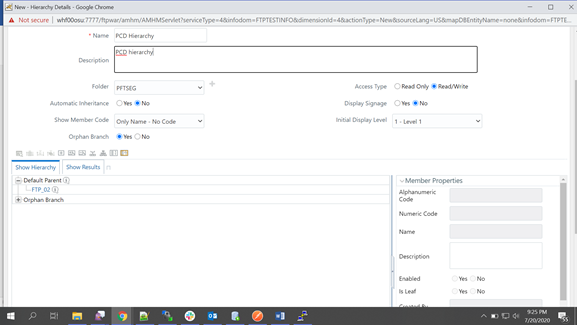
Figure B-11 Application Preferences
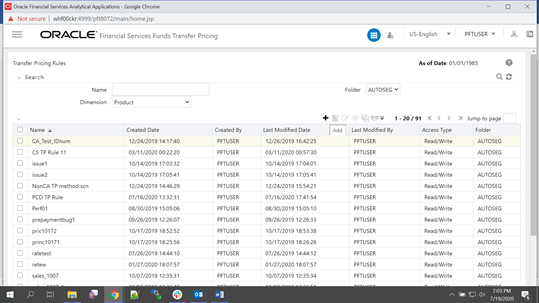
- Create Transfer Pricing Rules (TP Rule): Navigate to Fund Transfer
Pricing, FTP Assumption Specification,
Transfer Pricing Rules, and then click
Add.
Figure B-12 Transfer Pricing Rules
- Enter the Mandatory fields, select PCD Hierarchy as
Product Hierarchy.
Figure B-13 Transfer Pricing Rule: Definition Mode
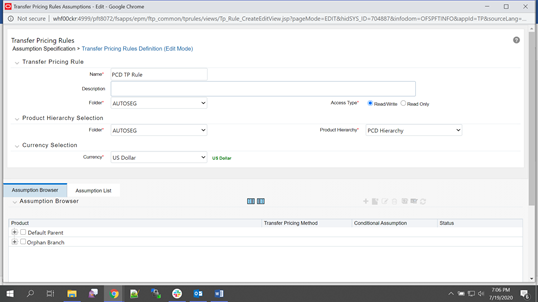
- Expand the product parent and select any product to which you want to add
Transfer Pricing Rule.
Figure B-14 Product Hierarchy Selection
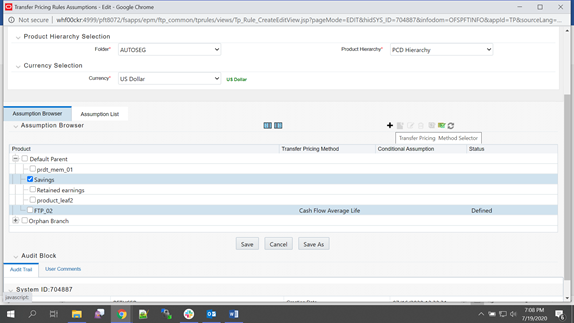
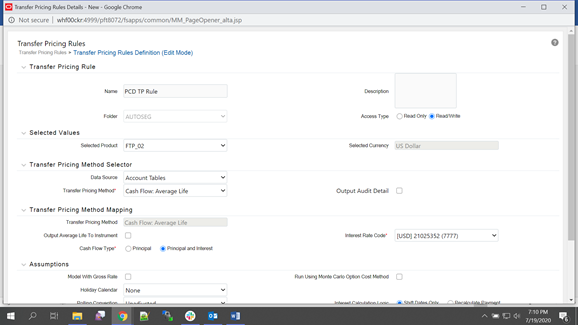
- Add the Transfer Pricing Rule as follows. Select any Transfer Pricing
method. For example: Cash: Average Life and select the IRC code.
Figure B-15 Transfer Pricing Rules
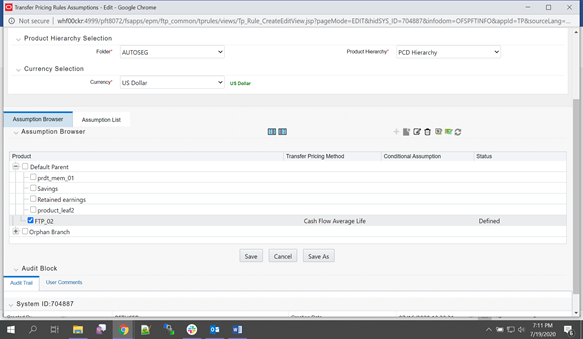
- The selected Transfer Pricing Method will be displayed for that product as
follows. Save the Transfer Pricing Rule.
Figure B-16 Transfer Pricing Rules
- Enter the Mandatory fields, select PCD Hierarchy as
Product Hierarchy.
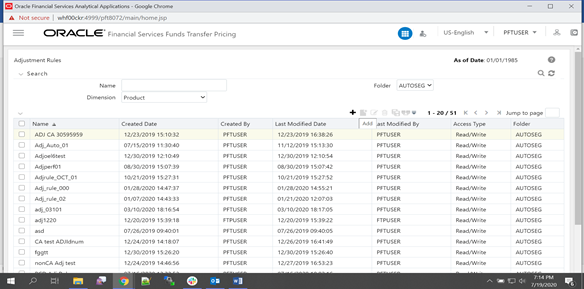
- Create Adjustment Rules: Navigate to Funds Transfer Pricing,
select FTP Assumption Specification, and then select
Adjustment Rules. Click Add.
Figure B-17 Adjustment Rules
- Enter all the Mandatory fields.
- Click Adjustment Type Hierarchy and select the below
Adjustment Types by moving from LHS to RHS, and then click
Ok.
Figure B-18 Adjustment Type Hierarchy Browser

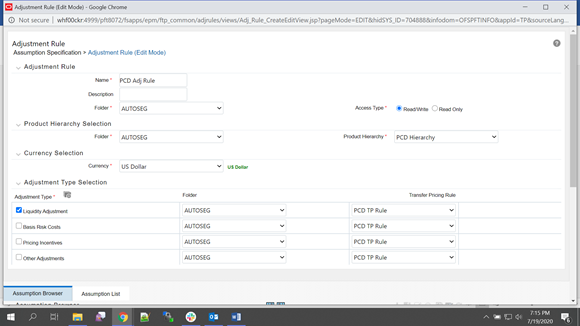
- Adjustment types will be displayed as follows. Select Transfer Pricing Rule
for each Adjustment types.
Figure B-19 Adjustment Rule (Edit Mode)
- Adjustment Method has to be added for each Adjustment Types:
- Select any one Adjustment Type say Liquidity Adjustment. Below the
Assumption Browser expand Product Hierarchy and then select the same
product for which TP Rule was created.
Figure B-20 Adjustment Type Selection

- Click Add to select the Adjustment Method.
- Select any Adjustment method from drop-down like Formula Based rate.
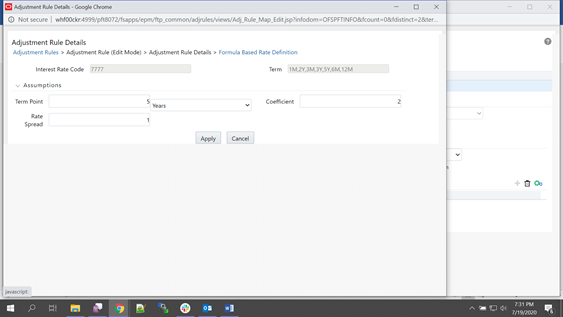
- Fill the mandatory fields. Under Parameters grid, define Formula by selecting the row as follows. Then click the Delete icon which is displayed next to delete icon on right side of the Parameters grid.
- Formula window is displayed as follows. Fill all the fields and
click Apply.
Figure B-21 Formula Based Rate Definition
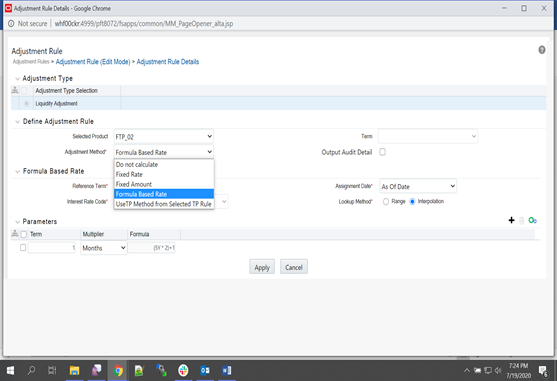
- If the Adjustment method is Fixed Rate then refer to the following
screenshot.
Figure B-22 Adjustment Rule Details
- Select any one Adjustment Type say Liquidity Adjustment. Below the
Assumption Browser expand Product Hierarchy and then select the same
product for which TP Rule was created.
- Now the defined Adjustment Method will be displayed for the product as
follows.
Figure B-23 Adjustment Method
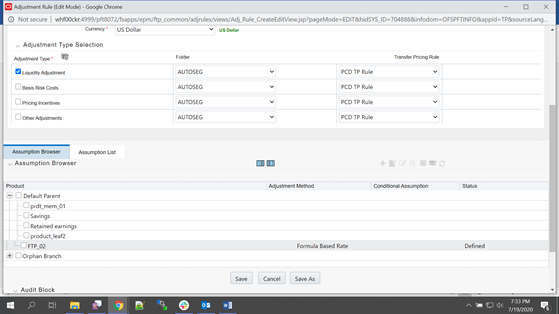
- Repeat adding Adjustment Method for each of the Adjustment Types namely Basic Risk Costs, Pricing Incentives, and Other Adjustments. Then click Save.
- Create the Standard Process: Navigate to Funds Transfer
Pricing, FTP Processing, Standard
Process, and then click Add.
- Enter Process details and click Apply.
Figure B-24 Standard Process (Edit Mode)
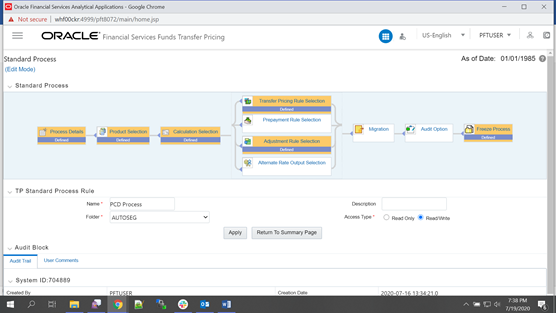
- Under Product Selection section, click Source and
select the Source Hierarchy as PricingManagementGeneratedInstruments as
shown below.
Note:
If Source Hierarchy has no data then for Source Hierarchy to load data in Standard Process screen execute the following update query in Atomic Schema.update REV_TABLE_CLASS_ASSIGNMENT set validated_flag = 'Y' ; commit; - Click Apply to navigate to Calculation Section. Fill
the details as follows:
Figure B-25 Calculation Selection
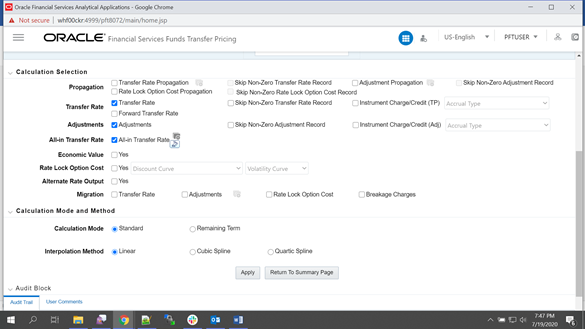
- Select All-In Transfer Rate Hierarchy. Then select a
product and click Define.
Figure B-26 All-In Transfer Rate Hierarchy
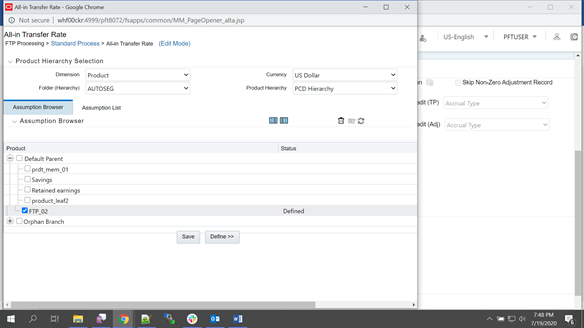
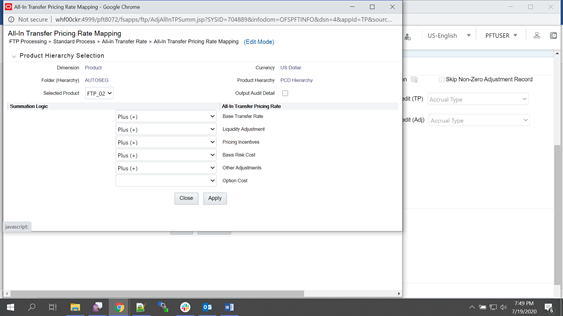
- All in Transfer Rate mapping window will be displayed as follows. Select
Plus for each Adjustment Types and click
Apply.
Figure B-27 All-In Transfer Pricing Rate Mapping
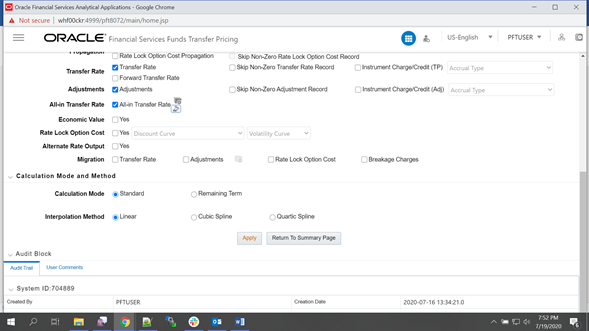
- Click Apply to navigate to Transfer Pricing Rule
list. Select TP rule and then select Adjustment
Rule.
Figure B-28 Calculation Selection
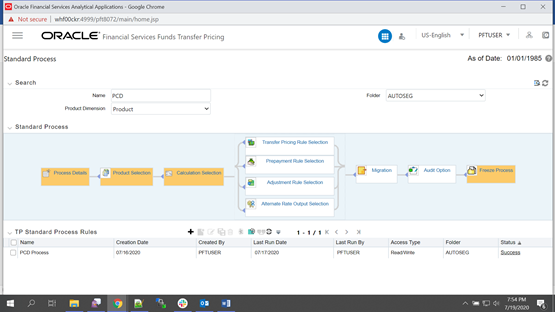
- In the last section select Freeze and then
Confirm. The created Standard Process and
displayed in the summary as shown in screenshot.
Figure B-29 Standard Pricing Process Summary
- Enter Process details and click Apply.
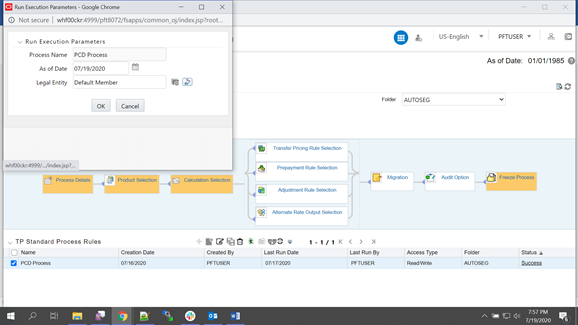
- Execute the Standard Process to test the status:
- Select the Process and click the Run icon.
- Select As of Date as Todays date and click OK.
Figure B-30 Run Execution Parameters
- Refresh the summary screen and verify the status of the process. It should
show success. If it is failed verify the logs.
Log path:
../ftpshare/logs