9.3 Customer Master Loader
The Customer Master Loader allows the user to load the Customer Master Information required by the Profitability Analytics Cloud Service to enrich the demographics at the account-level. To load the Customer Master Data, you need to use the Data Loader service. First you need to upload the data, and then run a Batch to propagate the data into the processing Processing Layer.
To load the data, follow these steps:
- Navigate to Profitability Management Cloud Service. From the
LHS menu, select Data Management Tools, select
Data File Administration, and then select File
upload and download to display the File Upload/Download
screen.
The File Upload/Download screen displays the list of files that are uploaded to the Object Store. The list displays the following details for each file:
- File ID: The unique file id. This is auto generated during upload.
- Prefix: The prefix added to the file name.
- File Name: The name of the uploaded file.
- Stripe Name: The unique identifier for storing the files.
- Uploaded Date: The file upload date.
- Download File: Click the Download icon to download a copy of the file.
- Delete: Click Delete to delete the uploaded file.
- Click Drag and Drop to browse and select a file for upload
from the local directory.
You can also browse to the local directory from the File Explorer and select file and drop it here.
The File Upload/Download service supports upload of TXT, DAT, and CSV format files.
Name of the Data File must follow the format as given below:- A prefix as input_yyyymmdd where the date format is related to the As of Date of Interest (i.e., 02-May-2023 becomes 20230502).
- A suffix as _STG_CUSTOMER_MASTER.dat.
- An example of a Data File Name could be:
input_20230502_STG_CUSTOMER_MASTER.dat.
Note:
The file name is case-sensitive.
For more information about File Upload and Download, see File Upload and Download.
- After selecting the file to upload, click Upload.
The UI displays a confirmation message Upload successful.
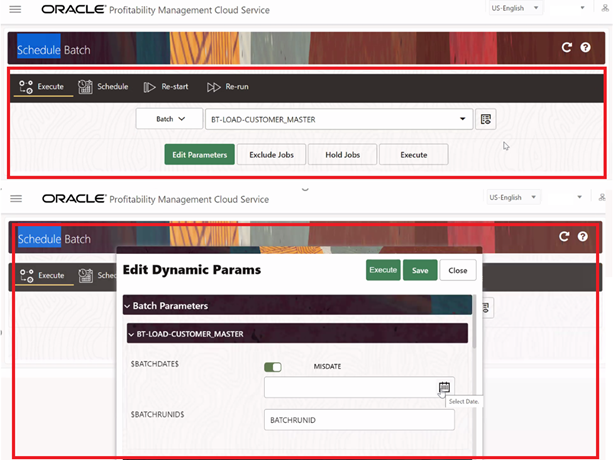
- From the LHS menu, navigate to Operations and Processes, select Scheduler, and then select Schedule Batch.
- Select the Batch that is a seeded batch labelled as
BT-LOAD-CUSTOMER-MASTER and click Edit
Parameters. In the Dynamic Parameters pop-up window, change the date
to the relevant As-of-Date, and then save the batch.
Figure 9-1 Menu Scheduler – Schedule Batch and Edit Parameters

- From the LHS menu, navigate to Operations and Processes, select Scheduler, and then select Execute Batch.
- From the LHS menu, navigate to Operations and Processes, select Scheduler, and then select Monitor Batch.
- Select the Batch and then select the
MISDATE and the Batch name. There
may be multiple executions of the Customer Master Loader batch. Select the latest
execution and click Start Monitor.
The UI displays the Status of the batch.
For more details about Scheduler processes, see the following links: