6.4.2 Creating a Segmentation Mapping
This procedure describes the steps to create segments, and then map the segments to the segment types as a part of the profitability insight analysis.
To do the Segmentation Mapping, follow these steps:
- To open the Segmentation screen, navigate to Profitability Analytics
Cloud, select Setup Configurations, and then
select Segmentation Mapping.
Figure 6-17 Segmentation Mapping – Add

- Click Add to open the Segmentation Mapping Definition
screen.
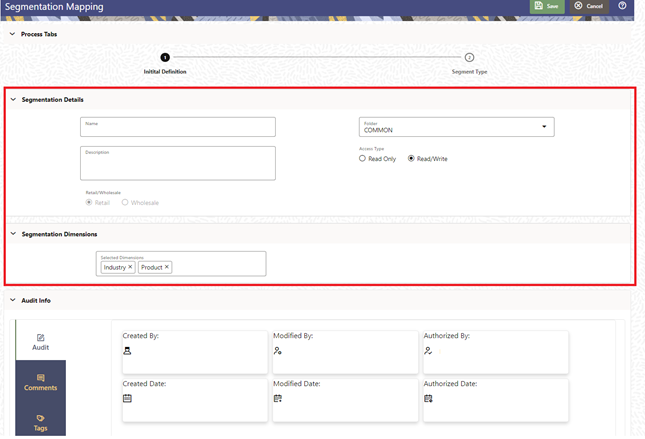
Figure 6-18 Segmentation Mapping - Add

- In the Segmentation Details section of the screen, enter the
following details:
- Name: Name of the segment.
- Description: A description for the segment.
You can create segments for Retail or Wholesale Customer types. The various details you enter for these customer types may differ.Note:
If you do not specify the segment Retail or Wholesale, the service will default it to Retail. - In the Segmentation Dimensions section of the screen, select
the relevant Segmentation Dimension. The drop-down list
displays a list of segments based on which you create different segments within your
segment type.
- Retail Customer Dimensions:
- Age
- Profession
- Customer Income
- Product
- Net Income Before Taxes
- Asset Balance
- Credit Score
- No. of Transactions
- Average Transaction Amount
- Number of Accounts
- Wholesale Customer Dimensions:
- Age of Corporate
- Industry
- Customer Income
- Product
- Net Income Before Taxes
- Asset Balance
- Credit Rating
- No. of Transactions
- Average Transaction Amount
- Number of Accounts
Note:
This is the seeded list as of now and will be open to amendments in the future to accommodate requests from banks to add more dimensions to support relevant use cases.Figure 6-19 Segmentation Mapping - Segment Type

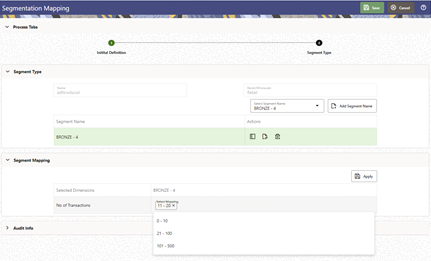
Figure 6-20 Segmentation Mapping - Segment Type

- Retail Customer Dimensions:
- Click Add Segment Name after selecting your Segment Name. You
can select multiple Segment Names and add them to your Segment Name list.
At this point, the Actions menu is activated. You can select to do the following actions to the Segment Name/s you added:
- View
- Edit
- Delete
- To assign values to the Dimension/s you previously selected, a list of
value bands or dimension members, you require to click Edit
for each of the Segment Names you have added to the list.
Figure 6-21 Segmentation Mapping

- Click Apply. Repeat the steps for assigning the new Dimension
Name values to the other Segments available in your list.
A confirmation message Mapping is applied is displayed.
- At any point of time, you can edit the Assignment by clicking the Edit button on a given Segment.
- Click Save.
This returns to the Segmentation Mapping screen and the newly added Segmentation Mapping is displayed.