Upgrades When Adding a New Database Server

This section provides upgrade instructions to enhance your system security by adding a new database server to house the security database. If you are using multiple Simphony application servers, upgrade the initial application server. After upgrading subsequent application servers, ensure that on each application server the security database server name matches the dataSource entry for the CACHE host name located in the application server’s DBSettings.xml. This file is located on the initial Simphony application server that was upgraded. For example:

alias="Cache"

dbType="<TYPE> "

dataSource="<SERVERNAME>"

To initiate this type of upgrade:

  1. Perform Steps 1 through 5 in Simphony Upgrade Procedures.
  2. Certificate Location: Throughout the upgrade process, the Simphony installation application checks for the entry of a valid Service Host Name. The following parameters review the installation application’s Service Host Name validation behavior:
    1. If Microsoft Internet Information Services (IIS) is selected for the Certificate Location field, note that the Service Host Name (to be entered on the next installation screen) is based on the installed secure certificate's Common Name (CN) field.
    2. Certificate: To add a new certificate, select New, click Select, enter or select the certificate location, and then enter the Password for the certificate.
    3. To use an existing certificate, select Existing, and then select the installed certificate from the drop-down list.
    4. If you are using a Load Balancer server and using the Import/Export Service or plan to use the Oracle Hospitality Simphony Engagement Cloud Service, select LoadBalancer for the Certificate Location field. Note that the Service Host Name (to be entered on the next installation screen) is based on the Full Qualified Domain Name (FQDN) of your application server.
    5. Https IP Address: Enter the application server’s IP address.
    6. Service Host Secure Port: If you enter a port number other than the default of 443, you need to enable that port on the Load Balancer server, and then click Next.
  3. When using IIS, enter (or verify) the Service Host Name (for the Simphony application server). If the Service Host Name does not match the installed secure Certificate’s CN text, a warning message dialog appears.
    1. Do not ignore the message; select No, and then correct the invalid Service Host Name.
    2. Enter the Default Gateway IP address and Default Net Mask in their corresponding fields, and then click Next.
  4. When using LoadBalancer, enter (or verify) the Service Host Name (for the Simphony application server). If the Service Host Name does not match the FQDN of your computer, a warning message dialog appears.
    1. Do not ignore the message; select No, and then correct the invalid Service Host Name.
    2. Enter the Default Gateway IP address and Default Net Mask in their corresponding fields, and then click Next.
  5. Enter the following information that is used to connect to the security database:
    1. Server Name: Enter the name of the security database server.
    2. Service Name: (Oracle Database users) Enter the name of the service (TNS alias).
    3. Username: Enter your security database access user name.
    4. Password: Enter your security database access password.
    5. Database Port: Enter the port number used to access the security database server, and then click Next.
  6. Enter your security database administrator Username and Password logon credentials, and then click OK and Next. If the security database server name and logon credentials entered in Step 3 match the server name where the transaction database is stored, the installation application prompts and affords users the opportunity to separate the databases onto different database servers. Because you want the two databases separated, click Yes.
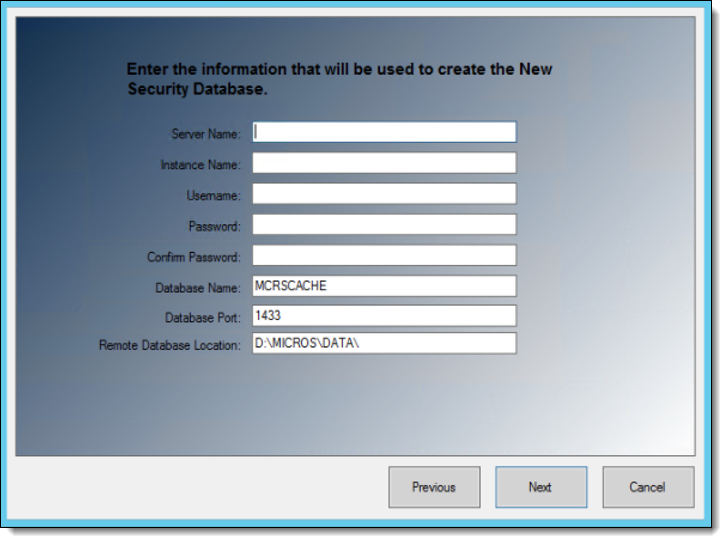
  7. Enter the following information that is used to connect to the secondary database server, and then click Next:
    1. Server Name: Enter the name of the secondary database server. This name should match the dataSource entry for the CACHE host name located in the application server’s DBSettings.xml. For example:

      alias="Cache"

      dbType="<TYPE> "

      dataSource="<SERVERNAME>"

    2. Service Name: (Oracle Database users) Enter the name of the service (TNS alias).
    3. Username: Enter your security database access user name.
    4. Password: Enter your security database access password.
    5. Confirm Password: Re-enter your security database access password.
    6. Database Name: Enter the name of the security database.
    7. Database Port: Enter the port number used to access the security database.
    8. Remote Database Location: Enter the path and folder names where the Security database is to be created.

    Figure 1-1 New Security Database Information


    This figure shows the installation/upgrade screen that requires information to create the new separate security database.
  8. Enter the logon credentials for a database administrator (sys user), and then click OK.
  9. Enter the following information to connect to the reporting database:
    1. Server Name: Enter the name of the reporting database server.
    2. Service Name: (Oracle Database users) Enter the name of the service (TNS alias).
    3. Username: Enter (or verify) your reporting database access user name.
    4. Password: Enter your reporting database access password.
    5. Database Port: Enter the port number used to access the reporting database.
    6. Username: Enter (or verify) your reporting database access user name.
    7. Password: Enter your reporting database access password, and then click Next.
  10. Enter a database administrator’s logon credentials for the sys user, click OK, and then click Next.
  11. Click Confirm. The installation application creates a new user and security database on the secondary database server and drops them from the original database server. When the upgrade is complete, click Finish.