Configuring Order Channels

One order channel, called Default, is automatically provisioned and assigned to all new Simphony 19.6 checks if no other channels are configured. The Default channel name can be changed, but the Active column is grayed out and it cannot be set to inactive.

  1. Select the Enterprise, click Descriptors, and then click Order Channel.
  2. Click the Insert icon (This image shows the Insert icon.) on the toolbar.
  3. In the Insert Record dialog, enter the Record Name (for example, Kiosk), and then click OK.

    The name cannot be more than 32 characters long.

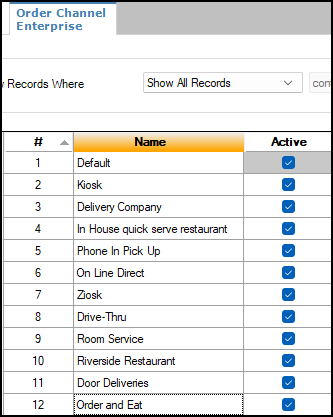
    Figure 14-2 Examples of Order Channel Names


    This figure shows the Order Channel module with a sample list of Order Channel names.
  4. Deselect Active for order channels that are not being used in the enterprise.
  5. Click Save.
  6. Select the Enterprise, property, revenue center, or zone, click Setup, and then click Order Channel Parameters.
  7. For each order channel parameter record, select the appropriate options as described in the following table:

    Table 14-5 Order Channel Parameter Options

    Option Description

    1 - Print on Customer Receipt and Guest Check

    Select this option to print the order channel name on customer receipts and guest checks.

    2 - Print on Order Printer

    Select this option to print the order channel name on order printers.

    3 - Enable Routing Order by Order Channel

    Select this option to control order routing by the order channel. The workstation order devices must be set for all possibilities and use this as an override to disable order devices. Order channel routing takes precedence over order type routing if both are set.

  8. If 3 - Enable Routing Order by Order Channel is selected, click the ellipsis point (...) button in the Order Device Mask column, select the order devices for the order channel, and then click OK.
  9. Deselect Active for order types that are not being used at this hierarchy level.
  10. Click Save.
  11. To override the default order channel setting for a revenue center:
    1. Select the revenue center, click Setup, and then click RVC Parameters.
    2. Select the Default Order Channel from the drop-down list.

      This is the order channel that is active when a workstation operator begins a check at this revenue center unless it is overridden at the workstation or manually changed.

    3. Click Save.
  12. To override the order channel setting for a workstation:
    1. Select the property, click Setup, and then click Workstations.
    2. Double-click the workstation.
    3. Click the Transactions tab.
    4. Select the Default Order Channel from the drop-down list.

      This is the order channel that is active when a workstation operator begins a check on this workstation unless it is manually changed.

    5. Click Save.