Configuring Menu Item Definitions, Family Groups, and Condiment Group Names Consumer-Facing Settings
As stated in the beginning of this chapter, the use of Simphony Transaction Services (STS) Gen 2 in conjunction with configuring consumer-facing content, is currently supported for Simphony Standard Cloud Service customers (those hosted on the Oracle Hosting Center).
See Transaction Services for more details about STS Gen 2 support and setup requirements.
Enabling Consumer-Facing Content
To enable consumer-facing content in the Menu Item Definition, Family Groups, and Condiment Group Names modules, you must first enable STS Gen 2 on a revenue center.
- In the EMC, select a revenue center, click Setup, and then click RVC Parameters.
- Click the Options tab, enable option 74 - Enable Simphony Transaction Services Gen 2, and
then click Save.
Note:
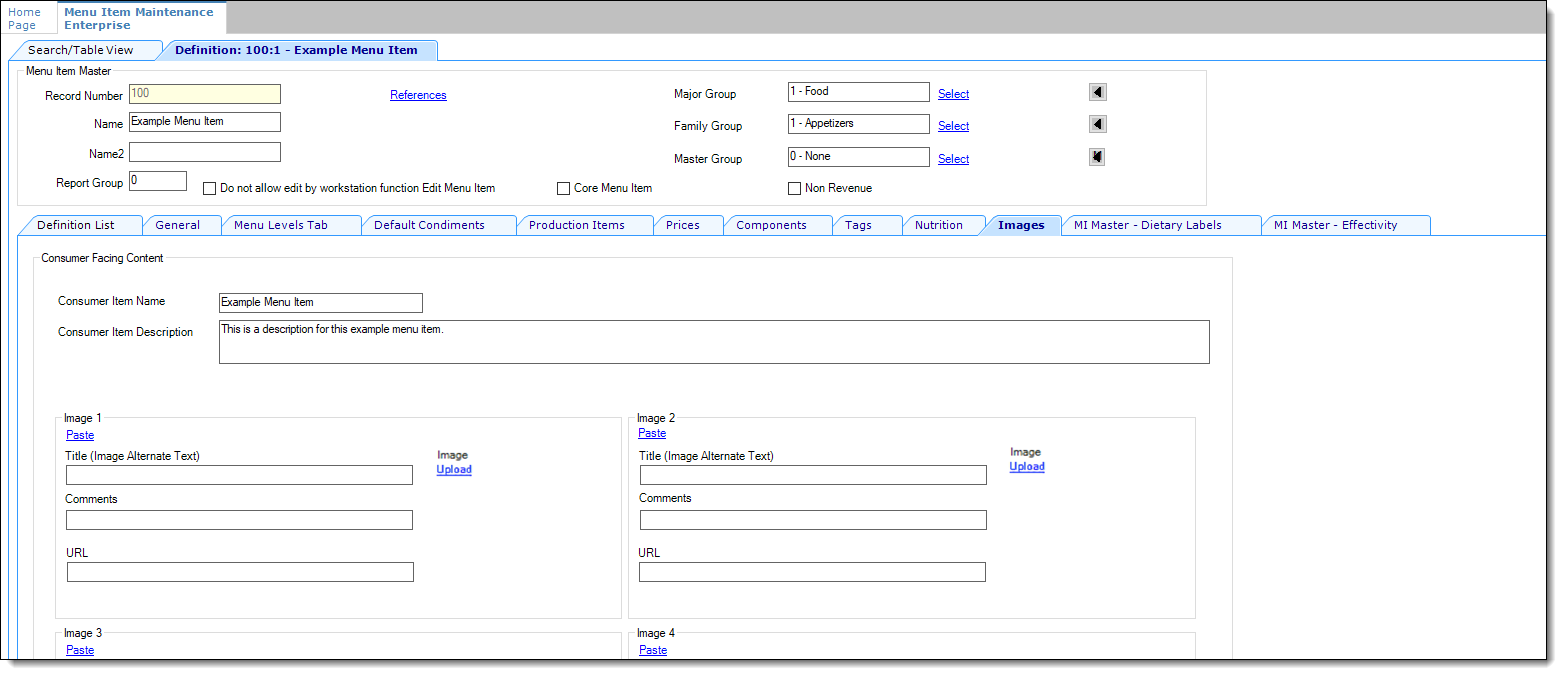
After enabling option 74 - Enable Simphony Transaction Services Gen 2 in a single revenue center, an Images tab shows in the Menu Item (MI) Definitions module for all of the revenue centers assigned to the same property. However, you can only add images to the MI Definitions module where the menu items used by the revenue centers are located. In other words, if a revenue center uses menu items records originating from the enterprise or property levels, this is the MI Definition module location where the Images tab is configurable. - Select the enterprise, property, or revenue center, click Configuration, and then click Menu Item Maintenance.
- From the Record Type drop-down list, select Menu Item Definition, and then click the Search button.
- Select the menu item record you want to assign images to, switch
to form view, and then click the Images tab.
Figure 47-1 Menu Item Definition - Images Tab

- From the Consumer Item Name field, enter the menu item name you want guests to view on the point-of-sale (POS) API device.
- From the Consumer Item Description field, enter a menu item description you want guests to view on the POS API device, and then clickSave.
Adding Images to the MI Definitions and Family Groups Modules
Access to the Image tab differs between the MI Definitions and Family Groups modules. As noted before, the MI Definition module’s Image tab only shows upon enabling option 74 in the RVC Parameters module. Access to Family Groups is not determined in the same fashion. The Family Groups module is accessible to anyone who has access privileges to the module, but like the MI Definitions module, no images can be added to Family Groups unless the Oracle Hosting Center establishes an Oracle Cloud Infrastructure (OCI) account with Oracle Cloud Object Storage access.
Note:
If you want to add images to the Family Groups module, access the enterprise, property, or revenue center level, click the Configuration tab, select Family Groups, select the family group of your choice, and then toggle to Form view. The Images tab is available from there.-
Each menu item definition can have up to ten images associated with it.
-
Each individual image is restricted to no more than 1 MB in size.
-
Only *.JPG, *.PNG, and *.JPEG formatted image files are supported.
-
Each organization’s total Oracle Cloud Object Storage compartments are restricted to hold no more than 2 GB of image files.
The steps to add images to both the MI Definitions and Family Groups modules are exactly the same. The following steps and examples are shown from the MI Definitions module’s perspective.
-
Perform steps 3 through 7 from the previous section. The Upload link does not become active and ready for use until Oracle Hosting successfully creates your Oracle Cloud Object Storage account.
-
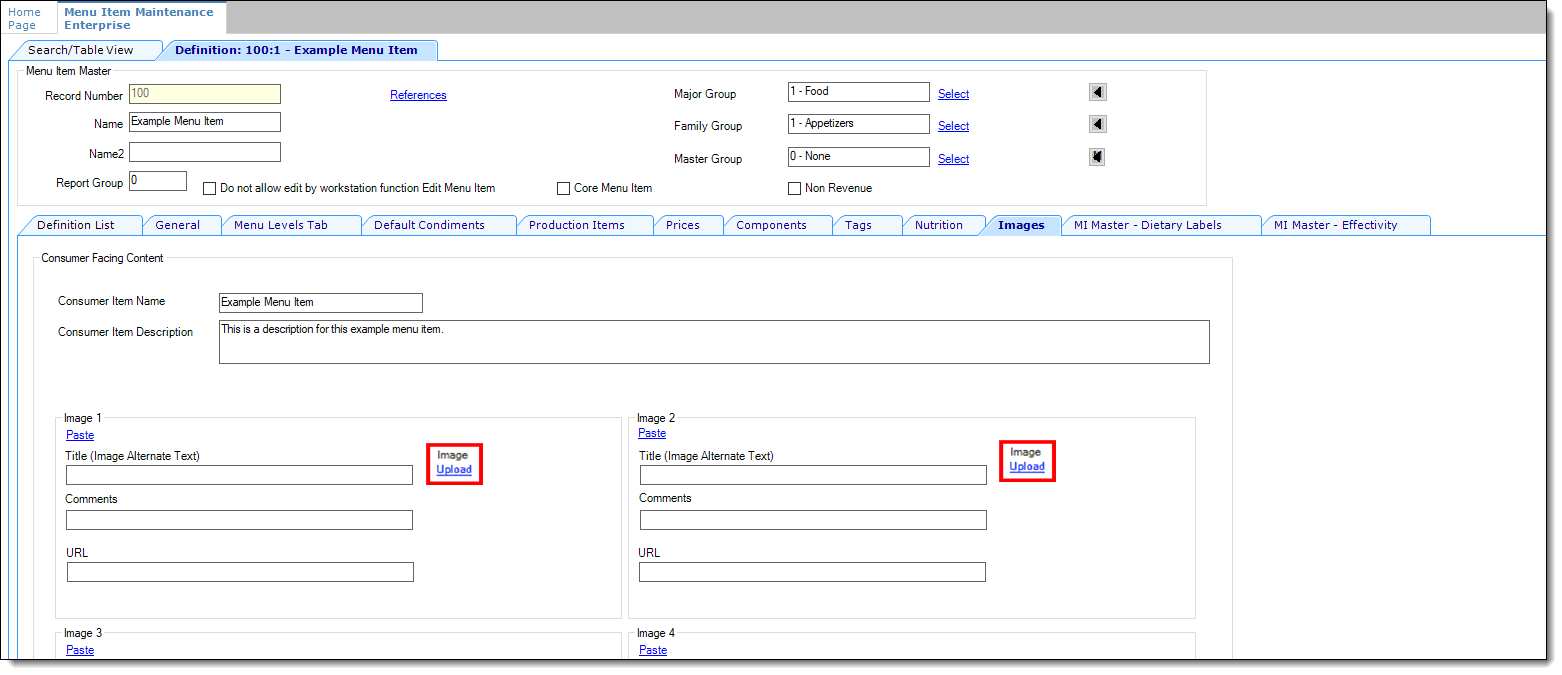
Click the Upload link.
Figure 47-2 Menu Item Definition - Images Tab Upload Link

-
You are prompted to select the image for the menu item you want to upload. When you first click the Upload link and select an image, if the image isn't already stored on the Oracle Cloud Object Storage site, it adds the image to a new bucket in your designated object storage compartment. If you want to replace an existing image, the same method applies by clicking the Upload link and configuring the section in the same manner as described below.
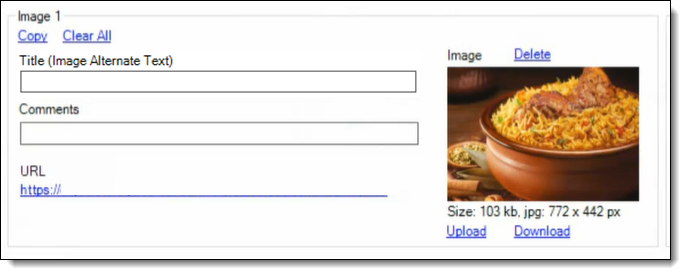
Figure 47-3 Images Tab - Image Handling Section

When an image is successfully uploaded to the cloud object storage site, the image is shown in the applicable image handling section. At the same time, several links become active and additional information auto-populates the form.
To configure an image section, see the instructions in this table:
Table 47-1 Image Handling Section
Fields and Links Description Paste (link)
Used in tandem with the Copy link. First click Copy, and then click Paste on any available image configuration section to duplicate an existing image section.
Title (Image Alternate Text) - field
The text entered here is used for the following two purposes:
-
This text field is used to name the uploaded image to your Oracle Cloud Infrastructure (OCI) account to run in conjunction with an Object Storage device.
-
This text field’s content is passed along to customers via the API and should not be left blank. This text is the description of the image for customers who use assistive technology. Enter an image name (or label) which customers can access while placing a mobile order. Properly naming images helps customers better identify items and improves their chances of successfully accessing and adding items to their order.
Comments (field)
Enter a description of the item you are showing.
Copy (link)
Used in tandem with the Paste link. First click Copy, and then click Paste on any available image configuration section to duplicate an existing image section.
Clear All (link)
Clears all fields for the image, but does not delete the image from the cloud object storage website.
Delete (link)
If you click the Delete link, it deletes the contents of an entire image section and also removes the image from the cloud object storage website.Note:
If you delete a Menu Item Definition, Family Group Names record, or an entire revenue centers or property with any associated images, all images are also deleted from the cloud object storage website. Deletion of unused images is one way to ensure your 2 GB total cloud object storage limit is not exceeded.Upload (link)
Used to send new images to the cloud object storage website. If you want to replace an existing image, click the Upload link, select another image, and the previously used image file is overwritten.
Download (link)
Used to download an existing image from the cloud object storage website and save it to a local disk.
URL (hyperlink to the cloud object storage website where each image is stored)
This field auto-populates upon successfully uploading an image to the cloud object storage website.
Size (field)
Shows the size and dimensions of the uploaded image file. Image files cannot be larger than 1 MB in size.
-
Configuring a Condiment Group Names Consumer Description
To add consumer-facing text to Condiment Groups:
- Select the enterprise, property, revenue center, or zone, click Descriptors, and then click Condiment Group Names.
- The Condiment Group Names module only opens in table view. Select
a condiment group name, enter your consumer-facing text in the Consumer Description field, and then click Save.
Figure 47-4 Descriptors - Condiment Group Names Module

Note:
You can add consumer facing text to your required or allowed condiments. For example, a common condiment menu item class (usually required for preparing steaks) is frequently called meat temps. These condiments provide the kitchen with a guest’s preferred steak “doneness”, such as rare, medium, medium well, and well done. You can add descriptive text to the meat temps condiment class like, “How would you like your steak cooked?”, and then guests can select from the available meat temps.Parent topic: Transaction Services