4 Printer Connection to the Host
The TM-P80II is capable of Bluetooth communication. In addition, custom firmware gives the printer the capability to communicate IDN over USB using the printers USB-C connection port with the supplied USB cable. This section describes both communication methods. You can also refer to the Epson TM-P80II Technical Reference Guide for further connection details.
USB-IDN Communication
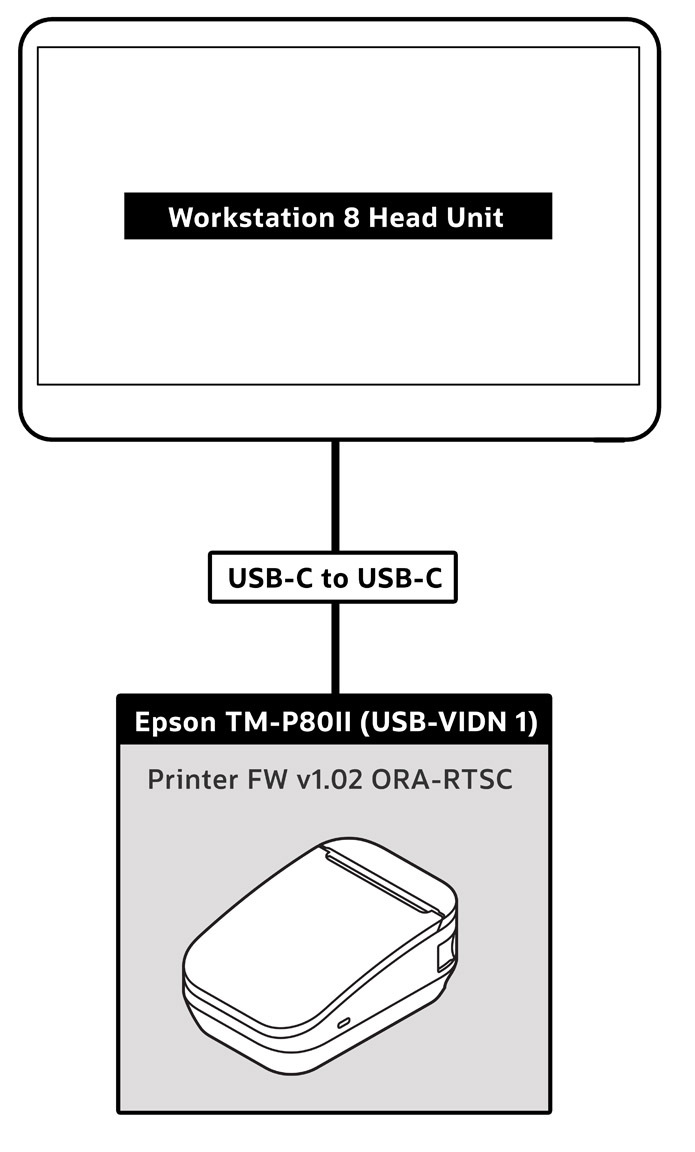
Starting with printer firmware v1.02 ORA-RTSC and Simphony 19.6 you can connect the TM-P80II printer to an Oracle Workstation 8 using a USB-C cable. This can be accomplished using the one that came with the printer or with the mounting bracket. An available USB-C port is all that is required at the workstation. Future updates will be provided to support this functionality with the Workstation 6 Series and Compact Workstation 3 Series.
-
Requirements: TM-P80II Printer Firmware v1.02 ORA-RTSC or greater, Simphony 19.6 or greater.
-
The TM-P80II USB port is configured as CDC-ACM Class which creates a virtual serial connection over the USB interface. The firmware accepts IDN commands over this virtual serial connection.
-
The Workstation 8 recognizes the USB connected TM-P80II with firmware and automatically assigns it to Com 9.
-
Any available USB-C port on the Workstation 820 System Unit or Peripheral Expansion Module can be used to connect the USB-IDN TM-P80II.
-
-
Within Simphony, configure an IDN printer on Com 9 as IDN ID 1.
Figure 4-1 Workstation 8 Connection Diagram
-
Uses default virtual IDN #1 and configured as IDN ID #1 in Simphony EMC
-
Printer Class set to CDC-ACM for virtual COM port 9
-
Supports ML printing
-
Supports all standard reporting (door open/paper out)
-
Supports transparent mode
CDC-ACM
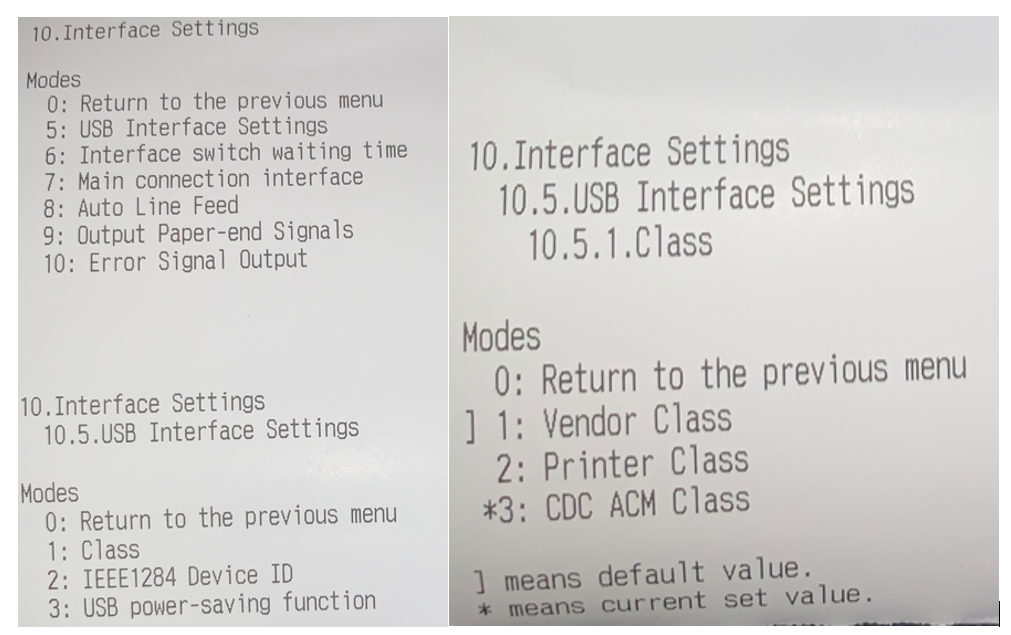
The TM-P80II USB interface is configured by default as a CDC-ACM class in order to create a virtual serial communication connection between the workstation and printer. TM-P80II firmware allows the printer to recognize IDN commands sent over this virtual serial communication connection. CDC-ACM class can be selected by an ESCPOS command, or by the printer panel operation as detailed below.
Selecting CDC-ACM class using printer panel:
-
Hold the feed button while powering up the printer. This will print the self test sheet.
-
Press and hold the feed button until the next sheet prints.
-
Follow the instructions at bottom of the sheet to select 3. Customize Value Settings.
-
Follow the instructions at bottom of the sheet to select 10. Interface Settings.
-
Select 5: USB Interface Settings, then 1: Class.
-
Choose 3: CDC ACM Class.
-
Cycle power to the printer.
Figure 4-2 CDC-ACM Confirmation
USB-IDN Device ID
-
Hold the feed button while powering up the printer. This will print the self test sheet.
-
Press and hold the feed button until the next sheet prints.
-
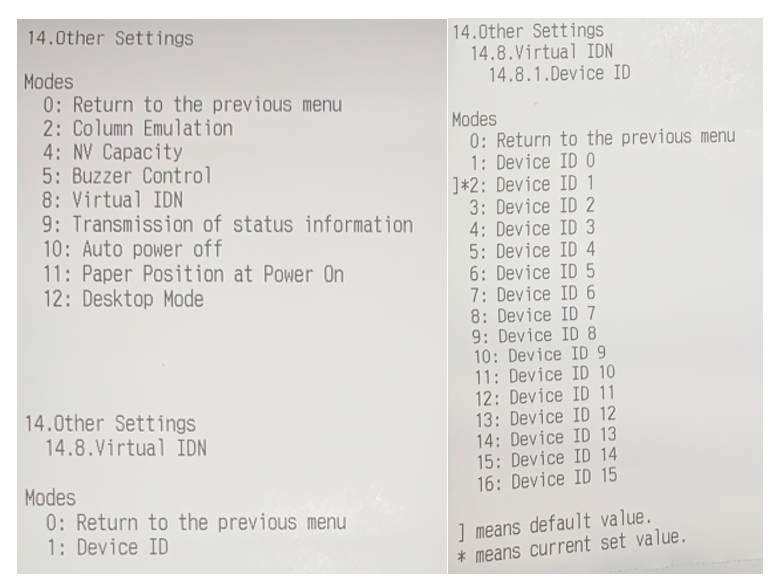
Follow the instructions at bottom of the sheet to select 3. Customize Value Settings.
-
Follow the instructions at bottom of the sheet to select 14. Other Settings.
-
Select 4. Virtual IDN, then 1 for Device ID.
-
Choose the desired device ID from the list.
-
Cycle printer power.
Figure 4-3 USB-IDN Device ID Change Confirmation
Bluetooth Connection
Turn on Printer Bluetooth Discovery for Pairing
-
With printer powered on, open the roll paper cover.
-
With the roll paper cover open, press and hold the Feed button for about one second until the buzzer sounds, then release it.
-
Close the roll paper cover.
-
A message that starts with Next Action prints.
-
-
Select [Bluetooth Status sheet]. Briefly press the Feed button (less than one second), and then hold down the button for at least one second.
-
A status sheet prints. The printer is now ready for pairing.
-
The printer can only be paired while the Bluetooth light
 is blinking. (1 minute)
-
Setting up Bluetooth from an Oracle Workstation Running Microsoft Windows
-
A new Oracle workstation will have Bluetooth disabled, and it must be enabled to allow for a Bluetooth connection to the printer.
-
Launch Device Manager and double-click the Bluetooth entry in the list to show the Intel Wireless Bluetooth Properties.
-
On the General tab, verify the device is disabled. If disabled, click Enable Device.
Figure 4-4 Enabling Bluetooth in Microsoft Windows

-
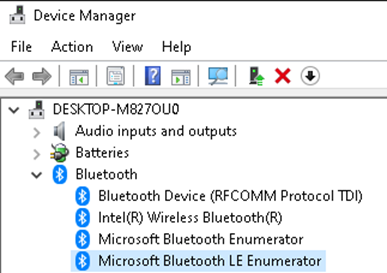
There should now be four Bluetooth items listed under the Bluetooth option. Verify all four Bluetooth options are enabled.
Figure 4-5 Microsoft Windows Device Manager Bluetooth Options
-
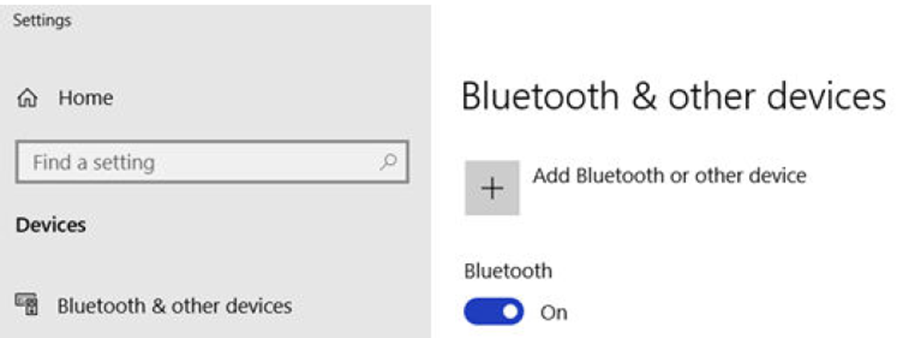
Now that Bluetooth is enabled, you can pair the printer with a Windows-based workstation. Under Settings, click Add Bluetooth & other device.
Figure 4-6 Pairing the Printer in Microsoft Windows
-
Search for TM-P80II_xxxxxx. The "xxxxxxxx" is the last six digits of the printer serial number.
Alternate Methods of Pairing the Printer
Pairing the printer is also possible by using EPSON TM Bluetooth Connector (Windows) or Epson TM Utility (Android). Both of these methods are described in detail in the Epson TM-P80II Technical Reference Guide.
Note:
For optimal mobile operation using Bluetooth, change the Battery Charge Mode to Mode 1 and Disable Desktop Mode. Both of these settings can be changed by using the Epson TM-P80II Utility. The Battery Charge Mode can also be changed using the buttons on the printer. These settings are described in detail in the Epson TM-P80II Technical Reference Guide.