Adding Expedited Report Rules
The Reporting Rules configuration feature enables you to define the reporting rules or criteria for the cases to be qualified for expedited reporting.
Use the following procedure to add expedited report rules.
- In the Business Configuration section, select Expedited Report Rules.
- In the left panel, select a filtering criterion. The left panel now displays the tree view of the Country/License Type/Reporting Rule based on the filtering criterion.
- Select a Reporting Rule and click to view the reporting details in the right
panel.
Note:
Ensure that you select the reporting rule-level icon/folder to view the details of the reporting rule.Tip:
- You can alternatively click Add Rule to create a new reporting rule.
- Use Copy Rule to make an editable copy of an existing reporting rule, along with all associated expedited reporting rule information.
- Enter the Report Name.
- Select the Report Destination from the drop-down list. This is the name of the agency to which the report will be scheduled.
- Select Auto Distribute Reports to distribute reports automatically.
- Select Active to specify if the configured rule is active or
inactive.
Note:
Only active rules are considered for report scheduling - Select Origin of events to include-Domestic to include domestic cases based on the country of incidence OR Select Origin of events to include-Foreign to include foreign cases based on the country of incidence
- Select Report on Drug not Administered. This option ensures that all drugs that are not administered are reported.
- Select Active Moiety if you want to enable this option.
- Select the required Form from the drop-down list of expedited report forms.
- Select the Local Comment Type from the drop-down list. This field is used to extract local evaluator comments from case data.
- Select the Clinical Reference Type from the drop-down list.
This field is used to obtain information from study configured for a case.
Tip:
This field is enabled only for CIOMS-I and other forms. - Select the Language and Message Type from the drop-down list.
- Select the Listedness from the drop-down list. This ensures that the license being evaluated for reporting is listed.
- Select the Seriousness- Fatal/Life Threatening option from the drop-down list. This field ensures that cases that contain Death or Life Threatening seriousness criteria for an event are evaluated.
- Select the Seriousness- Serious (Event) option from the drop-down list. Enable this field to check if the event level seriousness assessment is Serious.
- Select the Seriousness- Serious (Case) option from the drop-down list. Enable this field to check if the case level seriousness assessment is Serious.
- Select the Seriousness- Serious (Severity) option from the
drop-down list.
This enables you to define the Severity as Mild, Moderate, Severe and Unknown.
- Select the Product Specific - Group Name from the drop-down list. This field enables you to configure product specific reporting rules.
- Select the Product Specific - Family Name from the drop-down list. This field enables you to configure product specific reporting rules.
- Select Causality-Most Conservative. This ensures that the system looks at event level reported causality, event level determined causality and case level causality.
- Select Causality-Include Non-Clinical Trial Cases. This enables you to include the Spontaneous Cases (Non Clinical Trial Cases) for causality assessments.
- Select Causality - Causality as Reported (Event) as required, from the drop-down list.
- Select Causality - Causality as Determined (Event) as required, from the drop-down list.
- Select Causality - Causality as Reported (Case) as required, from the drop-down list.
- Select Causality - Causality as Reported (Case) as required, from the drop-down list.
- Select or create the Advanced Condition to restrict cases to
the advanced conditions defined here.
If any of these three causalities are confirmed, then the case will be considered as reportable.
Note:
Use the Advanced Conditions browser to select or create an Advanced Condition by clicking Select. - Select the Responsible Group from the drop-down list. This is the group to which the reports scheduled by this reporting rule will be assigned.
- Select the Cover Letter from the drop-down list. Use this field to select cover letters that have been configured for reporting template use.
- Enter any regulatory report comments under the Comments text box.
- Click Save to save the changes made to this section.
Tip:
If you have added a new Reporting Rule, click Add Rule to save the new Expedited Reporting Rule.
About the Filtering Criterion
The filtering criterion is essential as it helps you to search for specific items. The Argus Console provides this option for the Business Configuration section.
Using Organized by
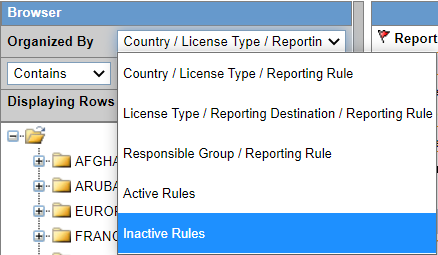
The filtering browser is displayed in the top-left corner of the left panel. The Expedited Report Rules section can be filtered on the basis of any of the five combinations shown in the following illustration.

Consider the following examples:
- If you enable Organized by Country/License Type/Reporting Rule, then the output generated will be visible in a tree-format, in the left panel, based on the entire categorization of Country, License Type and Reporting Rule.
- If you enable the Organized by Responsible Group/Reporting Rule, then only the Responsible Group and Reporting Rule views will be available in the tree view in the left panel.
Tip:
- Enable the Organized By filter for Active Rules, to obtain the list of active reporting rules.
- Enable the Organized By filter for Inactive Rules, to obtain the list of inactive reporting rules
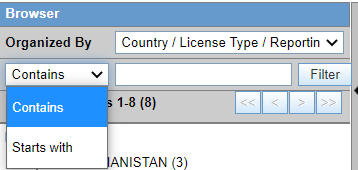
The Argus Console helps you to filter information further for the Business Configuration section. Once you have selected the Organized by, you can specify whether your search should contain or start with specific alphabets or words.
For example, the filtering criterion defined in the following illustration for all Country/License Type/Reporting Rule data that contain the term Canada.

Sorting of Expedited Report Rules
The Reporting Rules are sorted in an alphanumeric order. The logic of ordering of Reporting rules based on Organized by is as follows:
Parent topic: Configuring Expedited Report Rules