Field Descriptions

The following table lists the Field Descriptions for this section.

Field or Control Name Description

Rename

Enables you to rename the datasheet.

Activate Datasheet

Enables you to activate the current data sheet. Be aware of the following:

  • When you click the checkbox, the system enables the radio buttons next to Activate Datasheet.
  • You can either select the option to activate the data sheet with Terms added on the current dates or on another date entered in the Other Date field.
  • Once the datasheet is activated, the system disables the Activate Datasheet text box.
  • If you enter a date greater than the current system date, the system permits you to enable the activation date.

Core Sheet

The Core Sheet checkbox enables you to indicate that this data sheet is the central data sheet. This checkbox is disabled if another data sheet is marked as the core data sheet.

Include

The Include checkbox enables you to indicate that this data sheet includes the particular datasheet selected in the drop-down list. Be aware of the following:

  • The system populates the drop-down list with the list of datasheets that do not include other data sheets.
  • The system enables the drop-down list only when the Include checkbox is checked.

    If a product family has a single datasheet that is marked 'Core', the system disables the Include checkbox.

Other Date

This radio button is enabled if the current date is not to be selected. Select this checkbox and enter any other date, as required.

Global /No local labeling assessment required

Checking this option automatically marks any license using this data sheet, as assessed, and the license does not require any local labeling assessment.

Notes

On clicking the Notes icon, a pop-up appears to enable users to enter notes while entering the details of the Datasheet.

Listed Term

This field displays the listed terms (Preferred Term) for the datasheet.

View Revisions

Enables users to view a list of term that were added or removed with the added date.

New Name of the Datasheet Name (J)

Enables you to rename the datasheet in Japanese.

The View Revisions dialog displays the datasheet revisions, as shown below:
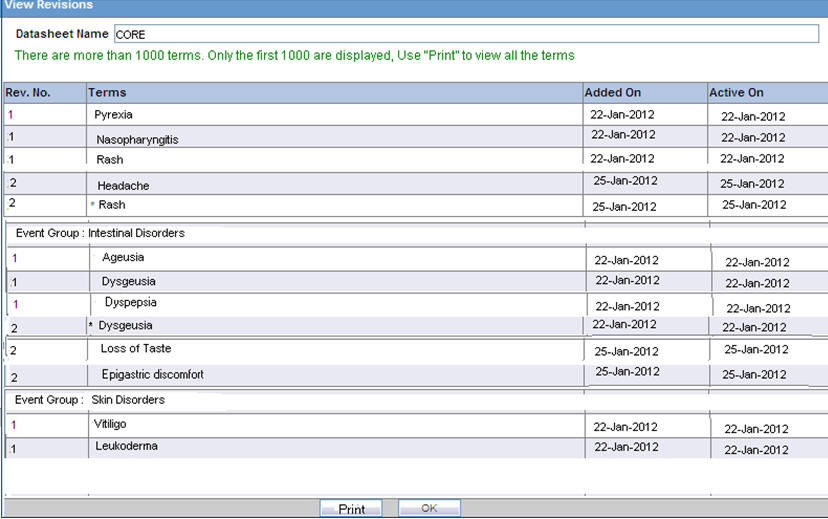
View Revisions dialog

Note:

In order to facilitate optimum system performance, you can configure a limit on the number of revised terms that get displayed. If, for example, this value is set to 1000, the datasheet will display only 1000 revised terms in the list. This value is configurable in web.config by using the keyname DataSheetRevisionTermCount. The default value is 1000.

Click Print to view all other revised terms.

Use the following procedure to create a datasheet.

  1. In the Datasheet section of the Product Family section, click Activate Datasheet to activate the data sheet associated with the Product Family.

    Datasheet options

    Note:

    If you want to make a copy of the datasheet, click Copy. Ensure that you enter a new name for the datasheet, if you are making a copy of another datasheet.
  2. Select the Core Sheet check box, if this data sheet is required to be the core data sheet. Only one core data sheet is allowed per product.
  3. Select the Include check box and select the value from a drop-down list. This helps you to indicate that this data sheet includes the particular datasheet selected in the drop-down list.
  4. Select Global/No local labeling assessment required to automatically mark any license using this data sheet as assessed.
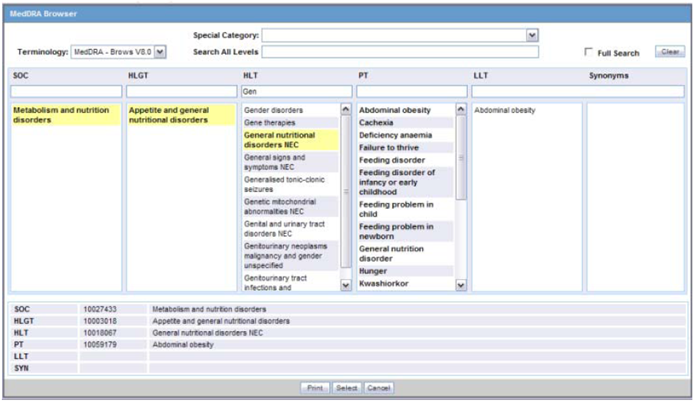
  5. Click Add Term to select the listed terms (Preferred Term) for the datasheet. The MedDRA browser appears.
    MedDRA Browser screen
  6. The MedDRA Browser available for Datasheets enables the administrator to select either multiple or all Preferred Terms (PTs) in the following way:
    • Click the required High Level Term (HLT) and select multiple PTs by clicking on each required PT.

      OR

    • Right-click the HLT to select all entities available under PT.
  7. Select the Preferred term from the MedDRA browser and click Select.

    Tip:

    You can alternatively click Select and Close, in the MedDRA browser to save and exit the Product Family screen.

    You can use Delete Term to delete the selected listed term(s) from the datasheet.

  8. Click Select from the Event Groups tab of Datasheet to select an event group. The Event Group Selection window appears.
  9. Press Save to save the data sheet. The Data Sheet name displays in the Data Sheets list.

    Tip:

    To view the revision history associated with a Datasheet, click Revisions. A pop-up appears containing the following information:
    • Rev. No: Displays the revision number of the datasheet. This number is updated each time the data sheet is activated.
    • Terms: Displays all the terms that were added / removed. In case a term has been deleted, it is marked with * against the term name.
    • Added On: Displays the date when the terms were added in the datasheet.
    • Active On: Displays the date when the datasheet was made active for that revision.