Create Oracle Analytics Server groups and users
This section contains the following topics:
- Create Oracle Analytics Server groups
- Create Oracle Analytics Server users
- Map default Oracle Analytics Server roles to user groups
- Deploy help files for Oracle Analytics Server dashboard
Parent topic: Configure Oracle Analytics Server
Create Oracle Analytics Server users
Create a user having the same credentials as the application user for Oracle Healthcare Translational Research and add them to one of the appropriate groups created in Create Oracle Analytics Server groups.
Parent topic: Create Oracle Analytics Server groups and users
Map default Oracle Analytics Server roles to user groups
-
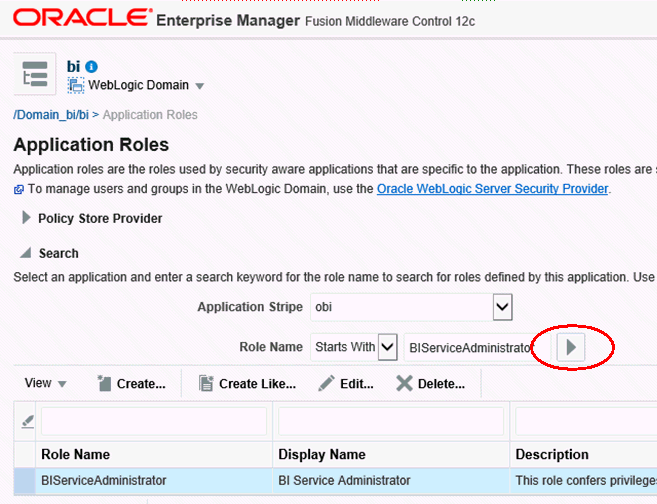
- Log into the Oracle Analytics Server Enterprise Manager at http://<obiee_server>:<admin_port>/em.
- Click the Weblogic Domain drop-down menu.
- Select Security > Application Roles.
- In the drop-down Application Stripe ensure obi
is entered and click Search Application Roles
(arrow icon). A list is displayed.

- Select the row for BIServiceAdministrator and click Edit.
- In the Members table, click Add. The search dialog is displayed.
- Select Type as Group.
- Click Principal Name > Starts With.
- Enter BIServiceAdministrators.
- Click the arrow button to search.
- In the Searched Principals, select the row for BIServiceAdministrators.
- Click OK to add the group as a member.
- Click OK to save the changes.
- Repeat steps 3-13 to add:
- Role BIContentAuthor to group BiContentAuthors
- Role BIConsumer to group BIConsumers
- Log into the Analytics application
http://<OBIEE_SERVER>:<ANALYTICS_PORT>/analytics with the user created in Create Oracle Analytics Server users.
- Grantine BIAuthors to Create New Analysis
-
- Log into the Analytics application as the "weblogic" user or a user that is part of the BIServiceAdministrators group.
- Click Administration.
- Select Manage Privileges.
- Locate the entry Subject Area: TRC.
- Click the BI Service Administrator hyperlink. A dialog box is displayed.
- Click + to search roles to be added for the Oracle Analytics Content Author.
- Select the Oracle Analytics Content Author entry and click the arrow button to add it to the Selected Members list.
- Check whether Set Permission to is set to Granted.
- Click OK.
- Ensure that the Oracle Analytics Content Author role is selected and click OK to reflect the changes for the Subject Area: TRC.
- Log in as a user who is a part of the group BIContenAuthors and verify that you have access to the TRC subject area.
Parent topic: Create Oracle Analytics Server groups and users
Deploy help files for Oracle Analytics Server dashboard
Parent topic: Create Oracle Analytics Server groups and users