Defining Users

The OPA_ADMIN database role is required to access the Define Users window. See Enrolling an Administrator for information on creating a user account with the OPA_ADMIN database role.

This section includes:

Defining a New User

When you create a new user in the database, you define the user's first and last name, user name in the database, and set a password. Additionally, you can add an email address and set superuser status.

To define a new user, from the Define Users window under the Security menu:

  1. Define the Account Name, which is the user name a user specifies upon login to the application. The account name is often prefixed with OPS$ but this prefix is not required.
  2. Enter the user's First Name and Last Name. The first name and last name appear in the menu bar when this user is connected to TMS.
  3. Set the Super User? field to either Yes or No. If this person is a superuser then no Data Access Group information is stored (see Assigning Data Access Groups to a User). Superusers have access to all data. Only superusers can run the following jobs and reports:
    • All Disconnected System Integration (DSI) jobs, including importing and exporting data
    • Autoprocess VTAs
    • Predict VTA/VTI Report
    • Site Impacts Report
    • Omission Impacts Report
    • Cross Dictionary Impacts
    • X Areas with Outstanding Changes
    • Classification Statistics Report
    • Date Comparison
    • Dictionary Comparison
    • Dictionary Export
  4. Set the Load User? field to either Yes or No. If set to Yes, this person can load dictionaries into the predictionary tables. Most TMS users do not need this ability.
  5. (Optional) Enter a Comment about this user. Comment information can help administrators identify users, and thus maintain each user's privileges more effectively.
  6. (Optional) Enter an Email Address for the user. This field is added to support future functionality.
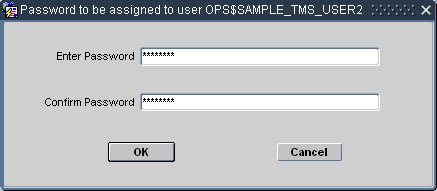
  7. Click Create Schema. The "Password to be Assigned to User Account Name" window opens.Image of the password assignment window.
  8. Enter and confirm the password for this user, and click OK.

If the password entries match, TMS adds this user to the OPA_ACCOUNTS table and TMS_ACCOUNTS table, and grants the TMS_ACCESS role to the account. Proceed to Assigning and Revoking Roles to assign additional roles for this user.

Assigning and Revoking Roles

TMS uses menu-based security, so roles give a user access to particular TMS menus or windows. The TMS role TMS_MAINTAIN_PRIV, for example, allows a TMS user to use all of the windows and batch jobs under the Repository Maintenance menu.

This section describes how to assign roles to, and revoke roles from, a TMS user.

For more information, see:

Assigning Roles to a User

To assign roles to an account:

  1. Select the user in the Define Users window, then click Assign Roles.

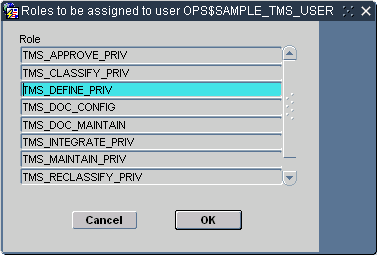
    The "Roles to be Assigned to User Account Name" window opens, displaying the TMS roles that this account does not currently have.

    Image of the role assignment window.
  2. Highlight the roles you want to grant to this account. You can Shift-click to select multiple consecutive rows, or Ctrl-click to select multiple non-consecutive rows.
  3. Click OK. TMS grants the role or roles you selected to this account.

Revoking Roles from a User

To revoke roles for an account:

  1. Select the user in the Define Users window, then click Revoke Roles.

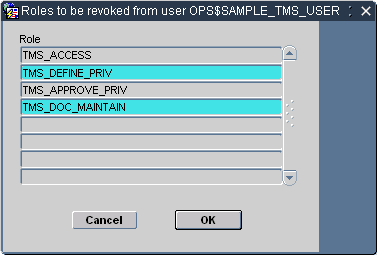
    The "Roles to be Revoked from User Account Name" window opens, displaying the roles currently granted to this account.

    Image of role revocation window.
  2. Highlight the roles you want to revoke from this account. You can Shift-click to select multiple consecutive rows, or Ctrl-click to select multiple non-consecutive rows.
  3. Click OK. TMS revokes the role or roles you selected to this account.

Changing a User's Password

You can change any user's password in a database where you have administrator privileges.

To change a user's password:

  1. Start a SQL*Plus session as SYSTEM.
  2. Issue the following alter user command:

    alter user username identified by new_password

Assigning Data Access Groups to a User

Data Access Groups (DAGs) work in conjunction with roles to control a user's access to TMS data. You can use them to fine tune the data that a particular user or class of users can operate on. For example, the user with TMS_MAINTAIN_PRIV would still be able to access all of the windows and batch jobs under the Repository Maintenance menu, but if you also assign a DAG that only allows access to MedDRA, then he would see only items relevant to MedDRA.

If a person is designated as a superuser in the Define Users window, he or she belongs to all DAGs and has access to all data.

To assign a DAG:

  1. Select the user in the Define Users window, then click Assign DAGs.

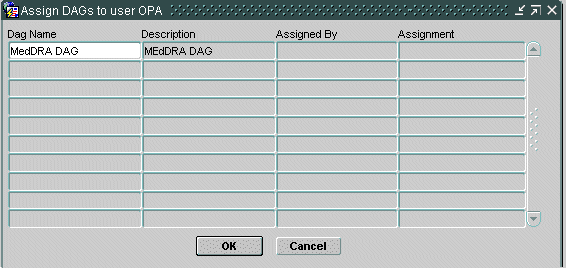
    The "Assign DAGs to user Account Name" window opens. If the user has been assigned any DAGs, they are listed.

    Description of the illustration "user_assign_dags.gif"
  2. Place the cursor in an empty field under Dag Name. From the LOV, select the DAG to assign.
  3. Click OK. TMS assigns the DAG or DAGs you selected to this account.

Migrating Account Information from Oracle Clinical

This section applies only to TMS installations that are integrated with Oracle Clinical.

TMS stores general user account information in the OPA_ACCOUNTS table and TMS-specific user account information in the TMS_ACCOUNTS tables. See the Oracle Thesaurus Management System Technical Reference Manual for details.

If you have already set up user accounts in Oracle Clinical, you can migrate all account information from ORACLE_ACCOUNTS to OPA_ACCOUNTS, as follows:

  1. In TMS, go to Security, then select Define Users.
  2. Click Get O*Clinical Account Data.

    The system inserts all records from the ORACLE_ACCOUNTS table into the OPA_ACCOUNTS table. The default comment text for each record is "Maintained in Oracle Clinical."

  3. Set up TMS-specific security for each user:

You must continue to maintain these accounts in Oracle Clinical.