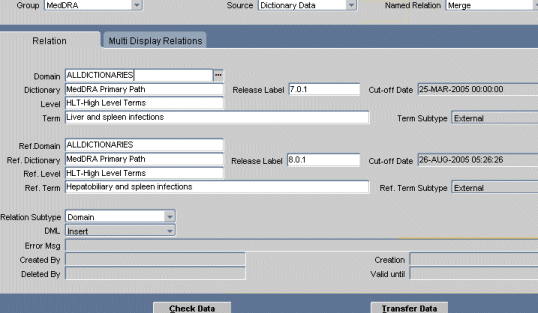
Using the Release Label Authoring Window
You can use the Release Label Authoring window (under the Repository Maintenance menu) to create named relations of type Release Label between dictionary terms.
Release Label named relations allow you to track complex changes to dictionary terms in different versions of the same dictionary such as:
-
merging two terms into a single term
-
splitting a single term into two terms
-
replacing one term with another term
Because these changes involve multiple inserts and deletes in a single audit transaction, TMS cannot automatically maintain a record that these terms are related. You can create relations here.
You can also create relations between terms in different dictionaries in this window.
TMS applies the named relation from the first term listed in the window (in the section that starts with the Domain field) toward the second term listed in the window (in the section that starts with the Ref. Domain field).
This section includes:
- Defining a Release Label Named Relation Between Two Terms
- Checking Data Before Activation
- Transferring Data
- Additional Fields
Parent topic: Repository Maintenance
Defining a Release Label Named Relation Between Two Terms
To define a relation between terms using the RL named relationship, complete the following steps:
Parent topic: Using the Release Label Authoring Window
Checking Data Before Activation
Click the Check Data button to verify the data. If TMS detects any errors, it displays a notification in the Error Msg field. See Activating Data for more information.
Parent topic: Using the Release Label Authoring Window
Transferring Data
To transfer the defined relation and any other terms and relations currently in the selected Activation Group from the predictionary tables to the production tables, click the Transfer Data button. See Activating Data for more information.
Parent topic: Using the Release Label Authoring Window
Additional Fields
The following read-only fields are displayed at the bottom of the window:
-
DML: This field displays the DML transaction being performed on the defined relation.
TMS uses a series of Insert and Delete transactions (collectively known as DML--Data Manipulation Language--transactions) to move data from the predictionary tables to the production tables. Each of these transactions are explained as follows:
-
When a predictionary record is saved, the DML value changes to Insert.
-
After a record is transferred into the production tables, the DML field displays a null value.
-
When a record is deleted from the production tables, a replica of that record gets automatically inserted within the predictionary tables. This replica is created with a DML value of Delete.
-
-
Error Msg: TMS displays a notification in this field if any errors are encountered on your clicking the Check Data button.
-
Created By: This field automatically displays the user name of the individual who created the relation. It is populated after the relation is saved the first time.
-
Creation: This field automatically displays the date and time the relation was created. It is populated after the relation is saved the first time.
-
Deleted By: This field is populated only when a relation is deleted from the production tables and activation/transfer of data is performed after such a deletion. It displays the user name of the individual who deleted the relation.
-
Valid Until: This field automatically displays the date and time until which the relation remains valid. It is populated after the relation is saved the first time.
Parent topic: Using the Release Label Authoring Window
