4 Generating Request File
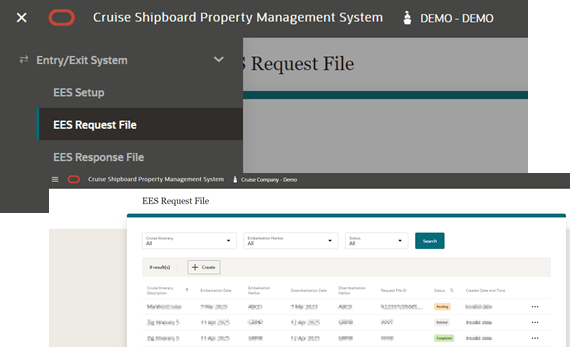
The EES Request File page allows you to view previously generated request files, and has an option to create a new request file for submission (reservation manifest) to EES for verification.
Figure 4-1 EES Request File Page

In the EES Request File page, all the records of previously generated EES request files are shown. You can search a record using one of the search filters - cruise itinerary, embarkation harbor and request file status.
In each of the request records, you can delete, re-generate and view based on the Request File status - Pending, Completed and Deleted.
-
View: Applicable for status Pending, Deleted and Completed
-
Re-generate: Only applicable for status that is Pending and CI method is Web Portal (CSV)
-
Delete: Only applicable for status that is Pending
Creating Request File
There are two ways to create request file per EES application setup - Web Portal (CSV) and System to System (S2S), and below are the steps.
For CSV method,
-
From the Navigation menu, click Entry/Exit System then the EES Request File
-
Click Create button to open the Create Request File page
-
At the Create Request File screen, the reservation manifest listing will populate based on below selection criteria; modification of the manifest is not allowed as it is listed based on Embarkation Harbor:
- Profile Type: a reservation filter by profile type, with possible options of guest and crew
-
Cruise Itinerary: current or future cruise itinerary record
-
Embarkation Harbor: the embarkation port with arrival date based on the selected Cruise Itinerary
- Upon selecting the above criteria, the system auto fills the Embarkation and Disembarkation Date, Disembarkation Harbor and Time. Modification on these fields is not allow
- Click the Process button to retrieve listing of guest manifest records meeting the selected criteria. The record shown would only consists of checked in reservation status with actual embarkation date matching the embarkation harbor date
-
You can also search the reservation record by entering these keywords: a surname, given name, stateroom number or folio number
-
A guest data is deemed as an error and is highlighted in red if the data is missing the following information - Folio number, Surname, Given Name, Date of Birth, Sex, Nationality, Travel Document Type, Travel Document Number, Travel Document Expiry Date and Travel Document Issued Country
-
The Generate option is disabled if the loaded information contain erroneous data. You need to correct all the erroneous reservation data in SPMS Desktop Application, and then refresh the manifest by clicking the Process button. If there are no error in the reloaded reservation data, the Generate button become enabled. You can also enable the button by deleting the erroneous data from the manifest, and then select the Ellipsis button followed by the Delete button
-
Click Generate button to generate the csv file. The generated filename format is according to the selected profile type:
-
Guest Profile type will be “EESReqYYMMDDHHMM00.csv
-
Crew Profile type will be CrewEESReqYYMMDDHHMM00.csv
-
- The generated request file is saved to the user defined browser download location
For S2S method,
- Repeat step 1 to 8 of For CSV method
- Clicking Generate button in S2S configuration will create the request file in JSON format and it will not be downloaded. Instead, it will redirect you to Request file page, listing the newly created requests with status pending
- Once the request file is created successfully, it will be processed automatically by Border Control application EES S2S integration by connecting to eu-LISA endpoint
- When the request is processed successfully, the status will be updated to Completed, along with individual records status updated to the appropriate EES status received from eu-LISA
- If there is an error occurs while processing the request file, then the status of the file will show 'Error', with specific error messages returned by eu-LISA shown in the Error Message column. To view the all the request records with error status, click the Status Filter and select the error status
- Request file with error status will not be re-processed. User must delete the request file, resolve all errors and recreate a new file with the same data. You cannot recreate the request file with the same data if you have not delete the earlier file. See Deleting Request File topic for detailed steps on how to delete a request file.
Deleting Request File
-
On the EES Request File Listing page, select the request file record to delete and then the Ellipsis button
-
Click Delete button. At the confirmation message ‘Delete EES request?’, clicking Cancel will close the dialog box and Delete will flag the request file as Deleted
-
Once the Request File is flagged as deleted, the reservation manifest in this Request File will automatically flagged as deleted. To regenerate, see topic Creating Request File
-
Deleting a Completed or Deleted status request file is not permissible
Viewing Request File
-
From the Navigation menu, select Entry/Exit System and then EES Request File
-
On the EES Request File Listing page, select the request file record and then the Ellipsis button
-
Click View button to open View Request File page
-
There are two sections on this page:
-
Cruise Itinerary: Section shows the cruise itinerary details, request file ID and request file status
-
Request File Record(s): Section shows the guest details records
-
Re-generating Request File
The Re-generate File option re-creates the same EES Request File with the exact data from the selected File ID. This option is only available to CI method - Web Portal (CSV) and request file status is pending.
-
From the Navigation menu, select Entry/Exit System and then EES Request File
-
On the EES Request File Listing page, select the request file record and then the Ellipsis button
-
Click Re-generate to open the View Request File page and then the Re-generate File button to proceed