2 Security Server
FMS Security Server hosts sensitive information like FidelioBK schema password and KEK key. It stores these two parameters in encrypted form in the configuration file. It uses Data Protection Application Programming Interface (DPAPI), a Windows based encryption and machine level key for the encryption.
Security Server Encryption
Fleet Management Security Server hosts sensitive information in an encrypted form in the configuration file. You should run the server with Administrative privilege.
The below examples shows both the FidelioBK schema password and Key Encryption Key(KEK) key in plain text and encrypted format:
<?xml version=1.0 encoding=utf-8 ?>
<configuration>
 <appSettings>
<add key="FidelioBkPwd" value="" />
<add key="KEKKey" value="" />
<add key="ServiceUrl" value="https://localhost/OHCFMSSecurityService/FCTransactionsService.asmx"/>
<add key="TNSNamesPath" value="C:\Oracle\product\19.3.0\dbhome_1\network\admin\tnsnames.ora"/>
</appSettings>
Schema password and KEK in encrypted form:
<?xml version=1.0 encoding=utf-8 ?>
<configuration>
   <appSettings configProtectionProvider=DataProtectionConfigurationProvider>
    <EncryptedData>
     <CipherData>
<CipherValue>AQAAANCMnd8BFdERjHoAwE/Cl+sBAAAA0rBRLmkdWUumfaBJzssrgwQAAAACAAAAAAADZgAAwAAAABAAAAAjrjZ1Mv9n/9YTWeJObrEGAAAAAASAAACgAAAAEAAAAE7s1WJ6avIdjl/xCJFSHxXAAQAADGvQLFOHv5bbu8yElnDggZyC4g441wOzgpol5Z1SxmmlV0ZF1W+3jE1b0d7JQnGSU5oiJ9IcXicYWUOhFPZuHSHLf3jVVazGOqFVYYuX/PlsJ7KLAWbNIOsYItbj8C5u+fCLasFWd7RTjkJUh/ToqsUMHrPYwqzbeNe6tq9dngHoboA0DrI5tLjqBaQnaqxhMAYd3NllBRPfNPDq2ah5nJoMTOjpsbzGvfzQ9lxBlFaIk4ntdYcn3V9Lo2sn9zSHrFu/DbdeHN+xHtehFuUC4wlzAc+hl20y87tXuI72z5txCEsRwKM7tPqibqlvtje/si8H0SSzu5oA8P2tN1rzun+bd5il//vQG74WxgwWeMLA4gXbRg6Re7yXQDlmqNaqf36SEx7mtZa4TjjjYIkz2LkSxXDUuTiSYNd5w18N2xJyn8rXpV0zZeI8kKIAU/WP1aGWR5fvwtmfUskc+K3a7A23epLY8/fG2IqaVdiIXq8ZpoLPoT+ksL4DTLz6TyIn54Mj7y0+kqaeR7fYxvlwCiZzNTcVtjtcnPneu4f7GOLjsn6Ujyk08b0++YjpfzLRyYNjBuuXp4DPynPKSpAoqhQAAADhdk==
</CipherValue>
     </CipherData>
    </EncryptedData>
   </appSettings>
Secure Clients
On startup, any client (applications/interfaces/web services) connecting to the server for the first time will fetch and store the FidelioBK password and Encryption Key (KEK) in an encrypted form in their configuration files. Thereafter, the client will use the FidelioBK password and the KEK stored in the configuration files. The client will need to reconnect to the server if there is a change in the FidelioBK password or KEK key.
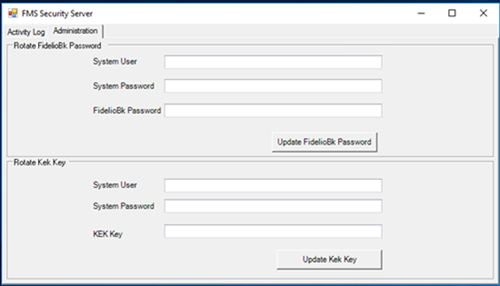
To update FidelioBK password and Key Encryption Key, open OHC Security Server, Administration and provide the relevant credentials
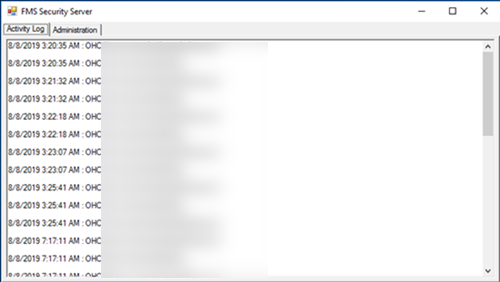
Figure 2-1 Server Logs for Successful Secure Client Connection

Figure 2-2 FidelioBK Password and KEK Key Fields on the Administration Tab

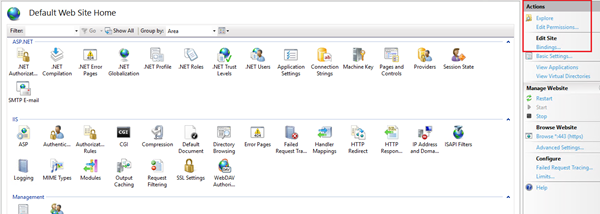
Adding HTTPS Binding
Updating the Configuration File
<appSettings> section in the Configuration
file.
Frequently Asked Questions and Troubleshooting
-
Where is the Security Server installed?
The Security Server is installed on the IIS Machine.
-
Who uses the Security Server?
-
An IT manager at the client site or
-
An administrator at the client site or
-
A support personnel
-
-
What is the purpose of the Security Server?
The Security Server is used to host sensitive information like FidelioBK password and KEK key.
-
What kind of logs are available for the Security Server?
An Activity Log capturing information of a client connection and is stored in the installation directory (C:\inetpub\wwwroot\OHCFMSSecurityService\bin\Log).
An Exception Log stored in inetpub folder (C:\inetpub\wwwroot\OHCFMSSecurityService\bin\Error).
A Trace Log that is used when the above logs information are insufficient for troubleshooting. Tracing can be enabled on the server and client configuration files using the <system.diagnostics> section that generates a detailed trace file called (messages.svxlog) which contain information of the errors messages and warnings. You can view the trace log file with SvcTraceViewer.exe tool. To avoid creating a large trace log, the tracing needs to be disabled once you obtain the information for the troubleshooting.
Importing the Self-Signed Certificates
- To import the PFX into the local computer’s Trusted Root
Certification Authority Certificates folder.
- Click the Windows Start button and select the Run command.
- Enter MMC and click OK.
- Select File, and click Add / Remove Snap In.
- Double-click Certificates.
- Select the computer account, select Local Computer, and then click Finish.
- Click OK to close the Snap-In window.
- Click [+] to expand the Certificates container, then select Trusted Root Certification Authorities, and Certificates.
- Right-click Certificates, select All Tasks, and click Import.
- At the Certificate Import Wizard, click Next.
- Click Browse, select the PFX to import, and then click Open.
- Click Next.
- Select Place all certificates in the following store. Ensure the Trusted Root Certification Authorities is visible in the Certificate Store section and click Next.
- Click Finish, and then click OK.
- To import the PFX file into the local computer’s Personal
Certificates folder.
- Click the Windows Start button and select the Run command.
- Enter the MMC and click OK.
- Select File, and click Add / Remove Snap In.
- Double-click Certificates.
- Select the computer account, followed by Local Computer, then click Finish.
- Click OK to close the Snap-In window.
- Click [+] to expand Certificates container and select Personal, and Certificates.
- Right-click Certificates, select All Tasks, and click Import.
- At the Certificate Import Wizard, click Next.
- Click Browse, select the PFX to import, and then click Open.
- Click Next.
- Select Automatically select the certificate store based on the type of certificate.
- Click Finish, and then click OK.
