5 Shipboard Property Management System Security
This chapter explains the Shipboard Property Management System's security features.
Authorization Privileges
Overview
Setting Authorization privileges establishes strict access control, explicitly enabling or restricting the ability to do something with a computer resource.
User authorization privileges are configured in the SPMS within the User Security module. The SPMS uses the simple authorization model, where each user belongs to one or more user groups, and the user has all privileges assigned to the user group(s).
The Oracle Hospitality Cruise Launch Panel is the control panel for SPMS programs and User Security Management.
User Security/Access Rights
This section describes the SPMS User Security Access by module and permission level available to users. Permission is granted at the group level instead of the individual user level.
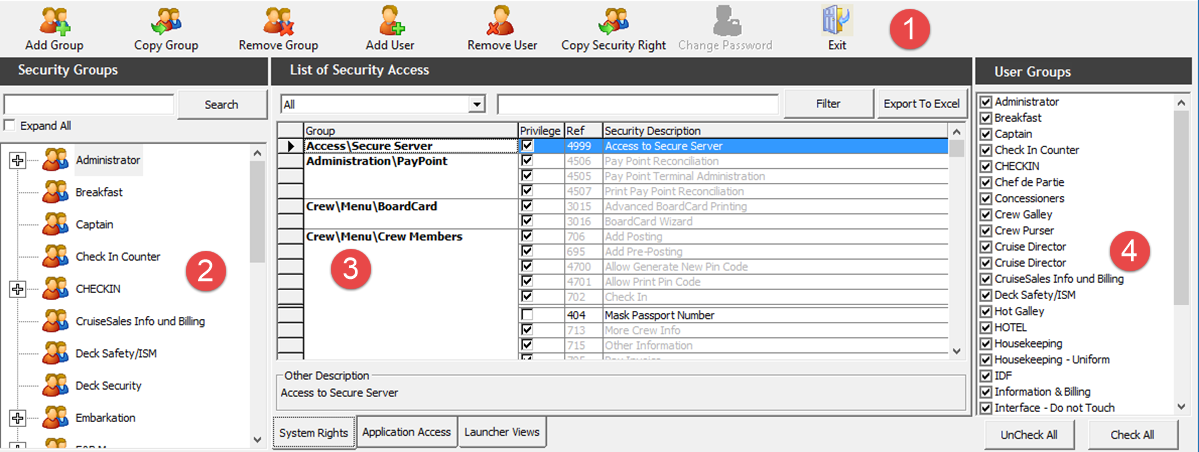
Figure 5-1 User Security Screen
-
Menu bar.
-
Security Group.
-
List of Security Access.
-
User Groups.
Accessing User Security Program
-
Launch the OHC Launch Panel from the
C:\Program Files (x86)\Oracle Hospitality Cruisefolder. -
Navigate to the Utilities tab and run the User Security program.
Adding a User
-
Select a Security Group from the Security Groups list.
-
Click Add User from the ribbon bar.
-
In the Add User window, enter the Login name and Description in the User Details section and check the User Group associated with this user. Multiple selections of the User Group are allowed.
-
Enter the Password and check the password criteria in the Security section.
-
At the Crew Name drop-down list. select the crew profile to associate the user login and enter the information in the various sections, if any.
-
Click Apply to save the user. The newly created user is saved under the Security group container.
Figure 5-2 Add User Window
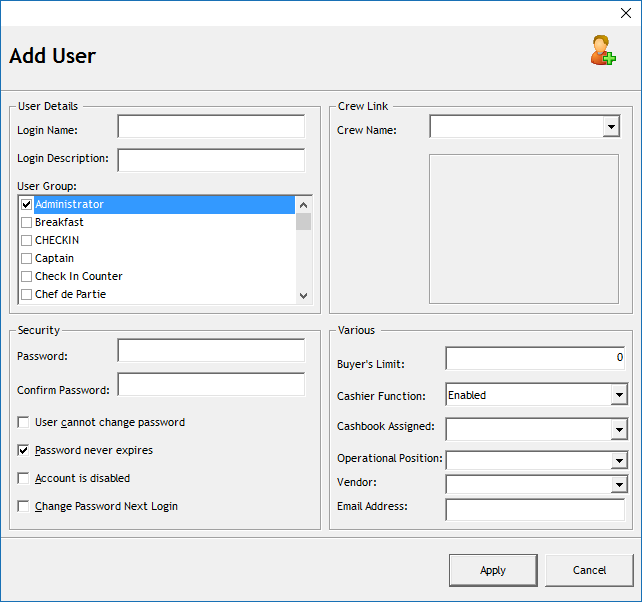
Table 5-1 Field Definition for Add User
| Field | Description |
|---|---|
|
Login Name |
Login ID used in SPMS applications. |
|
Login Description |
User Name. |
|
User Group |
Group Access Level. |
|
Password |
User Password. |
|
Crew Link |
Link to the Crew Profile. |
|
Buyer’s Limit |
Maximum spend amount allowed for goods purchases from MMS module. |
|
Cashier Function |
Enable/Disable the Cashier Function. |
|
Cashbook Assigned |
The Cashbook assigned to the user. |
|
Operational Position |
Operational Position the user is linked to. |
|
Vendor |
A user by iCrew WebServices to retrieve an excursion. |
|
Email Address |
Email address of the user. |
Changing a User Password
-
Expand the Security Group container and select the user name.
-
Click Change Password from the ribbon bar and enter the new password in the [User Name] field.
-
Click Apply to confirm the change and then click OK to close the dialog window.
Audit Trail/Application Activity Log
This section describes the steps to create triggers to log various changes made to the database. These triggers are configured in OHC Tools.exe.
Change Log Trigger
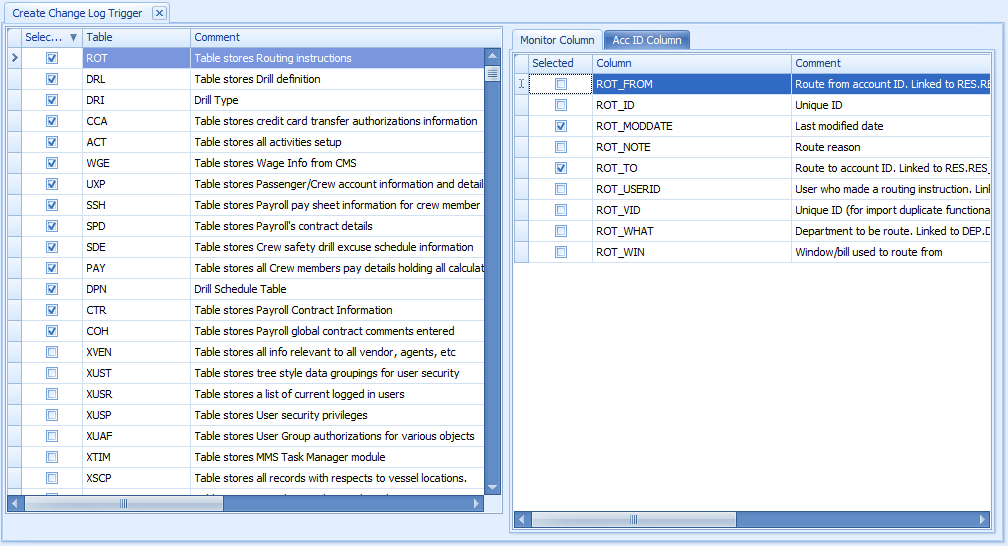
The following function triggers a change log activity when changes are made to the selected fields and stores the log in the ADU table.
Figure 5-3 Change Log Trigger
-
In the OHC Tools window ribbon bar, select Change Log Trigger.
-
In the Create Change Log Trigger window, check mark the table on the left pane and then navigate to Monitor Column on the right pane.
-
In the Monitor Column, check mark the fields for changes to be logged into the ADU table and then navigate to the Acc ID Column tab.
-
In the Acc ID Column tab, checkmark the field to write into the
ADU_ACC_ID. -
Click the Create Change Log Trigger at the ribbon bar to create the trigger. To add more table fields repeat the above steps.
Deleting a Log Trigger
This function creates a trigger to log data deletion activities of any value from the selected field into SDR table.
-
In the OHC Tools window ribbon bar, select the Delete Log Trigger.
-
In Create Deletion Log Trigger window, check mark the table on the left pane and then navigate to the Description Column on the right pane.
-
In the Description Column, check mark the field for changes to be to log into the SDR table and then navigate to the Acc ID column tab.
-
In the Acc ID Column tab, check mark the field to write into
SDR_ACC_ID. -
Click the Create Deletion Log Trigger on the ribbon bar to create the trigger.
-
The system prompts the total number of triggers deleted and created/uploaded. Click OK to continue. To add more table fields, repeat the above steps.
Inserting a Log Trigger
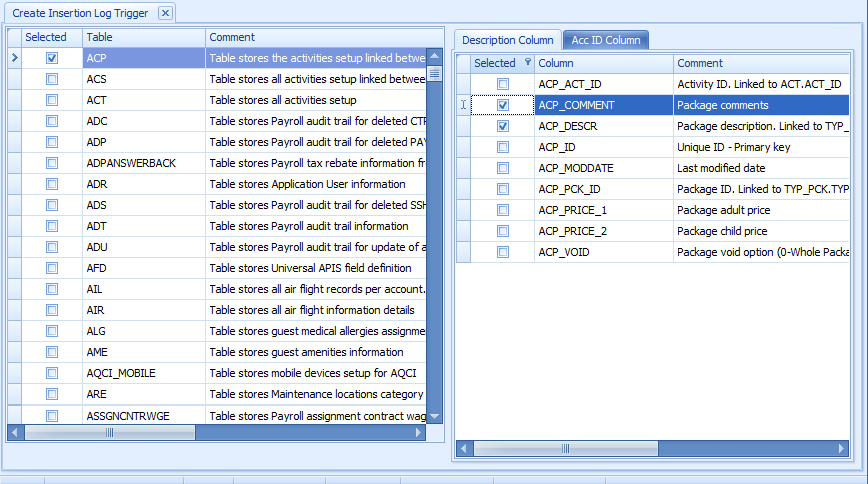
This function creates a trigger to log data insertion activities of any value for selected fields into the SIR table.
-
In the OHC Tools window ribbon bar, select the Insertion Log Trigger.
-
In the Create Insertion Log Trigger window, check mark the table on the left pane and then navigate to the Description Column on the right pane.
-
In the Description Column, check mark the field for changes to be logged into the SIR table and navigate to the Acc ID Column tab and check mark the field value to write into the
SIR_ACC_ID. -
Click the Create Insertion Log Trigger on the ribbon bar. The system prompts you with the total number of triggers deleted and created/uploaded.
-
Click OK to continue. Repeat the above steps for more table fields to be added.
Figure 5-4 Insertion of Log Trigger
Shipboard Property Management System OHC Tools
The OHC Tools is used in the Shipboard Property Management System to encrypt and store sensitive information. The customer can select the sensitive data to encrypt and store.
-
Launch OHC Tools.exe.
-
At the login screen, enter your login credentials.
-
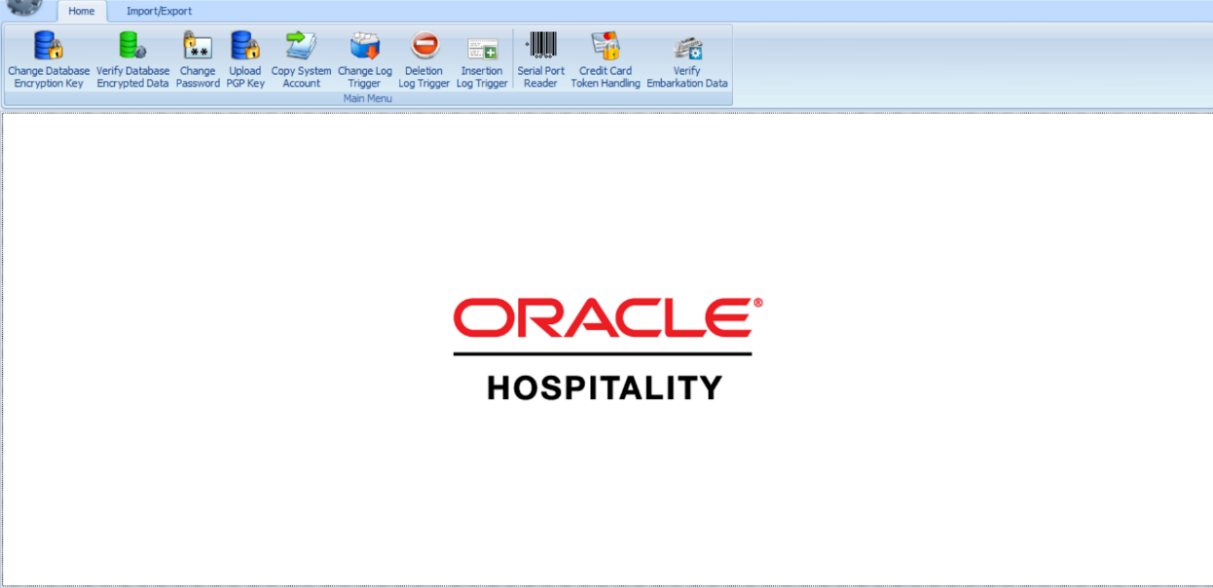
After the authentication is successful, you have access to the application and the screen shown below is visible.
-
Select the Change Database Encryption Key from the ribbon bar.
Figure 5-5 OHC Tools Main Page
Verify Database Encrypted Data
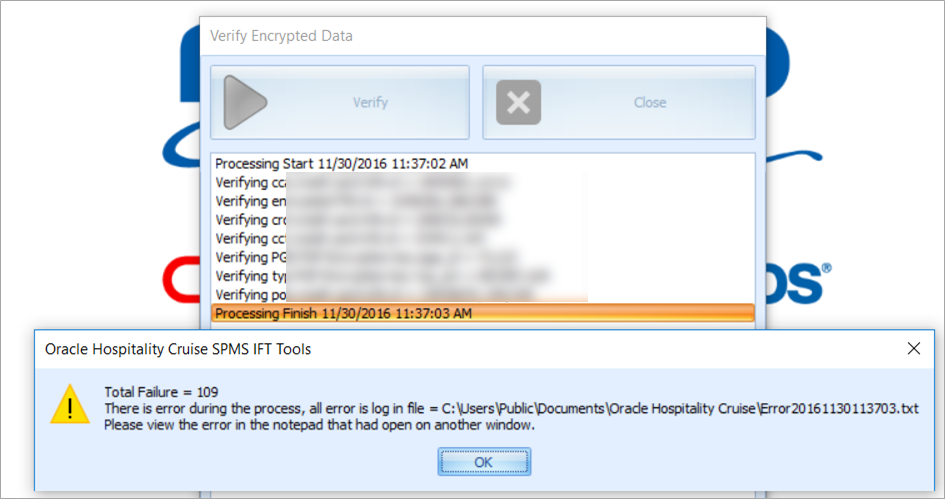
The Verify Database Encrypted Data function verifies the encrypted data and confirms that the encryption can be changed before performing Change Database Encryption Key.
Verifying Encrypted Data
Figure 5-6 Verify Database Encrypted Data
-
Log into OHC Tools and select Verify Database Encrypted Data from the ribbon bar.
-
On the Verify Encrypted Data window, click Verify. If the verification returns a failed message, possibly due to invalid data, correct the error and repeat the process.
-
Click Close when the process finishes.
Change Database Encryption Key
The Change Database Encryption Key function allows you to secure and protect important data such as credit card information and user passwords stored in the database using an encryption method compliant to the PA-DSS policy.
Creating an Encryption Passphrase
-
Login to OHC Tools and select the Change Database Encryption Key from the ribbon bar.
-
In the Encryption Key Manager window, enter the Passphrase 1 and Passphrase 2, Old Password, New Password and Confirm New Password.
-
Click Apply to proceed. The system prompts you with the message Please ensure there is no application currently running in order to prevent data corruption later.
-
If Transparent Data Encryption (TDE) is used, the system performs a database backup,allowing you to restore at a later stage. This requires a password for the DMP file. If an error were to occur during the backup, you will be prompt to enter the same password and they must be identical.
-
Click OK to continue and program prompts a request to stop the running application, if any.
-
When the change encryption key begins, program performs a backup process on tables that need to be re-encrypted.
-
If corrupted data is found during the encryption process, the system continues the process and prompts a warning at the end of the process before generating an error log.
Figure 5-7 Encryption Error Confirmation

-
At the prompt, select Yes to continue replacing the encryption key or No to roll back the process by restoring the backup. The Passphrase is saved in OHCSecurity.par with a one-year validity from the date of encryption.
-
The Passphrase is saved in OHCSecurity.par with a one-year validity from the date of encryption.
Change Password Manager
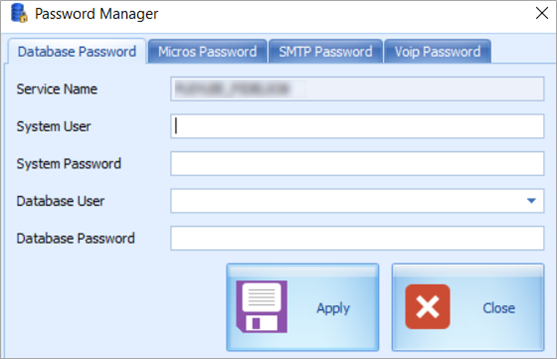
The Change Password function changes the database password, including the MICROS, SMTP, and VOIP passwords, and prevents users from changing the passwords directly from external database tools.
Note:
The User is not allowed to change the Ship’s database password when OHC QCI Sync application is running and requires a user granted with the Database privilege.Figure 5-8 Password Manager
-
On the OHC Tools window, select Change Password from the ribbon bar.
-
On the Password Manager window, enter the System User, System Password, Database User and Database Password. Passwords must meet the password specification.
-
Click Apply to update the database password and save to OHCSecurity.par.
-
Repeat the above steps to change the password for MICROS, SMTP and VOIP.
Upload Pretty Good Privacy (PGP) Key
The Upload Pretty Good Privacy (PGP) Key is a function used to upload the Public Key (.pkr) and Private Key (.skr), a key pair for functionality that requires a PGP Key. For example, Payroll, Credit Card, DGS Resonline, and Data Import handling.
A key pair can only be generated using third-party tools such as PortablePGP and FileAssurity OpenPGP. See PA-DSS Implementation Guide for more information.
For Credit Card processing, the Ship sends the public key to the credit card provider and in return, receives a public key from the provider.
-
On the OHC Tools window, select Upload PGP Key from the ribbon bar.
-
On the PGP Key Uploader window Credit Card tab, click Browse of the Public Key to select a .pkr file to upload. To upload a Private Key, click Browse of Private Key to select a .skr file.
-
Enter the Key Passphrase if the key is generated with a specific passphrase.
-
Click Upload to upload the keys. The system prompts Key upload is done successfully when the upload completes and both the keys are stored in the TYP_PGP table.
-
For DGS Credit Card handling, a key version is required.
Note:
The PGP Key has an expiry date and you must generate a new PGP Key and re-upload to the database after a reminder is prompted. The program does not allow reuse of the same PGP Key.