4 Setting Up CIW
This section describes the configurations required prior to using the CIW function.
Accessing the Setup Page
The setup function is accessible by launching the Advance Quick Check In module and navigating to the Setup tab on the main page.
Only users who has the permission are able access to the Setup tab, General Setup, Wizard Travel Rules and Wizard Travel Documents Eligibility assignment.
Setting Up Wizard Travel Rules
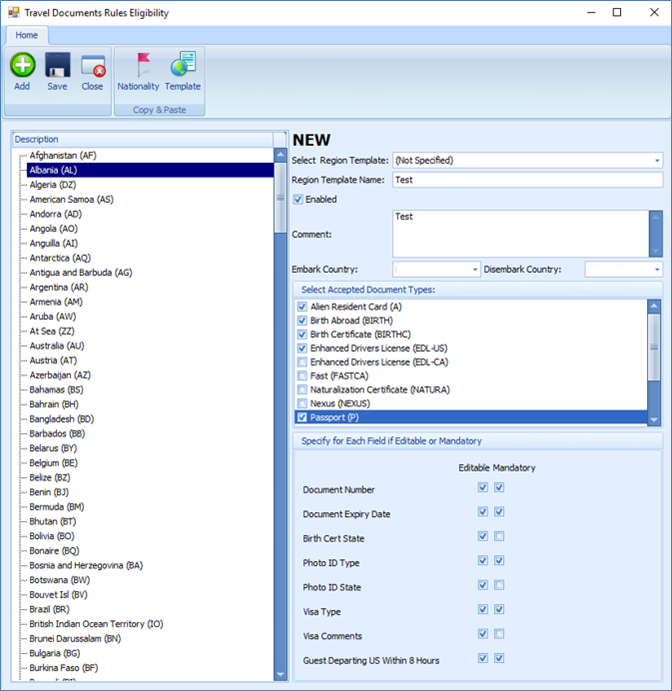
Before you begin using the Check-In Wizard (CIW) function, you must configure the travel rules for each nationality, by first creating a template and assigning the nationalities to the template.
Figure 4-1 CIW Travel Rules

Adding New Travel Document Rules Template
-
At the main page, select the Setup tab and the Wizard Travel Rules at the ribbon bar to open the rules eligibility screen.
-
By default, all the entry fields are disabled. On the Travel Document Rules Eligibility page, click Add or select an existing Template to activate the fields.
-
Enter the Region Template Name and Comment, then select Embark/Disembark Country from the drop-down list.
-
In the Select Accepted Document Type, select the applicable check boxes.
In the next section, select the applicable check boxes if the field is editable or if mandatory, and click Save to save the template.
-
Select the Nationality and check the appropriate document types accepted under the Select Accepted Document section. The accepted document types are defined in parameter Advance QCI, Wizard DocType xxx.
-
Select the requirement for document type whether it is editable or mandatory in the Immigration, Visa or other information screen in AQCI.
-
To add more nationality to the rule, repeat steps 6 – 7.
-
Click Save to save the template.
Duplicating Nationality Rules
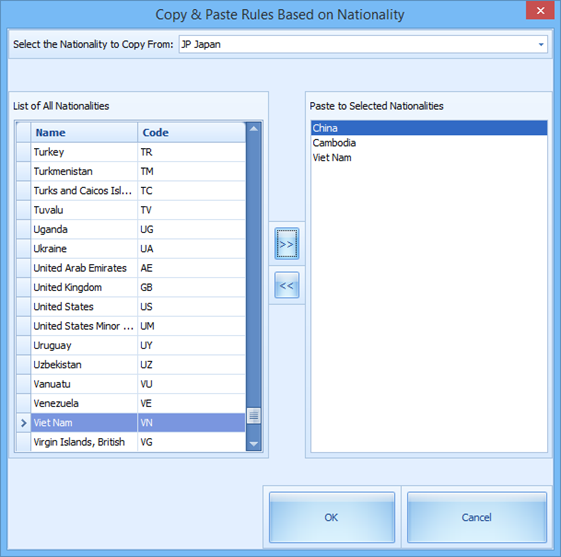
You can duplicate an existing rules defined in a nationality to other nationalities.
Figure 4-2 Copy/Paste Rules Based Nationality

-
At the Travel Document Rules Eligibility page, click the Nationality button.
-
Select the Nationality to Copy From using the drop-down list.
-
Select the nationailties on the List of All Nationalities and click the double right arrow to transfer the information to the Paste to Selected Nationalities window.
-
To remove the selection, select the nationality from Paste to Selected Nationalities, and click double left arrow.
-
Click OK to copy.
Duplicating a Template
You can copy an existing template if the rules defined are relatively similar.
-
On the Travel Document Rules Eligibility page, select a Region Template from the drop-down list.
-
Click the Template at the ribbon bar, insert the new template name when prompted and click OK to copy.
Defining Template to a CIW User
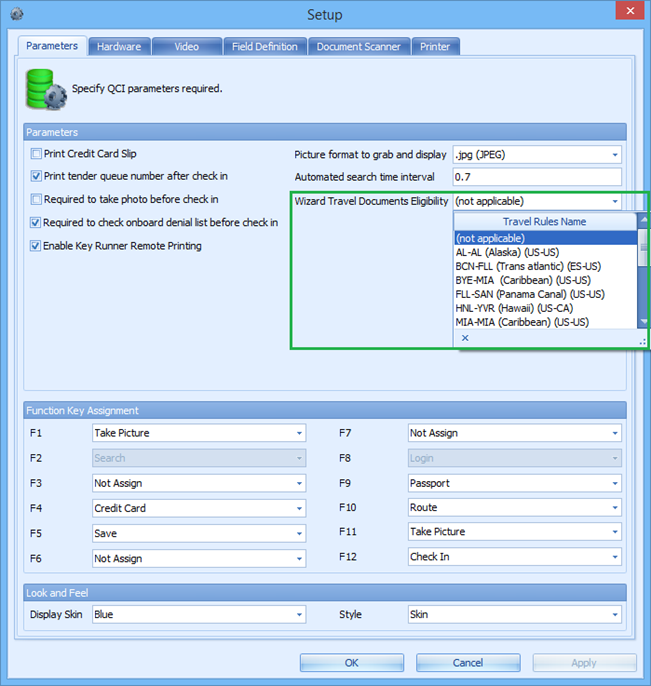
Figure 4-3 CIW Travel Documents Eligibility

Once you have the travel rules configured in the template, you can choose the template to use based on the voyage.
-
At the main AQCI page, navigate to the Setup tab.
-
Click the General Setup on the ribbon bar.
-
From the Parameters tab, select the Travel Rules Name under Wizard Travel Documents Eligibility drop-down list, and click OK to save.
-
The system then updates the selected template in parameter Advance QCI, Travel Documents Eligibility Setup and the selected template is becomes visible.
Setting up the Barcode Scanner
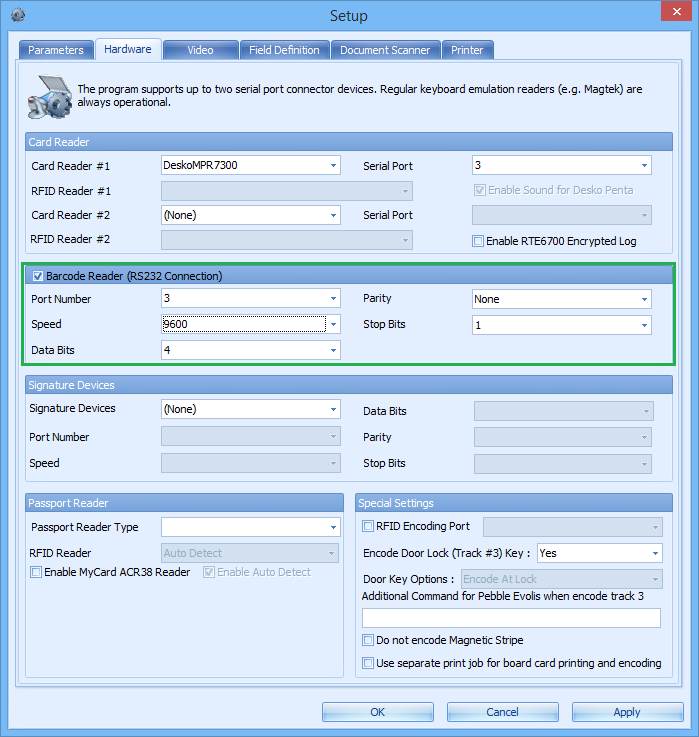
The CIW supports barcode scanning of the passenger’s board card, and the field used to search the passenger’s record is defined in the parameter, Advance QCI, Wizard - Scan Barcode field. Typically, the search uses the reservation board card external number to identify the passenger as the external number is usually printed on a document, such as set-sail pass.
Figure 4-4 CIW Hardware Tab

-
At the main AQCI page, navigate to the Setup tab and click the General Setup at the ribbon bar.
-
At the Hardware tab, select the Barcode Reader (RS232 Connection) check box, set the speed to 9600, and use the system defaulted port number, parity, stop bits and data bits setting. The supported barcode format is Interleaved2of5, Code 39 and Barcode C128, minimum speed at 9600.
-
Click OK to save.
Setting up the Passport Reader
The CIW function supports a number of passport readers that are used for registration. To configure the passport reader,
-
Repeat step 1 of Setting up the Barcode scanner.
-
At the Hardware tab, select the Card Reader for a swipe type reader or select Passport Reader for a scanner type reader from the drop-down list and use the system default settings.
-
Click OK to save.