POS Interface
An interface setup is required for the Point of Sales Systems such as Simphony to communicate with the Management module, enabling a charge to be posted to the guest account. The setup may differ on both systems, and are described in the following chapter.
Setting Up MICROS 9700/Simphony Interface
To configure any settings for Micros 9700/Simphony interface, you are required to establish a connection to the MICROS DB using the Net Manager program, and then followed by setting up the required parameters in the Administration, System Setup, Parameter.
As majority of the settings are managed within the system parameters, they are defined below:
PAR_PROMO
Table 9-16 Parameter Group Promo for Micros Server
| PAR Name | PAR Value | Description |
|---|---|---|
|
Micros Server Name |
Micros Database Service Name. |
|
|
Micros Server Type |
Database Platform MICROS 9700 is installed on: 0 - Oracle 1 - Microsoft SQL Server |
|
|
Micros User Name |
Micros Database User Name. |
|
|
Micros User Password |
Micros Database User Password. |
To set up the MICROS 9700/Simphony Interface
-
Log in to Administration and select Administration on the menu bar.
-
Select System Setup from the drop-down list, and then select Database Parameter Setup.
-
Select Promo group from the tree-view.
-
Enter the Micros Server Name, Micros Server Type, Micros User Name and Micros User Password.
Note:
A faster package enquiry can be obtained by specifying the IP address and Service Name in parameter, Promo, Micros Server name.
Setting Up Web Service Connection for Advance Micros Interface
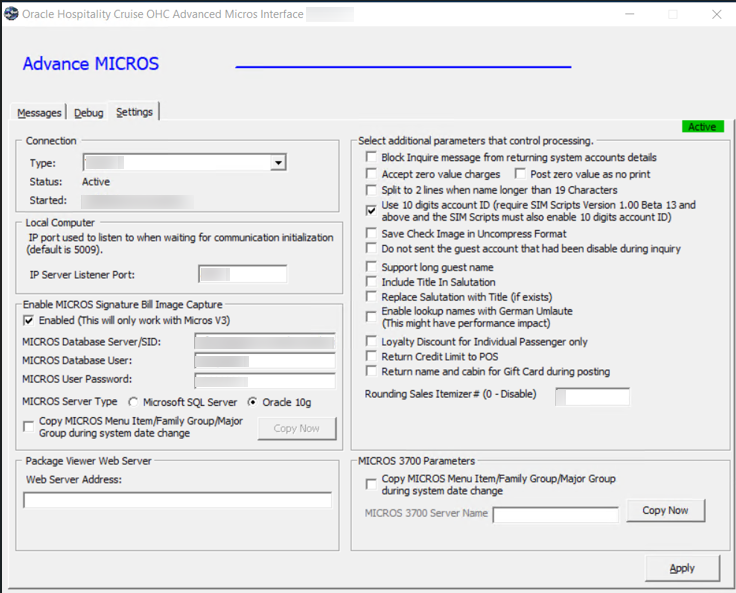
Setting up a Web Service Connection enables user in enquiring the guest information including package purchased, and the look up for sellable package in Advance Micros Interface. The Advance Micros Interface configuration is slightly different to Micros 9700 interface, and below figure shows where information’s are entered.
-
Launch OHC Advanced Micros program and go to the Settings tab.
-
Under Pack Viewer Web Server, enter the Web Server Address, User Name and Password.
-
Click Apply.
Figure 9-58 Advance Micros Interface

Other Setup
In order for POS User to view the guest information such as guest profile, a package purchased and remaining package plan, bill look up and many more, a Micros Picture View application must be configured at MICROS POS. Please consult MICROS Specialist for configuration of such application.
Setting Up Simphony Interface
As majority of the settings are managed within the system parameters, they are defined in PAR_PROMO parameter, as below:
PAR_PROMO
Table 9-17 Parameter Group Promo for Micros Server
| PAR Name | PAR Value | Description |
|---|---|---|
|
Micros Server Name |
Micros Database Service Name. |
|
|
Micros Server Type |
Database Platform Simphony is installed on: 0 - Oracle 1 - Microsoft SQL Server |
|
|
Micros User Name |
Micros Database User Name. |
|
|
Micros User Password |
Micros Database User Password. |
To Set Up the Simphony Interface
-
Log in to Administration, and select Administration.
-
Select System Setup from the drop-down list, and then select Database Parameter Setup.
-
Select Promo group from the tree-view.
-
Enter the Micros Server Name, Micros Server Type, Micros User Name, and Micros User Password.
Note:
A faster package enquiry can be obtained by specifying the IP address and Service Name in parameter, Promo, Micros Server name. -
Under Parameter group Simphony, enter the property ID in Micros Simphony Property Number to copy the DB.
Note:
The property ID is obtainable from Simphony Properties Enterprise System.
Setting Up Web Service Connection for Simphony
Setting up a Web Service Connection enables user in enquiring the guest information including package purchased, and the look up for sellable package in Simphony system.
-
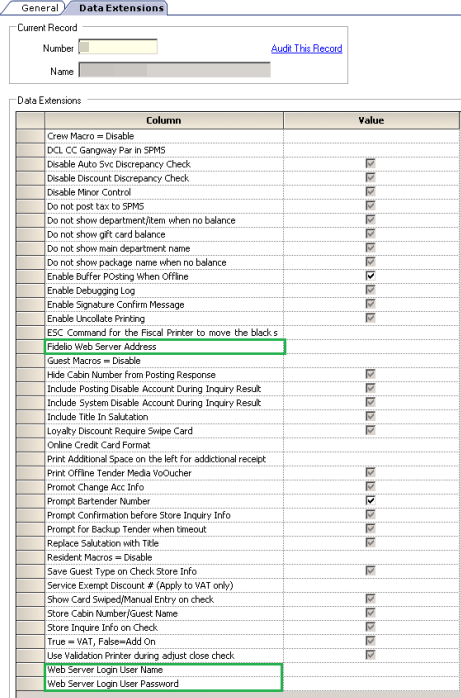
Log in to Simphony–EMC and go to Properties Enterprise tab.
-
On the left of the window, choose the properties you wish to connect to.
-
Double-click on the selected properties, and then go to Data Extension tab.
-
Enter the value of these extension field:
-
Fidelio Web Server Address
-
Web Server Login User Name
-
Web Server Login User Password
-
Figure 9-59 Simphony Data Extension Table
