Locations Setup
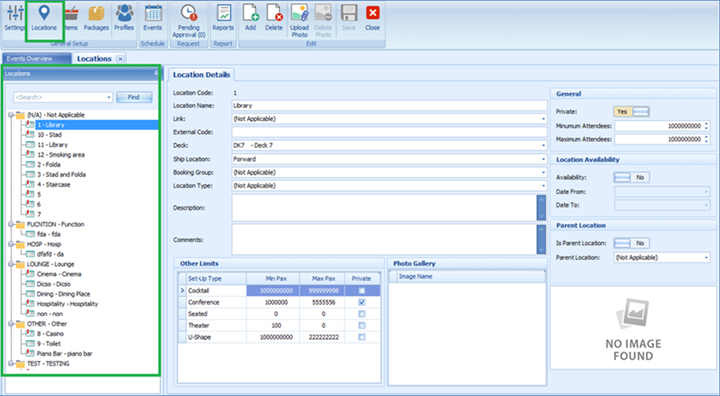
Figure 3-7 Locations Tab

The Locations Setup is accessible through the General Setup, Locations icon on the ribbon bar. It shows the location available for an event booking and is grouped by location category.
In each location, you can define the location details, determine the seating style suitable for that location, attach a photo gallery and set the minimum/maximum person allowed. All of these settings are linked to codes configured in Event Settings Overview.
Adding New Location
- Click Location from the General Setup group.
- On the Location tab, the sub-locations are listed in a container view. Click the + button to expand the container list.
- To add a new location, select the main location, and then click Add on the ribbon bar.
- In the Location Details section, enter all the necessary fields. The Location Code, Location Name, Booking Group, and Location Type are mandatory fields and the system prompts an error when the field is empty.
- Navigate to the Other Limits section, select the Set-Up Type suitable for this location, enter the minimum/maximum number of person allowed for each seating type and select the Private checkbox for events that are held privately.
- Click the Upload Photo icon on the ribbon bar to attach images of the location to the Photo Gallery section.
- At the General section, insert the minimum/maximum number of attendees allowed using the arrow up/down key. Turning the Private toggle to Yes indicates that the location has other events at the same time.
- At the Location Availability section, the availability is default to Yes. Sliding it to No makes the location unavailable. Select the available date from/to using the date editor.
- At the Parent Location section, select the Parent Location from the drop-down list if it is a sub-location. Sliding the toggle to Yes makes the location a Parent Location.
- Click Save on the ribbon bar to save the location.
Editing a Location
To edit a location, select the location from the location tree view and edit the information and then click Save to save the changes.