Payroll Details
The Payroll tab consists of two tabs.
-
Payroll: This tab includes a pay period selection and displays the pay sheet, all pay items, and a frame for additional information for each pay item.
-
Benefits: This tab includes the benefit contribution items and information about each item.
The majority of the payroll activity is performed from the Payroll tab of the Crew Payroll Details.
Pay Items List
In the Payroll tab of the selected crew member, the pay items are listed under the Pay Items List section.
Each of the items in the grid are tied to a record type, described in table below. Details of the item, such as Pay Rate, Units, and Modified Date appear in the Item/Audit section when you click on the item. If the payroll is in an active period, a summary of the payroll information is shown in the Edit Details form.
Checking the Show Balance-To-Date option switches the view to show the balance to-date amount of each pay item.
Figure 26-26 Pay Items List

Table 26-11 Pay Items Record Type
| Record Type | Description |
|---|---|
|
A |
Automatic. Added automatically when assigning or editing pay code from contract template. |
|
M |
Manual. Added when the posting is an adjustment such as Add New Pay Item or Cash Advance. |
|
P |
Paid out. |
|
R |
Accrued from last period. |
|
F |
Accrued to next period. |
|
B |
Pay accrued from last period. |
|
S |
Semi Auto. Pay code adjustment with calculation method defined as percentage. |
|
T |
Previous month paid out. |
Update Pay Units
The Pay Sheets contain detailed information, such as unit information, and the pay rate, and is used to determine the pay amount for each pay code in a contract by multiplying the units. You can change the pay units.
You are only allowed to update the pay units for pay codes that have ‘Adjust Unit Setup’ enabled in Pay code Maintenance.
Updating Pay Units for a single crew contract.
-
From the selected crew, navigate to the Payroll tab.
-
Click the Update Pay Units button on the Crew Payroll Details form or right-click on the pay code.
-
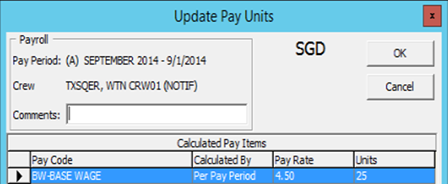
On the Update Pay Units form, select a Pay Code and double-click the Units field.
-
Adjust the value using the inline edit.
-
Add a comment and then click OK to save.
Figure 26-27 Update Pay Units
-
Instead of clicking the Update Pay Units button, you can also update the pay units under the Payroll tab by right-clicking the pay code in the Calculate Pay Items’ section.
Figure 26-28 Calculate Pay Items

Updating Pay Units for Multiple Contracts
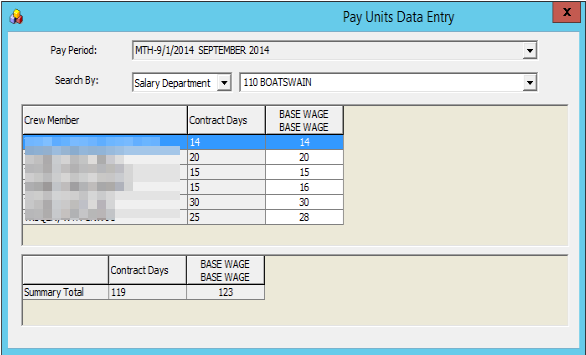
Apart from updating the pay units for a single crew contract, you can also update pay units for Multiple Contracts using the following steps.
Figure 26-29 Pay Units Data Entry
-
On the Payroll menu, select Update Pay Units from the menu option.
-
On the Pay Units Data Entry form, select the Pay Period and method and from the Search By fields.
-
Double-click the Base Wage field to enable inline editing. Edit the value and then click Apply to save or click Undo to revert the changes. The records will be updated and pay is recalculated.
Posting Adjustment
The Posting Adjustments allow you to perform a payroll adjustment or adding an ad-hoc posting to the crew contract.
You can only add or adjust a payroll posting that is not paid in this pay period. Payroll adjustments will only populate for those pay codes that are set up with Adjustments in Pay Code Maintenance.
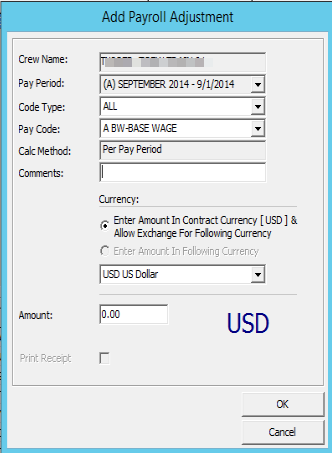
Figure 26-30 Payroll Adjustment Form
Adding Posting to Single Crew Contracts
-
On the Payroll tab of the selected crew account, click the New Pay Item button. You can also right-click on the item in the Pay Item List section.
-
On the Add Payroll Adjustment form, select the Code Type from the drop-down list. The calculation of the selected code type will be shown in the Calc Method field.
-
Enter the comments in the Comments field.
-
Check the respective Currency option and enter the amount.
Note:
There must be a currency exchange rate set up in the Administration module if you select the first option.
The values entered are either in units or amount, depending on the calculation method of the pay code. For example, the pay code for Per Hour or Pay Day calculation is by units.
-
Click OK to post or Cancel to discard. The record type in the Pay Item List for the adjustments posted is M.
Adding Postings to Multiple Contracts
-
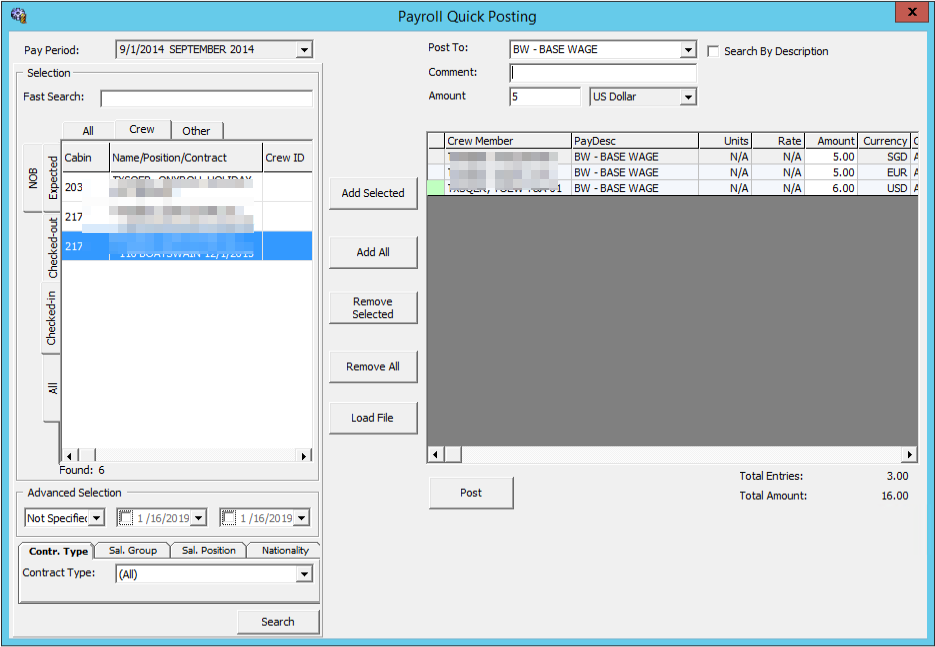
From the Payroll menu, select the Quick Posting option.
-
Select a Pay Period to list the active payroll.
-
Select a pay code from the Post To drop-down list. Check the Search by Description, to search using the pay code description.
-
Enter a comment in the Comment field.
-
Enter an amount or rate in the Amount field.
-
Individually select the crew account to post to and then click the Add Selected, or use the Add All button to add all listed accounts to the grid.
-
To remove an account, use the Remove Selected or Remove All button.
Figure 26-31 Payroll Quick Posting
-
At this point, you can still change the amount to post in the Amount field within the grid.
-
Click the Post button to continue.
Adding Postings by File
The Load File option allows you to import bulk adjustments posting using a file import method in comma-separated values (CSV) format. In order for the file import to work, you must follow the format specified in the Appendix, Quick Posting Import File Format chapter.
Note:
The Load File validation may not necessarily go into the assignment for the selected company, but it must go either into the assignment that falls under the selected month or into the month of the system date, if none is selected. Priority is given to the date range that matches the selected pay period, followed by the matching selected company.-
Repeat steps 1 and 2 of Adding Postings to Multiple Contracts (see above).
-
Click the Load File button and browse for the file to import.
-
All valid postings are shown under the Accepted Entries section and the rejected ones under the Rejected Entries section.
Note:
You cannot proceed if there are Rejected Entries and the button Add Accepted Entries will be disabled. You must correct the records and retry. -
Click the Add Accepted Entries button to add these records into the posting screen.
-
Click Post to post all the records.
Adjusting an Allotment
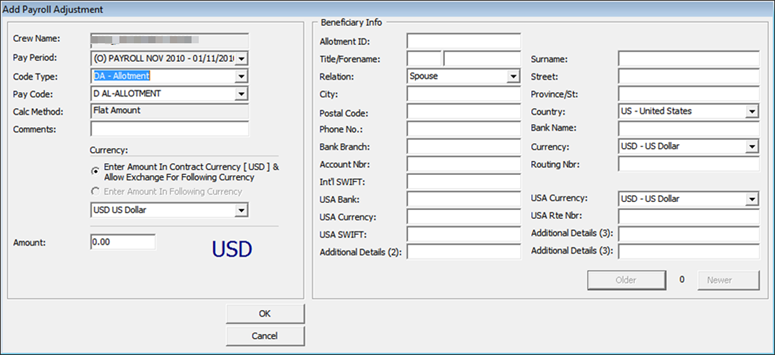
The Crew Officer can adjust an allotment of the crew member and, at the same time specify the beneficiary of the adjustment, provided the pay code, Specify To is enabled in Pay Code Maintenance. An adjustment can be posted only to record type M.
Figure 26-32 Payroll Adjustment
-
On the Payroll tab of the selected crew account, click the Void Pay Item button. You can also right-click on the item in the Pay Item List section.
-
If Specify To is enabled, update the beneficiary information.
-
Click the OK button to remove the item from the Pay Items List and recalculate the payroll.
Folio Posting
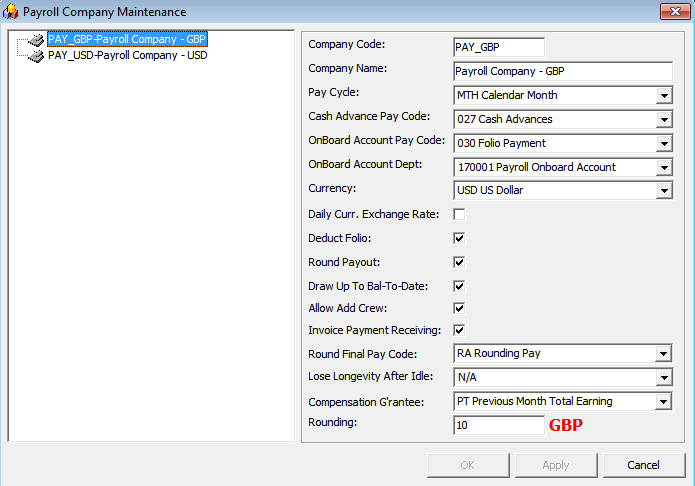
A folio posting is a posting of a crew member’s spending while onboard. Folio Postings that are deductible from a payroll payout must have the following settings:
-
The parameter Folio Posting is enabled or flagged with Y.
-
The Deduct Folio option is checked in to the Payroll Companies Setup.
-
The Deduct Folio option is flagged as Yes on the crew assignment setup.
Figure 26-33 Payroll Company Maintenance
When onboard expenses are settled through Pay Invoice in the Crew module, the amount is transferred into the payroll as a pay deduction, allowing onboard expenses to be deducted.
In order for this to work, you need to define the following settings:
-
The allow Invoice Payment Receiving option is selected on the Payroll Company setup.
-
The Payment department in the Crew module is the same as Onboard Account Department in Payroll Companies.
Transferring Folio Postings to Payroll
-
Log in to the Crew module and select a crew member from the Search Panel.
-
Click the Pay Invoice button.
-
Settle the invoice to Payroll Deductible payment code.
Note:
When a Void is performed from the Crew module using the Void button, the pay deduction in the Payroll module is reversed. Similarly, when the Void Pay Items in the Payroll module is used, the Folio Payment in the Crew module is reversed. -
You cannot transfer the Pay Invoice into the Payroll system when:
-
The Crew is paid
-
The Pay Period is closed
-
The Crew member does not have contract assign.
-
When settling the invoice, the crew can opt to deduct the invoice from payroll or not. If a crew opt not to settle the invoice to payroll, the folio balance does not appear in the crew member’s payroll statement as a deduction.
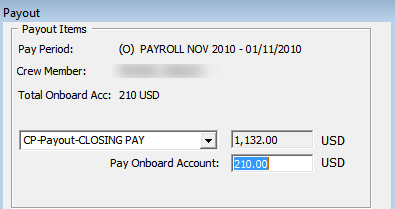
Performing a Folio Payout Posting
If the folio posting is not settled through the Crew module, the deduction of the onboard expenses is included during the payroll payout. Once the payout is done, you cannot undo the folio payout posting.
Figure 26-34 Folio Payout Posting
Cash Advance Posting
The Cash Advance feature handles the early pay out made against the anticipated balance for the month. A cash advance pay code is required in the Payroll Company under Cash Advance Pay Code per the following criteria:
-
Apply Order: Greater than other pay items pay code.
-
Calculation Method: P-FLAT - Flat Amount
-
Adjustment option: Checked as payroll adjustment.
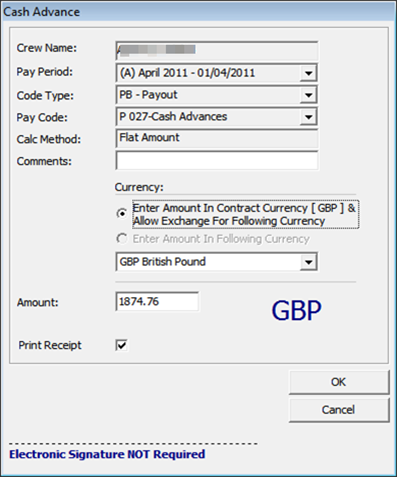
Figure 26-35 Cash Advance Posting
-
On the Payroll tab of the selected crew account, click the Cash Advance button. You can also right-click on the item in the Pay Item List section.
-
Enter the comment in the Comment field.
-
At the Currency field, select the Currency option and the currency.
-
Enter the amount to advance in the Amount field.
-
Check the Print Receipt if a receipt is required. You can set this as the default in the parameter Default Receipt Printing During Cash Advance.
-
Click OK to post the cash advance.
-
To void the cash advance, use the Void Pay Items or right-click on the posting.
The cash advance amount is controlled by these two (2) settings:
-
Draw Up to Bal-To-Date in Payroll Companies Maintenance is checked.
-
When this field is checked, the maximum cash advance amount allowed is per value in Bal to Date of the Crew Details summary screen.
-
Max Cash Advance in Crew Contract.
-
If the Max Cash Advance is set up, the system always calculates the value based on the % of Net Earning, followed by the value in At Not More Than field. If the % of Net Earning has no value, then the value of the calculated percentage applies.
Below is an example of the calculation.
-
Bal-To-Date: $500
-
Monthly: $2700
-
% of Net Earning: 50%
-
At Not More Than: $300
If “Bal-To-Date” is selected: The cash advance amount is $250 ($500x50%).
If “Bal-To-Date” is deselected: The cash advance amount is $300 ($2700x50%=$1350). Since the At Not More Than amount is $300, the withdraw amount is limited to $300 even though the calculated amount is more.
The Calculate Advance in the Payroll menu is a function that prepares a report, listing the available cash advances by crew member, using a special form to perform these calculations and placing the results in the Contract record for each crew member.
The options are:
-
Onboard Crew Only is an option for companies that use 12 month contracts, and they only include crew currently onboard in the report.
-
Up Until This Date calculates the available cash advance amounts up to the date specified. This process must be performed for each company.
Figure 26-36 Calculate Maximum Cash Advances
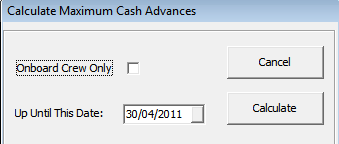
When you click the Calculate button, you generate and store the available cash amount in the database and in a report. In the following example, you have the CTR_MAX_ADVANCE_CALC which calculates based on the Per Pay Period Pay code. The formula used is (base wage) / 30 (total days of current month) x 20 days.
Update Total
The Update Total button updates all crew contracts that have calculation changes, such as a pay rate change or a currency rate change. Also, it can recreate the pay sheet if it is missing. This happens when a new pay period is activated but somehow the crew payroll only shows until the previous pay period. There are a few areas to process the Update Total.
-
Update Total at Pay Period setup.
-
Update Total upon system date change using the parameter Update BTD Total Upon System Date Change set as enabled.
-
Update Total when generating the Payroll GL file when ‘Update Total Prior’ is configured as enabled.
Note:
The Update total is only available when there is unpaid payroll in the Open/Active pay period.
-
Access the Pay Period Maintenance form from the Payroll menu, Pay Periods.
-
Select the pay period with Open or Active status and then click Update Total.
-
The system prompts a notification for the number of unpaid payrolls to update. Click Yes to proceed or No to return to the previous screen.
-
Once the update progress total is done, an error log screen prompts if a crew pay is missing or requires a setting.
Payout Process
The Payout process pays wages to crew members on every pay period. Crew members who have an open payroll from a prior pay period cannot receive their payout for the current pay period. Instead you must pay out the prior payroll before proceeding to pay the current pay period.
Once the payout is performed, no adjustments can be made for that period.
Figure 26-37 Payout Process
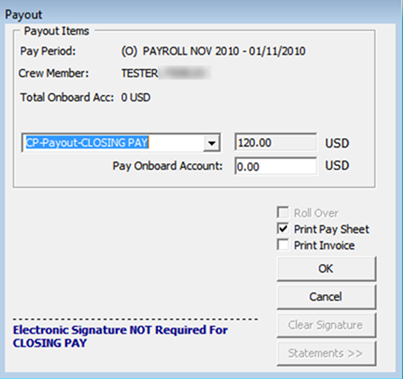
Figure 26-38 Payout Form
Paying out to Individual Crew
-
Select the crew member from the Crew Edit Details screen and navigate to the Payroll tab.
-
Select the pay period and click Pay Payroll.
-
On the Payout form, use the default payout pay code or select another from the drop-down list.
-
Change the folio amount if necessary.
Note:
The folio payments made at payout are based on the Deduct Folio setting in the crew contract setup, payroll companies’ setup, and the parameter setup. If the folio amount is changed, the net payout recalculates. -
Check the Roll Over option only if you need to accrue payout to next pay period.
Note:
The Roll Over option is enabled when the payout pay code is set to Accrued and the contract has not ended. This moves the pay period to next and no additional transactions can be made against the crew member account within that period. -
Check the Print Pay Sheet option if required. If printing is required for all, you may default the checkbox by enabling the parameter Default Pay Sheet Printing During Payout.
-
Check the Print Invoice option if required.
-
Click OK to proceed with payout.
Paying Multiple Crew Members
Other than performing a payout to an individual, you can also perform a bulk payout.
Figure 26-39 Pay Out Multiple Crew Members

-
On the Payroll menu, select Payout.
-
On the Pay Out Crew members screen, select the pay period and the crew members. Click Add Selected to move the selection to the right pane. To exclude the selected crew select the name(s) from the grid and click Remove Selected or Remove All.
-
Select the correct payout option.
-
Check the Print Pay Sheet /Print Invoice option if required.
-
Click the Process Payout button when ready, and click the Yes button at the confirmation prompt.
-
A payout progress box will appear with the Stop Payout option, allowing you to terminate the process for the remaining crew members.
-
The pay sheet and invoices are printed once the payout is processed for each crew member.
Reversing a Pay Out
A Pay Out can only be reversed for the following cases:
-
Pay Period status is Open/Active.
-
No Pay Out after the transaction you wish to reverse is reversed.
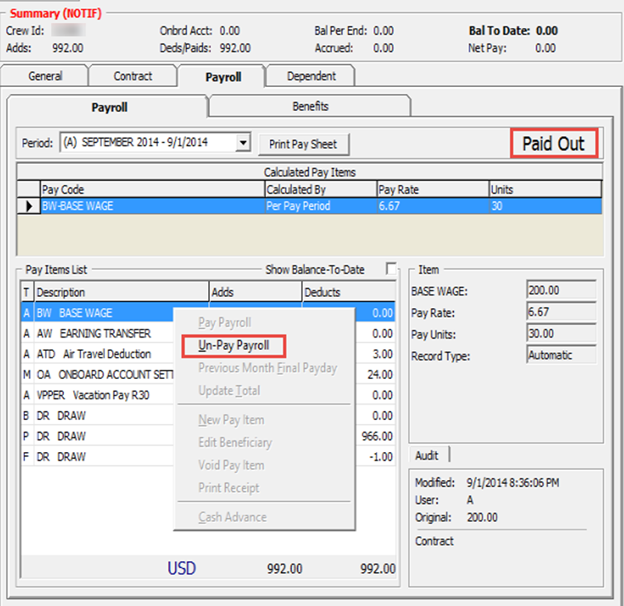
Figure 26-40 Un-Pay Payroll Option
-
Navigate to the Payroll tab of the selected crew member.
-
Right-click the Paid Out caption of the Payroll tab or on the Pay Items List select Un-Pay Payroll from the option list.
-
At the confirmation prompt, click Yes to proceed. This only reverses the pay out and all accrued amounts and does not reverse the folio payment.
To pay the rounded-up payout amount, enable the following settings in the Payroll Companies setup screen:
-
Round Payout
-
Round Final Pay code
This will accrue the remaining pennies to the next pay period and will pay them on the final pay using a separate pay code defined in the Round Final Pay code. The following table is an example of the rounded payout.
Table 26-12 Payout Rounding
| Without Rounding | Rounding | Rounded Amount | Pennies Amount accrued |
|---|---|---|---|
|
$1341.65 |
0 |
$1341.65 |
- |
|
$1341.65 |
2 |
$1342 |
-$0.35 |
|
$1341.65 |
5 |
$1345 |
-$3.35 |
|
$1341.65 |
10 |
$1350 |
-$8.35 |
|
$1341.65 |
-10 |
$1340 |
$1.65 |
|
$1341.65 |
-5 |
$1340 |
$1.65 |
|
$1341.65 |
-1 |
$1341 |
$0.65 |
Note:
If the contract currency is different from the onboard currency, the rounding refers to the Minimum Denomination in the Currency Exchange Rate setup.
Rounding is not applicable to multiple pay codes. The multiple payout does not use the Minimum Denomination from the Currency Exchange Rate but uses the default rounding instead.
Mark Paid
Reports are produced to aid the calculation of the payroll cash request. The report is generated based on any payments pending in the system. The Payments pending consists of any form of pay outs performed using the multiple crew member payout form or cash advances that were entered in the Quick Posting form. The pay outs and cash advances entered using the Crew Details forms are assumed to have been paid immediately, without the use of a cash request.
This is to ensure that the cash request includes the correct payments.
Figure 26-41 Mark Pay Outs and Cash Advance as Paid

-
After performing the cash advance in Quick Posting or when multiple crew member payouts are processed, select Mark Paid on the Payroll menu.
-
Select the corresponding pay code from the drop-down menu to list all of the pending payments.
-
Double-click on each crew member’s account to mark the payment as paid or click the Check All button to mark all payments, then click Mark As Paid to update. This places an ‘X’ in the transaction.