Setting Up Charge Route

The following function allows guests to separate certain charges in another invoice throughout the cruise or route them to another account. It is more feasible to set up routing instructions to move both current and future postings to a new invoice.
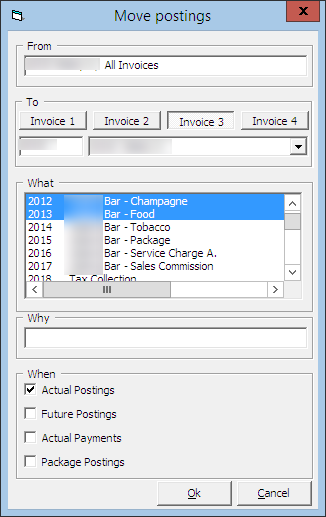
  1. Select the guest account and navigate to the Invoice tab.
  2. Click Move & Route to open a Move posting menu.

    Figure 10-74 Move Posting Tab


    This figure shows the Move Posting Tab

    Table 10-20 Definition of Move Posting Tab

    Field Description

    From

    Default to Guest account, All Invoices.

    To

    Selectable invoice from Invoice 1 to 4 or another guest/payer account.

    What

    Department Group or Financial Department code to route.

    Why

    The reason why charges were routed.

    When

    Type of postings to route.

  3. By default, the system displays All Invoices as the main invoice. Select the invoice where the charges are routed to.
  4. If changes are routed to another group/payer, enter the cabin number and select the guest name.
  5. Select either the department group or financial department code to route and the reason in the Why field.
  6. Select the type of posting to route, actual/future postings or actual payments.
  7. If Future Postings is selected, the system automatically places the department code in the Disc, Route, Pkg tab, Routing window. See also Disc, Route, Pkg section for more information.