Search Screens
-
Application menu
-
Dashboard tiles
-
Quick Links
-
Site map search
You can search for a particular entity by entering or selecting criteria in the search screens. Searches can be done using basic criteria, or can be done in advanced mode, which allows additional criteria to be added.
Depending on your setup OPERA Cloud defaults to either a basic search or an advanced search panel.
Advanced search panels are customizable via Page Composer and can be further personalized to suit your specific needs.
You can toggle between the two search methods using the Go to, Search action link in the top right.
Note:
When the Multi-Language OPERA Control is active you can search for profiles by either the primary or alternate (national character set) name in the Name and First Name fields.- Viewing Recently Accessed Records
- Search Using Basic Criteria
- Search Using Advanced Criteria
- Predefined Searches
- Modify Search
- Search Result Panel
- Presentation Pages
- Icons
- Keyboard Navigation
Parent topic: Common Actions, Icons, and Navigation
Viewing Recently Accessed Records
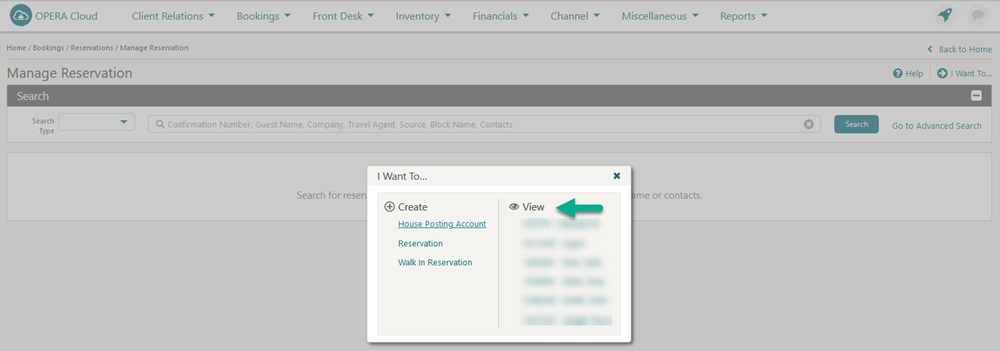
Related Topics
Parent topic: Search Screens
Prerequisites for Viewing Recently Accessed Records
OPERA Controls
-
Group: General
-
Parameter: View Recently Used Records
Parent topic: Viewing Recently Accessed Records
Search Using Basic Criteria
Figure 1-3 Basic Reservation Search

-
From a Advanced Search page, click Go To Basic Search in the upper right corner of the panel.
-
Enter search value as prompted.
-
Click Search. The entities that match the search criteria are displayed in the Results panel.
Parent topic: Search Screens
Search Using Advanced Criteria
Figure 1-4 Advanced Reservation Search

-
From a Basic search page, click Go To Advanced Search in the upper right corner of the panel.
-
Enter or select one or all of the search criteria displayed.
-
Click Search. The entities that match the search criteria are displayed in the Results panel
Note:
Depending on the services active the options available within Advanced Search will vary. For example with an active OPERA Cloud Sales and Event subscription the option to search by Sales Account is added to the View-by list. For more information, see Filtering Profile Search by Accounts.
Parent topic: Search Screens
Predefined Searches
Within the Front Desk Workspace menu Front Desk Workspace there are options for predefined reservation searches; click a menu option and click Search to launch the search.
Quick Launch also has Quick Links to go to a pre-defined search.
Parent topic: Search Screens
Modify Search
The current search criteria is displayed in the search panel. Click Modify Search Criteria to open advanced search to change your search criteria.
Figure 1-5 Modify Search Panel

Parent topic: Search Screens
Search Result Panel
Figure 1-6 Search Result Panel

-
Table: Displays results in rows and columns. Click
 to expand the row
to view and access the active Detail Links for the entity.
-
List: Displays results in rows. Click
 to expand the row to view the details and access all Detail
Links for the entity.
-
Card: Displays each entity in a card. Click
 to expand the card to view
more details.
Note:
This is the default view when OPERA Cloud is accessed on a tablet; tap the card to select the entity. -
Console: Displays result as a split view with the search result in the left panel and details for selected entity in the right panel.
-
Sort By: Select to change the sort-by order.
-
Show: Select a value from list to determine how many results are displayed per page.
- View and Goto Navigation
- Actions Menu
- I Want to Menu
- Modifying Column Selection and Sequence
- Exporting Search Results
Parent topic: Search Screens
View and Goto Navigation
Values displayed in Cyan in a search result provide a link to view more information or go to the related entity - tap or click the link text to open the related entity or view more details.
-
Click the Guestname to go to the Profile Presentation page.
-
Click the Confirmation to go to the Reservation Presentation page.
-
Click the Block Code to go the Block Presentation page.
-
Click the Balance to go to the Billing page.
-
Click the Room type to open the room type information page.
-
Click the Rate code to open the rate code information page.
-
Click the Rate column to view Reservation Rate Information.
Parent topic: Search Result Panel
Actions Menu
Tap or click the Actions menu![]() to view a list of actions
available for the entity.
to view a list of actions
available for the entity.
Figure 1-7 Actions Menu
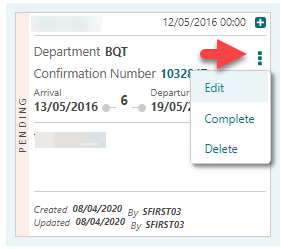
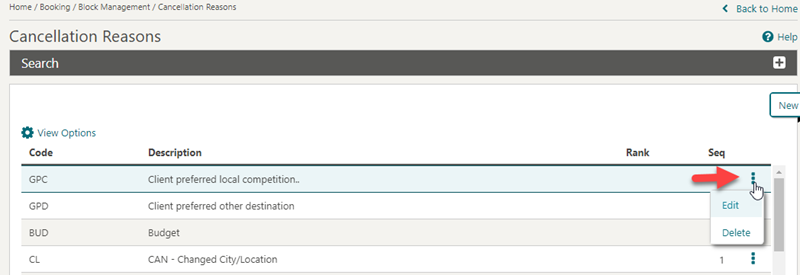
Throughout Administration search results are listed in a table view with an Actions menu displayed for each entity in the result.
Figure 1-8 Actions Menu in Administration Search Results
Parent topic: Search Result Panel
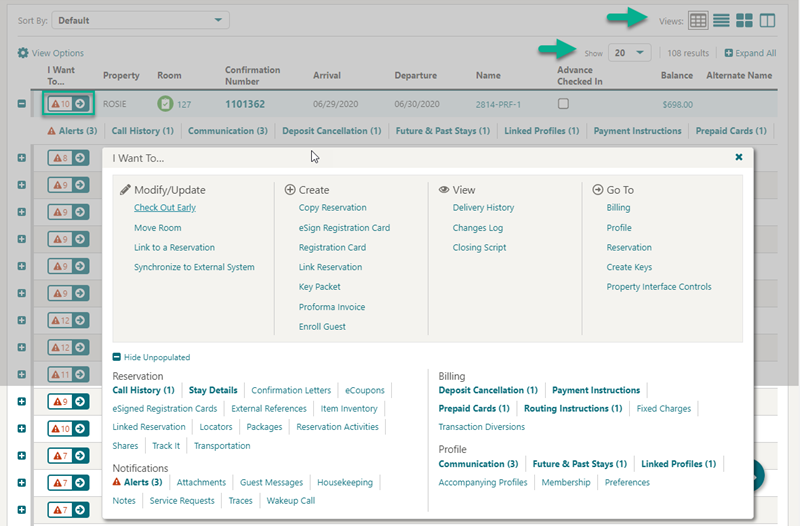
I Want to Menu
Tap or click ![]() to overlay a page with various
actions and detail links for the entity.
to overlay a page with various
actions and detail links for the entity.
Actions are separated into Modify/Update, Create, View and Goto categories. A maximum of 10 action links are listed in each category before a Show More is displayed. Tap or click each link to perform the required action.
By default OPERA Cloud displays all Detail Links. Detail Links displayed in BOLD contain data (populated) and are listed first'; regular text Detail Links do not yet contain data (unpopulated) .
Click Hide Unpopulated to only display Detail Links with active data.
Figure 1-9 I Want to Menu
Parent topic: Search Result Panel
Modifying Column Selection and Sequence
With the Column Options task assigned to your role you can select the columns and their sequence displayed in a table or list view.
Click View Options and select Columns > to view a list of columns. Check items in the list to select the columns to display in the result
Click Reorder Columns to set the column display sequence - select a column then use the navigation button to move the column up (left) or down (right) through the table.
Figure 1-10 Modifying Column Selection and Sequence

Parent topic: Search Result Panel
Exporting Search Results
-
Select Table view from Display Options
-
Click the View Options at the top of the search result and then click Export.
-
Select an option to export search result displayed in table view as ExcelHTML or CSV file.
-
When ExcelHTML is selected, the downloaded file is in HTML format with an XLS filename extension.(Excel is the default application).
-
When CSV is selected, the downloaded file is a delimited text file that uses a comma to separate the values in each column.
-
-
Filename: Enter a File Name.
-
Document Title: Enter a title.
-
Click Export.
The file is generated and downloaded on your workstation via the web browser.
Parent topic: Search Result Panel
Presentation Pages
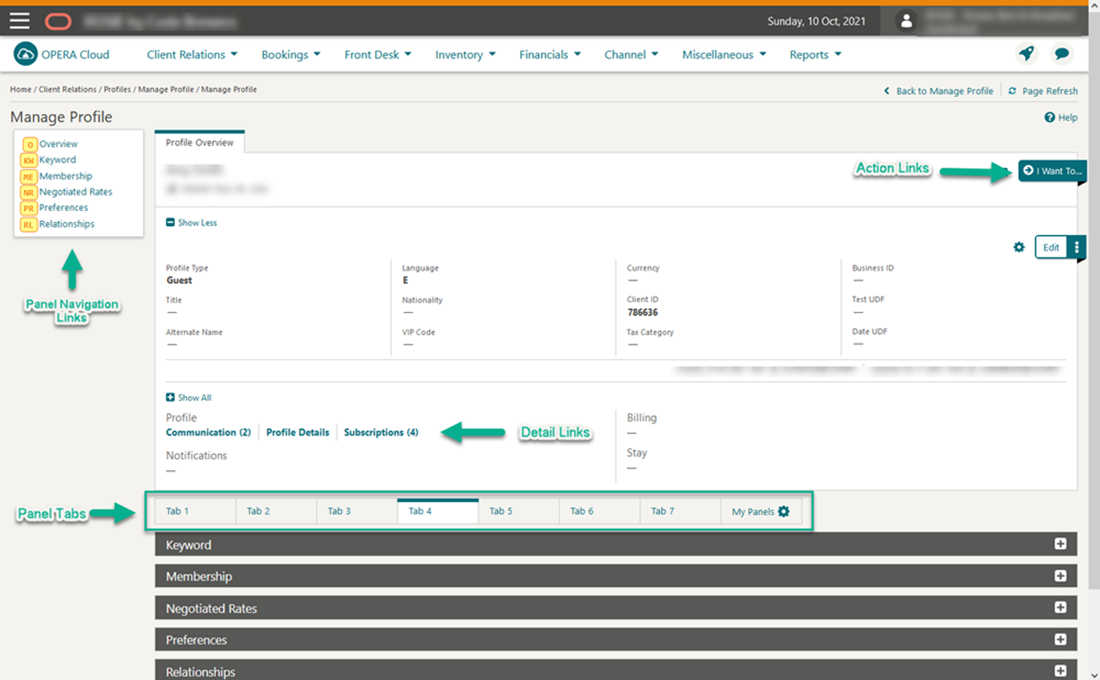
Presentation pages are used in both the application and in administration to display the details for an entity and provide links to the related data (Detail Links) and relevant actions (Action Links).
You can customize the Overview panel using Page Composer.
As you scroll down the presentation page, the Overview panel collapses and remains persistent as a "business card" at the top of the page.
Detail Links are displayed in three to four sections below the Overview. Click Show All to view all links or click Hide Unpopulated to toggle and only display the populated Details. Selecting a link launches the Detail panel as an overlay on the presentation page.
A selection of Details panels then appear on the presentation page based on the default or previous panel tab selection. Select a different presentation panel tab to change the Detail panels displayed on the presentation page. Scroll down the page to access the Details panel or navigate directly to a Details panel by clicking the panel name link in the left side navigation panel or pressing CNTRL and entering the keyboard access key Your current panel tab selection is remembered for the next time you access the same presentation page.
Up to seven panel tabs can be configured for each presentation page, each with a maximum of five Details panels selected. For more information, see Configuring Presentation Panel Tabs. You can also setup a personal panel tab; click My Panels to select the up to five Details panels you would prefer to display.
Tap or click ![]() to display the I Want To . . . action panel. The actions listed depend
on the type and status of the entity. For more information see: I Want to Menu
to display the I Want To . . . action panel. The actions listed depend
on the type and status of the entity. For more information see: I Want to Menu
Figure 1-11 Presentation Pages
Related Topics
Parent topic: Search Screens
Icons
Icons are used to visually indicate information. Common icons displayed throughout OPERA Cloud include
Figure 1-12 Common Icons
Parent topic: Search Screens
Keyboard Navigation
Invoke Actions
You can invoke actions and select navigation links on search, presentation and other types of screens using the keyboard. Press CTRL on your keyboard to reveal the keyboard access key(s) available for navigation and action links. The keyboard shortcut is displayed in a yellow square near the link or button - press the corresponding key to select the action.
For example, CTRL and then I launches the I Want To....
Figure 1-13 Keyboard Access Keys - Search

Or from within a presentation page.
For example, CTRL and then ME navigates to the Membership panel in Profile Presentation.
Figure 1-14 Keyboard Access Keys - Presentation

Invoke a List Field
List fields are
indicated with ![]() or
or ![]() .
.
Press F9 to display the list of values .
Invoke a Calendar Field
Note:
This doesn't apply to tablet devices with a native operating system date picker.
To display a calendar for a calendar field press CTRL + Home.
-
Esc: Closes the calendar popup.
-
Right Arrow: Move to next day.
-
Left Arrow: Move to previous day.
-
Down Arrow: Move to the next week.
-
Up Arrow: Move to the previous week.
-
Ctrl + Right Arrow: Move to next month.
-
Ctrl + Left Arrow: Move to previous month.
-
Ctrl + Down Arrow: Move to next year.
-
Ctrl + Up Arrow: Move to previous year.
-
Enter: Selects the chosen date.
Adjust Date by Increment
You can update a date incrementally by entering a positive or negative number of days.
For example, entering +7 will adjust the current date in the field by 7 days. Entering -3 will adjust the date 3 days prior.
Parent topic: Search Screens