Configuring Custom Numbers
Prerequisites for Custom Numbers.
Custom numbers enable you to configure formulas and conditions for generating custom reference numbers on any type of folio or receipt. Certain countries require a number to be generated in a specific way for tracking invoices and payments, and some of these countries require certain formulas.
To configure custom numbers, you should have a general knowledge of MOD and Weights and other calculations needed for creating Advanced Formula based reference numbers. You can create custom numbers by combining values or elements of a reservation to generate the unique number. The numbers can be as basic as the confirmation number, invoice number, nationality, and so on. Or it can be a more complex calculation using Luhns Algorithm, MOD with Weights, or Structured Reference numbers.
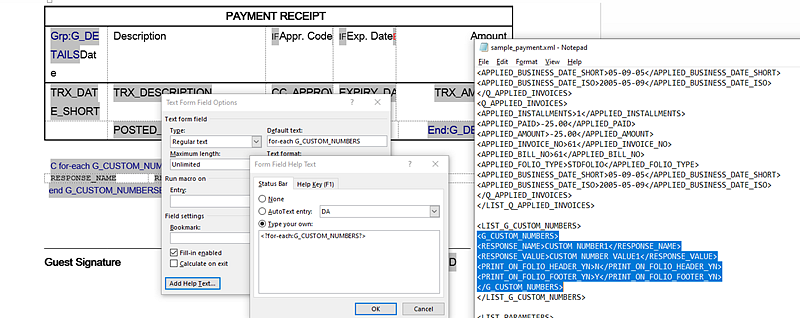
A Custom Numbers group is available in the XML of the sample_folio and sample_payment templates; refer to About Stationery Editor. You can insert the group into your customized template to generate the custom reference numbers on the folio or payment receipt.

Stored Custom Number(s) are also available in the Back Office Export
views, EXP_BOF_CITYLED_RECORDS, EXP_FOLIOTAX, EXP_ALL_TRANSACTION_VIEW, and EXP_BOF_ALL_TRANSACTIONS with five separate
columns for Custom_number1, Custom_number2, Custom_number3, Custom_number4,
and Custom_number5. An additional Custom_numbers column with all stored
custom numbers is available in a comma delimited string.
Note:
To create or edit SQL expressions, use the Edit Formula box or the Edit Condition box available in the Generation Details section of the Custom Numbers screen. These panels provide selectable values to build an SQL expression using String, Number, Date, Boolean, and conversion functions. You can also select from a list of SQL functions, separators, operators, and table columns (fields) such as ADDRESS1, ADDRESS2, ARRIVAL, BILLING_CONTACT_NAME, BIRTH_COUNTRY, and so on. These columns are a combination of data from Property details, Profile, Reservation, and Folio tax tables; they are specific to the reservation for which the custom number is being generated.Note:
To join multiple string elements together use the ‘||’ concatenation operator in your expression.Examples of Basic and Advanced Custom Number Formulas:
-
RESORT || '-' || DEPARTURE || '-' || CONFIRMATION_NO.Basic expression which generates a custom number that combines the property code, the departure date, and confirmation of a reservation; the resulting custom number could look like this: PROP1-04052020-780005823 -
OPERA_MISC.REFERENCE_NUMBER_WITH_WEIGHTS(INVOICE_NO,731,'BACK’)Advance expression which generates a custom number using the Reference Number with Weights function, based on the invoice number field, using 7-3-1 weights calculated from the back.
Examples of Custom Number Filter:
-
To generate a custom number only for Direct (AR) Bill invoices the filter condition would be the SQL expression: INVOICE_NO is not null
-
To generate a custom number only when folio window payment type is Mastercard, the filter condition would be the SQL expression :
PAYMENT_METHOD=’MC’

Adding Custom Numbers
-
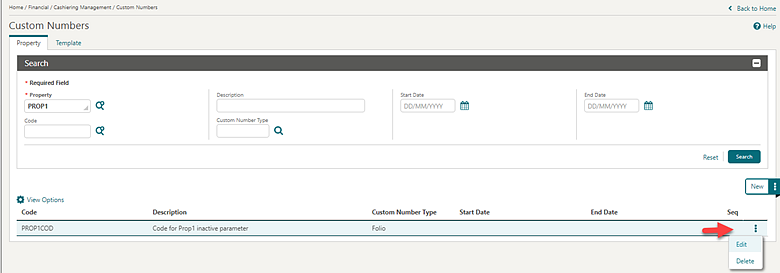
From the Administration menu, select Financial, select Cashiering Management, and then select Custom Numbers.
-
Select or confirm the Property.
Note:
When the Multi Property OPERA Control is active, new custom numbers are created by selecting the Template tab. After creating the template, you can copy custom numbers to specific properties using the Copy action. For more information, see Copying Configuration Codes to Multiple Properties. -
Click New.
-
Enter the following information:
-
Code. Enter a unique code for the custom number. This identifier can be output along with the custom number on the folio or receipt –
RESPONSE_NAMEin XML. -
Description. Enter a description for the custom number.
-
Custom Number Type. Select a value from the list to determine custom number type; this relates to the stationery template on which the custom number will be referenced. Options are Folio or (Payment) Receipt.
-
Start Date. Enables the custom number from this date forward.
-
End Date. Disables the customer number on this date.
-
Sequence. Enables you to specify where the new custom number appears in a sequence if you generate multiple custom numbers. A number appears automatically based on the code you select. Folio History and Receipt History show the first five configured custom numbers based on the sequence.
-
- The Generation Details section enables you to create or edit basic
and SQL-based reference numbers.
-
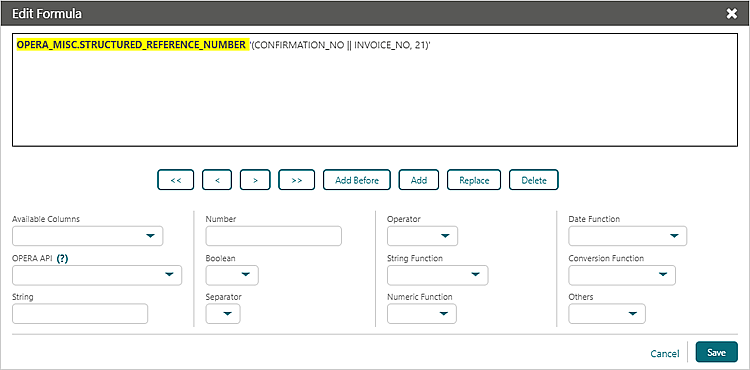
Custom Number Formula: Click the pencil icon to create or edit an SQL expression for generating a custom number. Work with the list fields to select and insert an SQL function, text, number, field, or operator into the editor at the current cursor position, highlighted in yellow.
-
Click Add to add (insert) selection after the cursor.
-
Click Add Before to add (insert) the selection before the cursor.
-
Click Replace to replace the current value selected in the editor with your new selection.
-
Click Delete to delete the current value selected in the editor.
-
Click < to navigate to the left .
-
Click << to navigate to the beginning of the expression.
-
Click > to navigate to the right.
-
Click >> to navigate to the end of the expression.
-
Click Save.
-
-
Filter Condition. Click the pencil icon to define or edit an SQL expression to specify the conditions under which the custom number is to be generated. Work with the list fields to select and insert an SQL function, text, number, field, or operator into the editor at the current cursor position, highlighted in yellow.
-
Click Add to add (insert) selection after the cursor.
-
Click Add Before to add (insert) the selection before the cursor.
-
Click Replace to replace the current value selected in the editor with your new selection.
-
Click Delete to delete the current value selected in the editor.
-
Click < to navigate to the left .
-
Click << to navigate to beginning of the expression.
-
Click >to navigate to the right.
-
Click >> to navigate to the end of the expression.
-
Click Save.
Note:
Refer to the Oracle Database SQL Reference Guide for details on string, date time, number and conversion functions that can be used in the expression editor. -
-
- Click Save
Editing Custom Numbers
The Edit Formula dialog enables you to change the elements on a formula.
-
From the Administration menu, select Financial, select Cashiering Management, and then select Custom Numbers.
-
Select or confirm the Property, enter additional search criteria, and click Search.
Note:
You can show or hide inactive custom numbers from your search by clicking the page level vertical ellipsis. -
Select the custom number, click the vertical ellipsis Actions menu, and select Edit.
-
Update the available fields
-
Inactive. Select check box to mark this custom number inactive.
-
Click the pencil icons to update the Custom Number Formula or the Filter Condition.
- Click Save.
-

Deleting Custom Numbers
-
From the Administration menu, select Financial, select Cashiering Management, and then select Custom Numbers.
-
Select or confirm the Property, enter additional search criteria, and click Search.
-
Select the custom number, click the vertical ellipsis Actions menu, and select Delete.
- Click Delete to confirm.
Function Examples
The following example uses the same variables for all APIs (except the pms.p.date function, which is standard). The variables are Invoice Number and 987654321 (to simulate a unique number for to the property). The Output column on the right shows the number generated based on each calculation. Numbers will vary based on the variables determined by the user.
The parameters (inputs) for these functions are numeric only, for example, NUMBER: OPERA_MISC.LUHN_ALGORITHM(<NUMBER>, ‘Y’ or ‘N’). You can combine multiple numbers in the calculation, and they can be concatenated using the String Function | | as shown in the following examples
Table 13-3 Functions
| Functions | Description | Example | Outputs |
|---|---|---|---|
|
PMS_P.BUSINESS_DATE() |
Returns the current business date of the property |
PMS_P.BUSINESS_DATE() - |
01-JUN-20 |
|
Luhns Algorithm with Check digit OPERA_MISC.LUHN_ALGORITHM(<NUMBER>’Y’ or ‘N’) |
Luhns Algorithm with check digit |
OPERA_MISC.LUHN_ALGORITHM ( INVOICE_NO || 987654321 , 'Y') |
86659876543216 |
|
Luhns Algorithm with no Check digit OPERA_MISC.LUHN_ALGORITHM (<NUMBER>, ’Y’ or ‘N’) |
Luhns Algorithm without check digit |
OPERA_MISC.LUHN_ALGORITHM (INVOICE_NO || 987654321 , 'N') |
866598765432154 |
|
Reference Number with Weights from back OPERA_MISC.REFERENCE_NUMBER_WITH_WEIGHTS (<NUMBER><NUMBER2>, ‘Back’ or ‘Front’) |
NUMBER2 is max 3 digits |
OPERA_MISC.REFERENCE_NUMBER_WITH_WEIGHTS (INVOICE_NO || 987654321, 731 , 'BACK') |
86659876543218 |
|
Structured Reference Number without Padding OPERA_MISC.STRUCTURED_REFERENCE_NUMBER(<NUMBER>, <NUMBER2>) |
Calculated reference number without padding |
OPERA_MISC.STRUCTURED_REFERENCE_NUMBER (INVOICE_NO || 987654321) |
RF828665987654321 |
|
Structured Reference Number with Padding OPERA_MISC.STRUCTURED_REFERENCE_NUMBER(<NUMBER>, <NUMBER2>) |
Calculated reference number with left padding. NUMBER2 is maximum of 21 |
OPERA_MISC.STRUCTURED_REFERENCE_NUMBER (INVOICE_NO || 987654321 , 21) |
RF82000000008665987654321 |
Parent topic: Configuring Cashiering Components