- User's Guide
- Oracle Argus Affiliate Users
- Creating Local Events
Creating Local Events
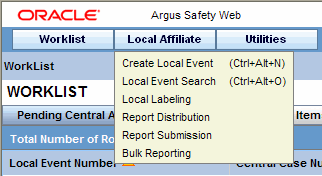
- In the Local Affiliate menu, select Create
Local Event to open the Local Event Entry form.

- When the system opens the Local Event Entry Form, enter the appropriate
information in the fields.
The following table lists and describes the fields on the Local Event Entry form.
Item Description Product Name
Enter the name of the product which is associated with the case. If the adverse event(s) is associated with more than one product, each of the additional product can be added from the Case Form. It is advisable to enter the most suspect product here.
You can click Select to search for a product from the Trade Name Product Lookup dialog. Several items will be automatically entered on the Case Form based on the product selected here.
- Click on Select. The Product Browser window appears.
- Enter the Ingredient key word for the search. The ingredient is displayed in the first column.
- Select the Ingredient to obtain the Family it is associated with.
- Select the Product Name to view the associated Trade Names.
- Select the Trade Name required.
- Select is now enabled at the bottom of the window. Click Select to add the product details
Report Type
From the list, select the item that best describes the type of report. The report type chosen here will determine which fields will be available for entering case information. The report type will also impact the duplicate search.
For example, selecting "Sponsored Trial" will make the Study ID and Protocol ID fields available. The Administrator can adjust the information in this list.
Receipt Date
Enter the date on which your company became aware of the case.
Study Number & Center ID
The Study Number and Center Id fields are enabled when the Product details are filled in this section.
Enter the ID for the Center.
You can click Select to search for a study from the Study Name Lookup dialog. Several items will be automatically entered on the Case Form based on the product selected here.
Steps to select the Center Id:
- Click Select to open the Clinical Trial Selection dialog.
- Select the Project from the drop-down list and enter the Study details as applicable.
- A list of centers associated with the row that you select appear at the bottom of the dialog.
- Highlight the required clinical study and study center and click Select.
Reporter First Name Reporter Last Name
Enter the reporter's first and last name.
Country of Incidence
Enter the country where the adverse event occurred. In Oracle Argus Safety application, you can either type the complete country name, or enter a two letter country code that will automatically be decoded. In Oracle Argus Safety Web, you can select the appropriate country from the list.
Note:
This may or may not be the reporter's or the patient's country of residence.Patient Initials
Enter the patient's initials.
Patient Date of Birth
Enter the patient's date of birth.
Patient Gender
Enter the patient's gender.
Event Description
Enter a brief verbatim description that describes the event that is most clinically important in the case.
Onset Date
Enter the date for the onset of adverse event symptoms.
Keyword
Enter a keyword when searching for duplicates. Keywords are only used for searching for cases.
Receipt Range Limits
Select this check box to search for cases that have been entered in the range of 60 days before the current date and 60 days after the current date.
Tip:
You can click Search to determine if this case has been entered before. A list of cases that match the search criteria appears. Inspect the list and determine if any case matches the event information that is to be entered.
- Click Create Local Event to create a new local event. The Local Event- Initial Event Entry screen appears.
- Enter the available event information in the AE Entry and Local Info tabs.
Refer to Entering Event Information for further instructions.
Parent topic: Oracle Argus Affiliate Users