Account data sources
When you have Data Source Management permission, you can access the account data sources feature to define and manage composite and regular datasources.
Understand composite and regular datasources
- Investigator
- Institution
- Trial
- site
- trial-site
This means that the Oracle Site Select composite data model imports five unique files: investigator, institution, trial, site, and trial-site that Oracle Site Select combines internally to create a single site row.
- Unique institution records combine with investigator records to form sites. Instead of having limited fields to import institution staff records, the investigator file can handle any number of institution staff in a nested structure of: first name, last name, email, phone, and role.
- The investigator file can import any number of investigator email addresses and is not limited to primary and secondary email.
- When creating a master list of sites for evaluation, if the datasource contains composite records, users can additionally filter by: therapeutic area, indication, drug class, and study phase.
- Oracle Site Select calculates an Investigator score for studies involving composite datasources. The score is the average of all site scores for the site's investigator, and it is listed for each of the investigator’s sites.
Note:
Oracle administrators manage composite datasources. Contact your Oracle Project Manager to manage configuration and import of data into these datasources.Regular datasources accept data in a flat, CSV (comma separated value) file format, such as an Excel spreadsheet. In this flat data model, each CSV row is a site and that row includes investigator, institution, and site data. You can configure regular datasources and import data into regular datasources using the Oracle Site Select application. Once you've imported data into a new datasource, contact your Oracle Project Manager who can associate the new datasource to your studies.
Preferred sites: This type of source allows CRO preferred sites to bypass study parameter filters and move into the Master List. This option requires upload and mapping of a CSV format file with CRO preferred sites. The source file must contain a column labeled "preferred_site" and must specify TRUE or FALSE for each row in the source.
Pre-selected sites: You can also upload study-specific, pre-selected site lists and have only those sites included in the datasource displayed on the Master List. To use this functionality, the datasource must include a is_pre_selected_site column, which must specify TRUE for all sites in the datasource.
Account datasource management
The Account data sources feature makes it easy to define and manage datasources. If you have the Data Source Management role permission, you can access this area from Account menu's Account data sources menu item.
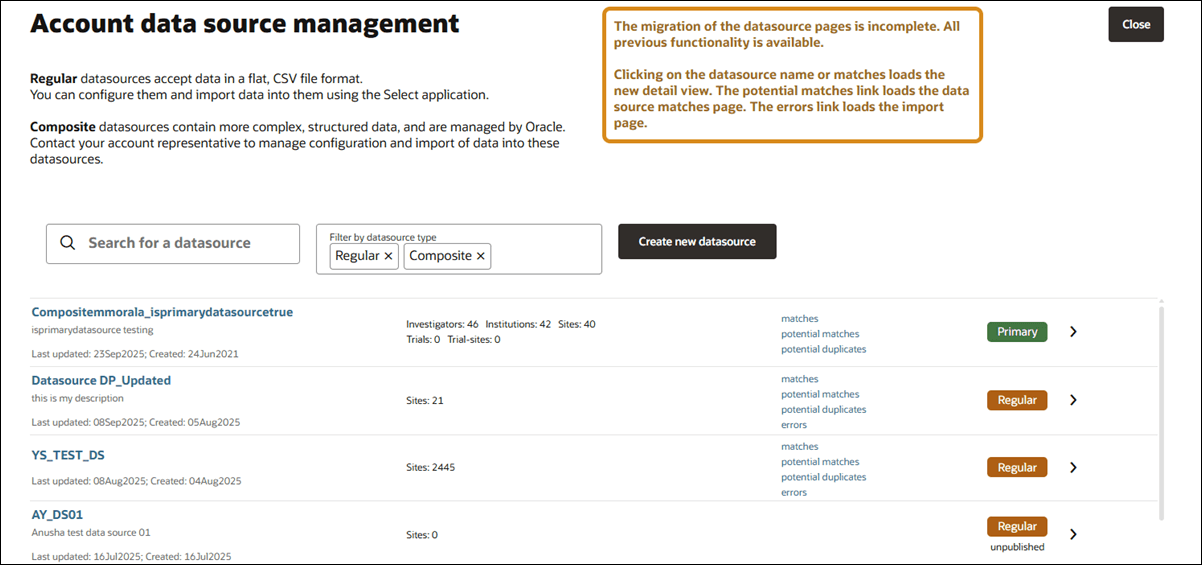
The datasource list page includes search and filter options to help you locate the datasource you want to view. You can click a datasource name to access the details area, or click the right arrow. For each listed datasource, you'll see other details like a description (if populated), Last updated date, Created date, Number/type of records, and quick links to match and error tabs (published datasources only). You'll also see a badge that identifies the datasource as a Primary, Regular, or Composite, and if the datasource has not yet been published, you'll see the note "unpuplished" below the badge.
When you click Create new datasource, or open an unpublished datasource to access the "Definition" tab. Under the Manage data source definition section, for Step 1: Define datasource structure, lets you enter a unique name, optional description, and upload a sample CSV schema. Note that for unpublished datasources, the tabs for Records, Matches, Potential matches, and Errors remain disabled until the datasource is published.
For Regular/CSV datasources, the schema file upload supports files up to 500KB and gives feedback if errors occur. The Definition tab also displays a list of tips for successful uploads to help ensure your schema meets the minimum requirements. The datasource will be auto-saved once you provide a valid schema and datasource name. If a new schema is uploaded later, it will replace the current one after confirmation. The page autosaves changes and shows “Changes auto-saved: <DDMonYYYY HH:MM AM/PM>" in red text when updates are saved.
- CSV import – A site row with an invalid institution country errors and that site record is not imported, but it is included on the import error list. Because the CSV import utility streams each record, a site record with an invalid institution country will be skipped and the next record will be processed. The list of error sites displays after the import process has completed.
- API import – An import of an institution record with an invalid country errors and the institution record is not written. If one record in a batch errors, the entire batch fails.
For composite datasources and published CSV datasources, schema uploads are disabled, but you can still edit the name and description as preferred, and changes will autosave. Unpublished CSV datasources allow editing of name and description as well as replacement of the existing CSV schema file.
After naming the regular datasource and uploading a schema as described above, the Step 2: Map the imported columns to Oracle Site Select data columns section walks you through mapping the imported data columns to Oracle Site Select data columns. This includes selecting a unique ID column, matching fields via a drag-and-drop interface, de-linking mapped columns for an unpublished datasource, and creating custom columns when needed. For composite datasources or published CSV datasources, mapping is view-only and editing is disabled.
Custom column example: A custom column “Equipment list” is defined at the site level in two customer datasources as a string array. In datasource 1, it includes “fMRI” and “portable X-ray.” In datasource 2, it includes only “portable infusion pump” for the same site record. When both datasources are attached to a single study, and the column is defined to concatenate array values, the resulting site record will include “fMRI, portable X-ray, and portable infusion pump” for the data column “Equipment list.”
A column mapping tool lets you filter, review, and adjust how each imported column aligns with the Oracle Site Select data structure. You can also review each column’s properties, including filter options and site scoring configurations. Once your schema is mapped, Step 3: Publish the datasource prompts you to publish, which is required before any data can be imported. Publishing locks the schema, so a confirmation dialog ensures you're ready. The datasource you publish will be private to your account. After publishing, the Records, Matches, Potential matches, and Errors tabs become active. Additional options allow for disconnecting mapped fields and deleting unused custom columns, with safeguards in place to prevent accidental data loss across datasources. For any published datasource in your account, you can import additional records data in CSV format, if necessary.
Note:
Column filters act as OR filters, for example, filtering on "string" and "Institution" will show all string columns and all institution columns. This is expected behavior.
When creating a new custom column, the column definition drawer will open with the custom column already created. If you click Close, that does not remove the newly created custom column. You must click the Delete button. For example, if you drag an imported column to the Create custom column area, the Data column properties drawer opens. If you change your mind about creating the column, you must click the drawer's Delete button. Clicking Cancel will not revert creation of that column as it was created immediately and before the drawer opened. If you wish to keep a custom column for future use, but unlink the custom column and the imported column, simply click the unmap icon on the column list in line with the "Mapped to:" label.
- concatenate data (string array)
- highest priority datasource wins (all data types)
- sum data (integer, real)
- average (integer, real)
Note:
Please contact your Oracle Project Manager to coordinate custom column merging methods prior to data load.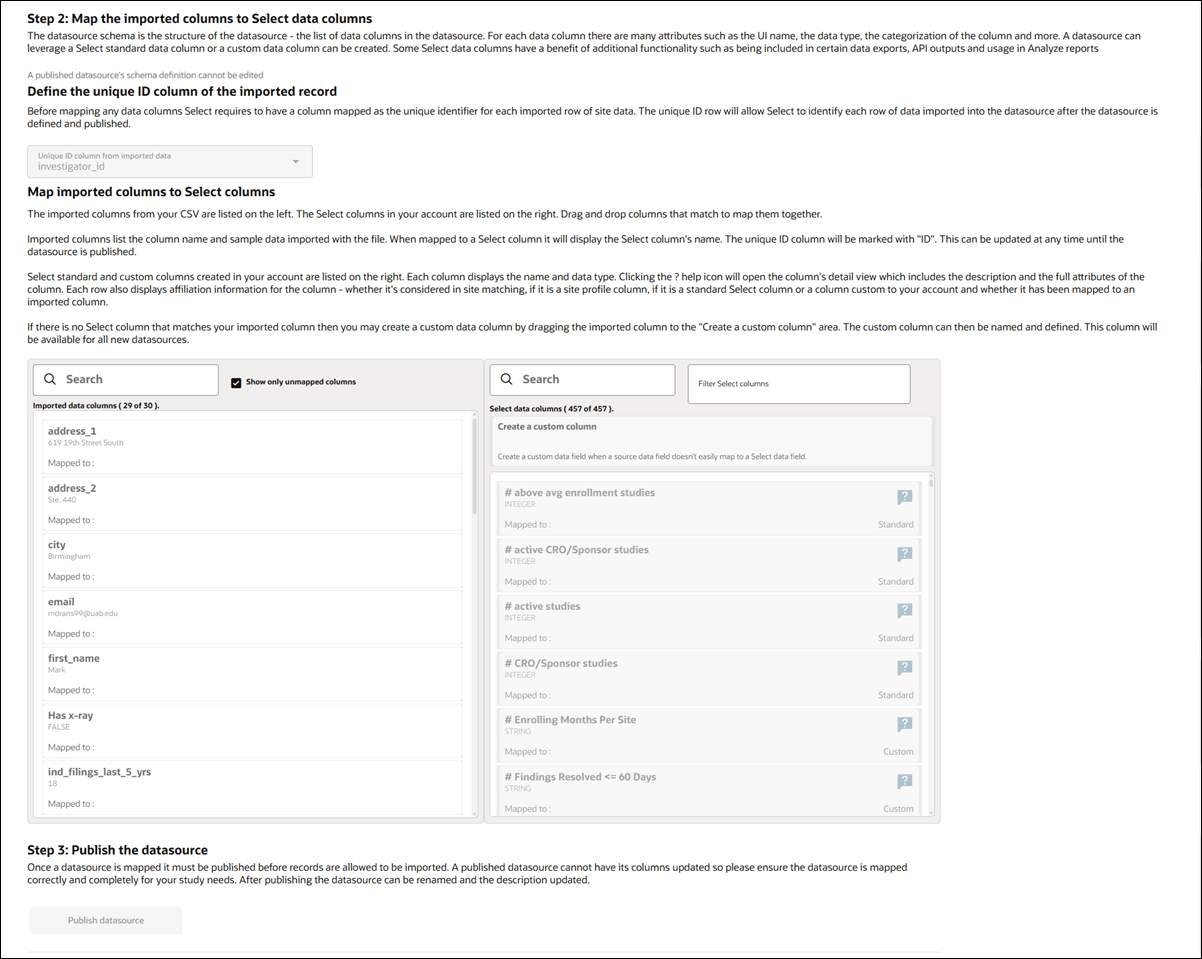
You can easily reuse an existing datasource setup. At the bottom of the Definition tab, below Step 3: Publish the datasource section, you’ll find a section for cloning a datasource. This option is available for both published and unpublished datasources.
To use the feature, click the Clone datasource button. This will create a new datasource with the same schema but without any imported data or associated sites. The new datasource will automatically have "_copy "added to the name, which you can change by editing the name field. This cloning option makes it easier to start a new datasource using an existing configuration as your starting point. Note that cloning only copies the definition of the datasource but not the data within the original datasource. You can overwrite the file with a new CSV and modify fields and field mappings in the copy as preferred.
By design, the Records, Matches, Potential matches, and Errors tabs are disabled until you’ve successfully uploaded the schema CSV for the new datasource. Once you upload the schema CSV, the page updates to display the data source name and description in the title area, and the data source is saved as unpublished. Mapping columns also display after the schema upload is complete.

Viewing datasource records
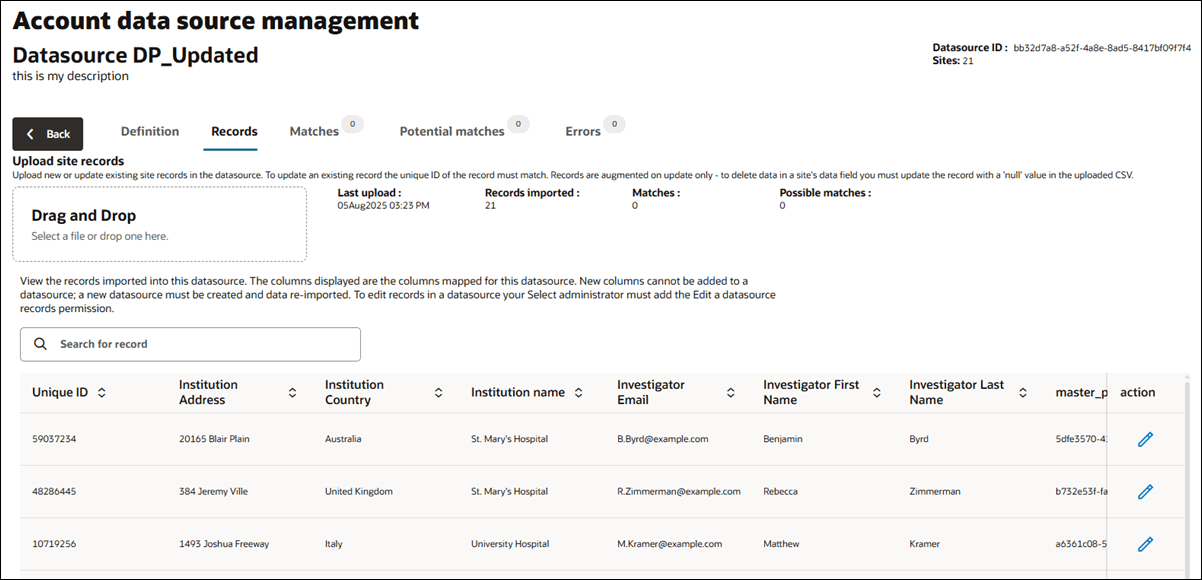
For both regular and composite datasources, you’ll see a “Records” menu item on the datasource details page above the records table. If applicable to the datasource, you can select a page or advance through the available pages using the pagination control at the lower left of the records table.
You can add or update records in a regular (flat) datasource via CSV upload on the Records tab, which includes a file upload control above the site records grid. Use this control to upload a CSV file to add new site records or update existing site records. The CSV file you upload will undergo standard processing validation (e.g., checking for valid country names, disambiguation, etc.). If errors are found, the Errors tab will show a numbered badge and a red exclamation mark to draw your attention to data issues you need to address. The tab lists each error message encountered when processing your CSV upload.
When you view a regular or composite datasource, you’ll see all mapped data columns for that datasource with all rows of imported site records and the data imported for each site. For composite datasources only, use the Data entity filter (above the data table) to choose between the five composite datasource entity types (i.e., Investigator, Institution, Site, Trial, or Trial-site) and filter the data in the table to the selected type. For both regular and composite datasources, the unique ID column for each site row is the first column in the table. Where appropriate, you can hover over a cell to view a tooltip with the full content of the cell (e.g., long string array values).
You can also search the record grid. Enter a value in the search field, and Oracle Site Select performs a “fuzzy” search (approximate string match) as follows:
Regular datasource searches data available in the records table for the following columns:
- unique id column
- first_name
- last_name
- institution
- country
- pi_emails
- city
- npi
- master_profile_id
Composite datasource searches the following columns by entity:
- Investigator (unique id column, first_name, last_name, pi_emails, and npi)
- Institution (unique id column, institution, country, and city)
- Site (unique id column, investigator_id, institution_id, and master_profile_id)
- Trial (unique id column, protocol_title, and protocol_numbers)
- Trial-site (unique id column, site_id, and trial_id)
Note:
To prevent performance issues, Oracle Site Select disables the search field when a flat datasource or composite datasource entity (i.e., investigators) has more than 50,000 records.Viewing and modifying datasource records
Editing records
When you have Edit a datasource record permission, you’ll see a fixed Action column with Edit and Discard action icons at the far right of the records table. Note that this permission is a user role permission that doesn’t apply to Teams. The permission allows you to edit regular and composite datasource entity records of the following data types:
- String
- Boolean
- Datetime
- Integer and real (numeric)
- Text
To edit a record, click the Edit icon and click the column cell you want to update. You’ll see a border around that editable cell. When you’ve finished the update(s), return to the Action column and click Save or Discard to revert unsaved updates(s) and return to view mode.
Managing potential record matches
Identifying matching sites to eliminate duplicate sites in Oracle Site Select and maintaining site history across studies is important, and you can manage these records on the Potential matches tab. Here, you can review the disambiguation potential matches and duplicates for sites you’ve imported into a datasource.
You must have the existing Data Source Management business role permission to access the tab and to use the functionality granted to you with this permission (i.e., some functionality is available only to Oracle administrators).
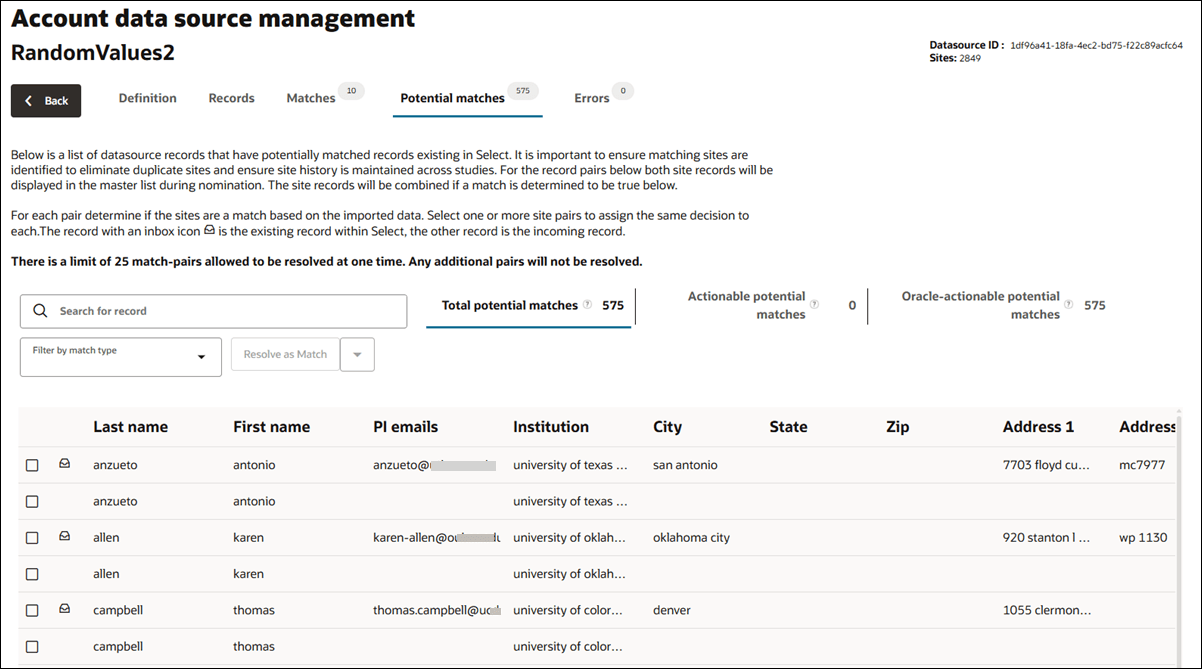
The Potential matches tab loads when you click on the number of potential matches for a datasource from the account datasource list page. You can also access the tab when you click the Potential matches tab on the datasource details page. The tab itself shows a badge with total actionable potential matches.
You’ll see three subtabs displayed above the grid on the Potential matches tab:
- Total potential matches: shows the number of records in the datasource that potentially matched a record in Oracle Site Select across all accounts. This tab is visible to you, but the content is enabled only for Oracle administrator use.
- Actionable potential matches: shows the number of potential match records in the datasource that match against a datasource record within this account. This tab is enabled for your use and Oracle administrator use.
- Oracle-actionable potential matches: shows the number of potential match records in the datasource that match against a datasource record outside this account. This tab is visible to you, but the content is enabled only for Oracle administrator use.
Only an Oracle administrator can see and act on potential matches or duplicates in a site profile datasource.
By default, the Potential matches grid shows both potential duplicates and potential matches (i.e., filtering is off). If preferred, filter the displayed records using the “Filter by match type” drop-down to select Potential or Duplicate. You can also search records in the list. Search will return string matches in any of the following grid columns:
- Last name
- First name
- PI email
- Institution
- City
- State
- Zip
- Address 1
- Address 2
- NPI
- Country
- Datasource
- Match type
- Master profile id
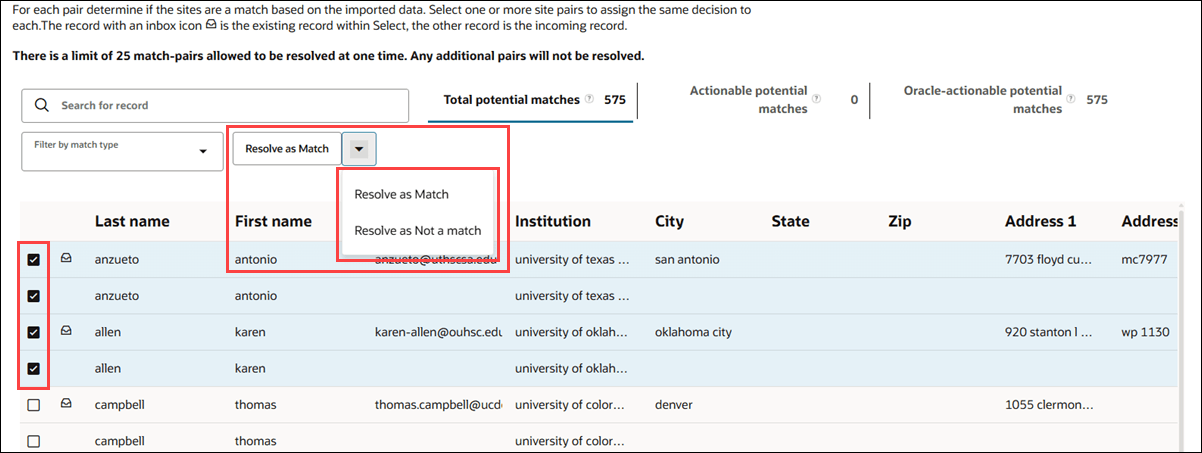
All records in the potential match grid are site records, and you’ll see a double row for each. The top record is the current datasource record; the bottom is the record matched record. The row for the record existing in Oracle Site Select has an inbox icon.
The Actionable potential matches tab shows the message “No potential matches were found for datasource” instead of an empty grid if no potential matches or duplicates are scoped to the account. This is the case regardless of whether there are potential matches or duplicates with a record in another datasource.
Resolve potential matches
All records in the potential match grid are site records; you’ll see a double row for each. The top record is the current datasource record, and the bottom is the record matched record. The row for the record existing in Oracle Site Select has an inbox icon.
Delete record for a potential duplicate match
To take action on a duplicate record, you may delete it from the datasource Records tab. You must have the existing Edit Datasource Record business role permission to delete one of the duplicate records.
Resolve a potential match
When you select at least one match pair in the grid, you can click the button above the table to Resolve as Match (default) or Resolve as Not a match.
If you choose Resolve as Match, Oracle Site Select updates the records as it did previously, meaning:
- For potential matches: The master profile IDs of the individual sites are updated to match the existing site so that the inbound site matches the site existing in Select. The site pairs are marked as resolved, and the potential matches grid updates to remove the potential match pair.
- For potential duplicates: The master profile IDs of the individual sites are NOT updated. The pairs are marked as DUPLICATES of each other, and the potential matches grid updates to remove the potential duplicate pair.
If you choose Resolve as Not a Match, Oracle Site Select updates the records as it did previously, meaning:
- For both potential matches and potential duplicates: The master profile IDs of the individual sites are NOT updated. The site pairs are marked as resolved, and the potential matches grid updates to remove the potential match pair.
Note that you can resolve rows of sites as matches and not matches, alternating, without needing to reload the page. You can also use the Resolve as Match action to resolve potential matches and potential duplicates as matches at the same time. There is a limit of 25 match-pairs allowed to be resolved at one time. Any additional pairs will not be resolved.
Delete a datasource
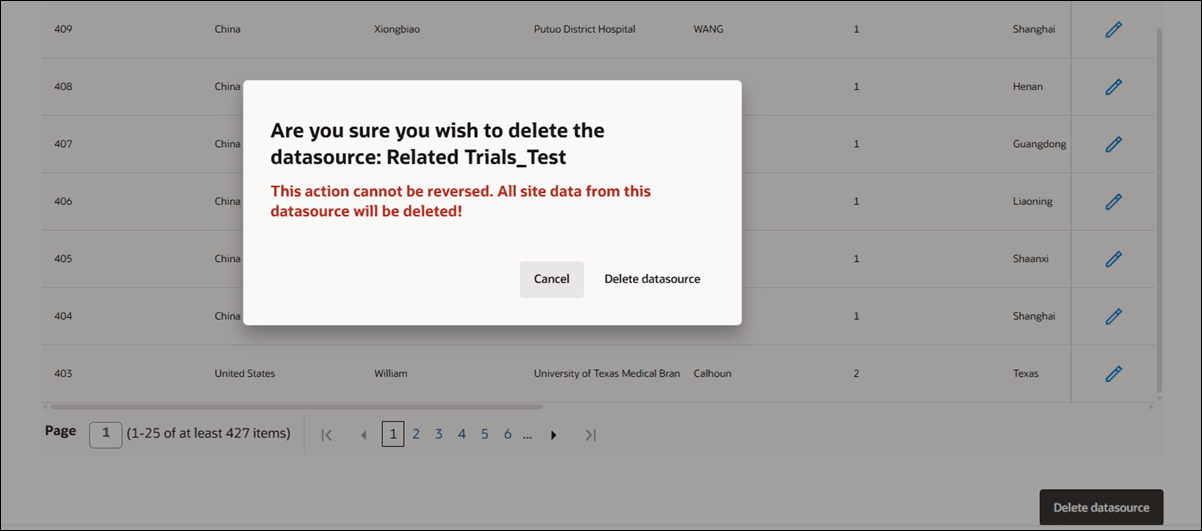
It is possible to delete an account datasource using the option available on the datasource Records tab. You must have Edit a datasource record permission to access the Delete datasource button at the bottom of the page. If you have only the Data Source Management permission, the button will be hidden from view.
When you click the "Delete datasource" button, it will be disabled to prevent multiple submissions, and a confirmation dialog displays. The dialog warns that the action is irreversible and all site data from the datasource will be deleted, and you will need to choose either to cancel or confirm the deletion. If you proceed, you will be redirected to the datasource list page, where you will see a notification that the delete process has started. The delete button remains disabled after a failed attempt until the page is refreshed, and a successful deletion updates the datasource list to remove the datasource and returns you to the summary list page.
While deletion is in progress, the affected datasource’s list item will not have actionable links, and the datasource detail counts will display as zero. You will find the "Delete datasource" button at the bottom of the Records data grid on the details page, and its color will be gray. After the deletion attempt, a status message will inform you whether the deletion succeeded or failed.
- Create a new regular datasource
Create a new datasource for any dataset that you want to import and merge into the Oracle Site Select site profile database. You will determine the unique identifier for the datasource and set up definitions for each field in the datasource. - Clone a datasource definition
Cloning a datasource creates a copy of the datasource schema, not the data or sites. The new datasource will have the same name with _copy appended to the name, and you can update the name as preferred. - Import data for a published regular datasource
Once a datasource is mapped it must be published before you can import records. To add records, upload a CSV that contains the same columns as the mapped datasource.
Parent topic: Account management