Account settings
The account-level Email templates and settings, Users and permissions, and Workflow templates pages have been redesigned, and we made additional usability enhancements.
Account users and access
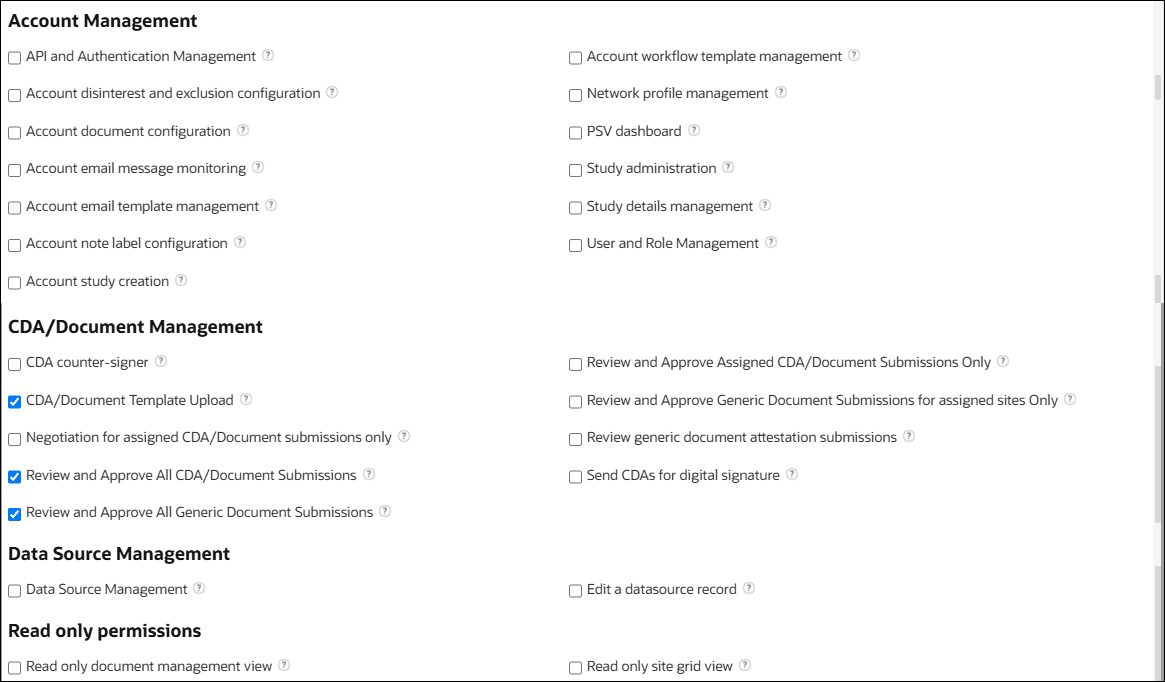
This release enhanced user role and team management with improved workflows and a redesigned user roles and permissions page. The page previously titled Managing user accounts is now titled Account users and access. We also retitled the link to this area in the Accounts menu. The previous users and access menu option is now titled Users and access. You'll see the Users and access menu option if you have a role with User and Role Management permission.
The Account users and access page includes three action buttons:
- Add new user – Specify the user’s email address, first name, and last name. You can optionally specify the user’s status (Active or Inactive)
- Configure roles – Use this option to create, modify, or delete a role. You’ll specify the role name, description, and associated permissions to create a role. To modify an existing role, you can change the name or description and check or uncheck available permissions. If you Delete an existing role, it will be removed, and any user with that role will no longer have the associated permissions.
- Configure teams – Use this option to create, modify, or delete a set of permissions limited to one or more studies. This configuration is similar to the available options for configuring a role, except you will specify (or modify) the studies included in the team. Again, removing a team will remove the associated permissions and study access for any user assigned to that team.
The Account users and access page has a paginated grid of all active and inactive user records. Use the type-ahead search field to find user records that match any part of the last name, first name, or email address. You can also sort any column in the grid. Click a user's Last name, First name, or Email address field to open the Edit user modal, where you can update any of these fields or the Status (Active or Inactive) field.
To manage an individual user’s Roles or Team assignments, click edit ![]() in the user’s Roles or Teams column. A drawer will open from the right side of your screen where you can select or unselect the roles or teams you want to add or remove for that user.
in the user’s Roles or Teams column. A drawer will open from the right side of your screen where you can select or unselect the roles or teams you want to add or remove for that user.
When you close the Account users and access page, you’ll automatically navigate to the homepage for the last study you accessed.

We also made usability improvements to organize user permissions in the Create/edit roles and Create/edit teams modals. When you access the roles or teams modals, you'll see related user permissions grouped under the following section headings:
- Account management
- CDA/Document Management
- Data Source Management
- Read Only Permissions
- Reporting
- Site Grid
- Site Management
- Site Selection
- Study Management
- Survey Management
- Targeted Search
EPIC: SEL-18303
Account-level email templates and settings
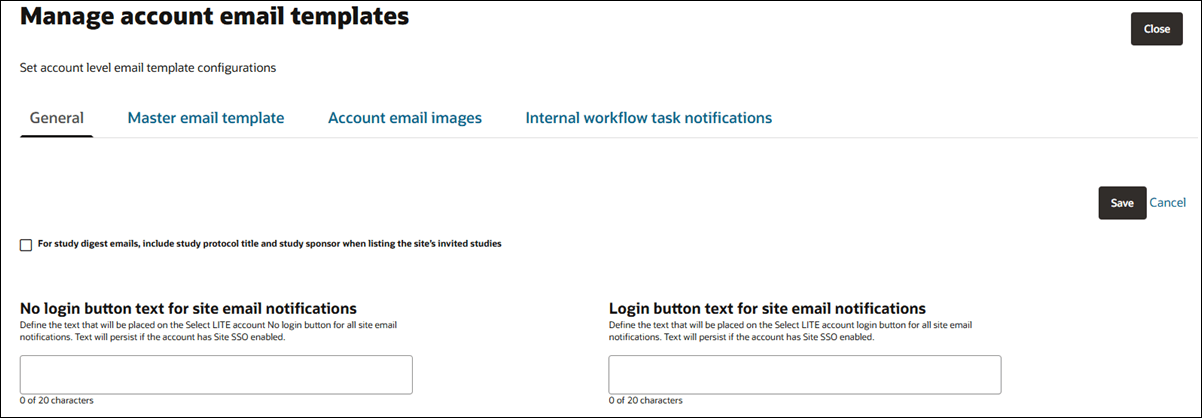
Release 25.1 gives the Account-level email templates and configuration settings a new streamlined layout. Click Account menu > Email templates and config to open the enhanced configuration page, titled Manage account email templates. When the page opens, you’ll see a horizontal tabbed menu for easy navigation. There’s also a Close button in the upper right corner. Please note that Close exits the page but does not save any changes you make in the tabs, so click Save where needed.
Note:
It is important to remember to save your progress on each tab before closing the page.Here’s what you’ll find in the horizontal tabs:
- General: Control how study digest and invitation emails appear. You can:
- Show the study protocol title and sponsor in digest emails.
- Set custom button labels for Login/No Login buttons in site email invites.
- Click the Save button to apply your changes.
- Master Email Template: Customize the look and feel of your emails on this tab. You can:
- Configure header and footer logos.
- Complete rich-text enabled fields for adding:
- A login button introduction
- Login/No Login button descriptions
- Pre-footer text
- Preview to confirm the email template meets your formatting and layout expectations.
- See a list of available email placeholders you can use for dynamic content.
- Click the Save button to apply your changes.
- Account Email Images: Upload and manage up to five images that can be used via placeholders in your study email templates. Images automatically save when uploaded, so there's no need to click a Save button for this tab.
- Internal Workflow Task Notifications: Customize internal task notification emails on this tab. You can:
- Edit the Subject line and Email body.
- Use placeholders in either field for dynamic content (click the Show email placeholder list link to see your options).
- Format the Email body with rich text for a polished look.
- Click the Save button to apply your changes.
EPIC: SEL-19020
Account workflow templates
If you have a user role with the Account workflow template management permission, you can access the redesigned account-level workflow templates page (Account > Workflow templates). This page lists all saved templates alphabetically and includes helpful details when available, such as workflow descriptions, tasks, last updated dates, and the names of the users who last made changes. To locate a specific template, use the search field to filter by template name or description.
To open an existing template, click the right arrow on any row. To create a new one, click the Create new workflow template button. You’ll see all the familiar configuration options, including fields to define the template name, description, and messages for the study and completed workflows.
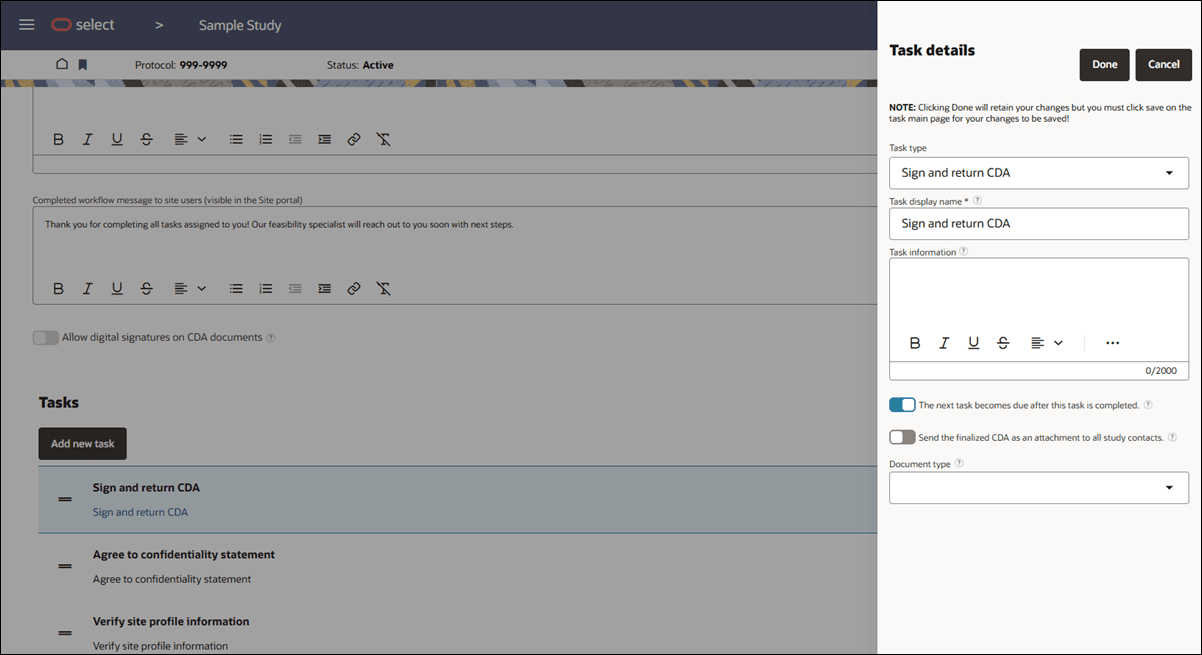
Within the template, you can scroll down to manage tasks (i.e., add, edit, delete, or reorder as needed). Click the right arrow on a task row or click the Add new task button to open the Task details drawer. This drawer lets you define the task’s type, display name, and other task-specific information. The fields update automatically based on the selected task type. When you’re done, click Done to apply your changes and close the drawer.
Note:
Clicking Done on the task details drawer does not save the task to the template. You must click the Save button on the page.To finalize your updates, return to the main workflow template page and click Save changes at the upper right. If you no longer need the template, the Delete option is available at the bottom right, just below the task list.
EPIC: SEL-18305
Account integrations
We reorganized the Account integration settings in this release to make them easier to access and manage. If you have the API and Authentication Management permission, you’ll now see all settings under the Account > Integrations menu item.
Account pages accessible with the API and Authentication Management permission:
- General
- Event notification history and status
- Integrations
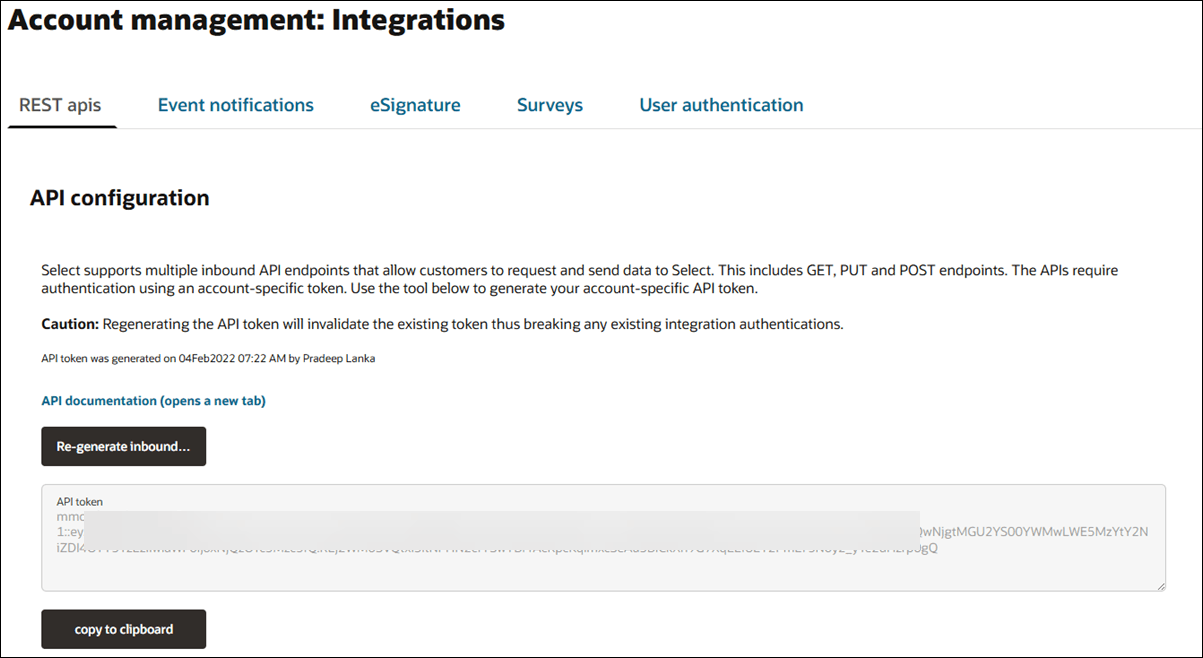
The redesigned Account management: Integrations page combines integration configuration settings into a single page with tabs for specific functionality.
- REST APIs: Regenerate your account’s inbound API token (please use with caution as it replaces the current token, thus breaking any existing integration's authentication) and access API documentation in a new browser tab.
- Event notifications: Create and manage settings for site profile, site status, and Library document outbound event notification messages. Additionally, manage users that will be notified of failed event messages.
- Email notifications for failed messages
- Use Add to create a new contact that will receive email notifications when an outbound event message fails
- Click on a contact to open a detail drawer to update the contact's notifications or to delete the contact
- Configure outbound notification messages
- Use Create new message to add a new event notification configuration
- Click on an event message to update the configuration or delete the outbound message
- Email notifications for failed messages
- eSignature: Includes settings for Adobe Sign integration for CDA documents. This feature is temporarily disabled in version 25.1 and will return in a future release.
- Surveys: Enable or disable integration with Alchemer, select your hosting region, and reauthorize if needed.
- User authentication: View your Oracle IDCS configuration set by Oracle services and managed by Oracle Support. Use the "Select login test preference" section to choose between standard login or SSO for testing, and remember to click Save before leaving this tab.
EPIC: SEL-19266
Account networks
In this release, we updated the Account networks feature to use Oracle design standards and introduced several enhancements. The redesigned Account networks page shows an alphabetical list of the account’s saved networks and displays the following details for each saved network:
- Network name (required)
- Network ID (required)
- Description (optional)
- Last updated: <date>
- Status badge (i.e., Active, Pending review, or Inactive)
The redesigned page also includes a search field, so you can search for an existing network, and you can Create a new network if necessary.
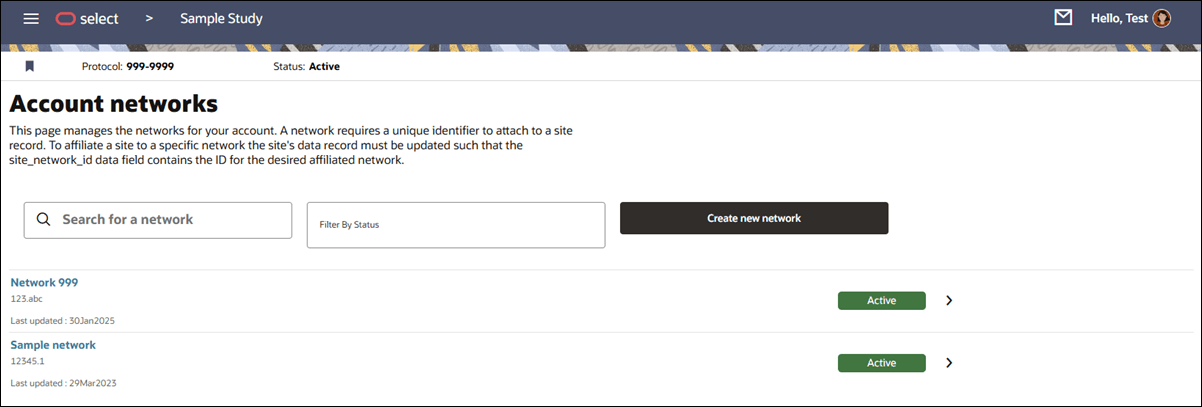
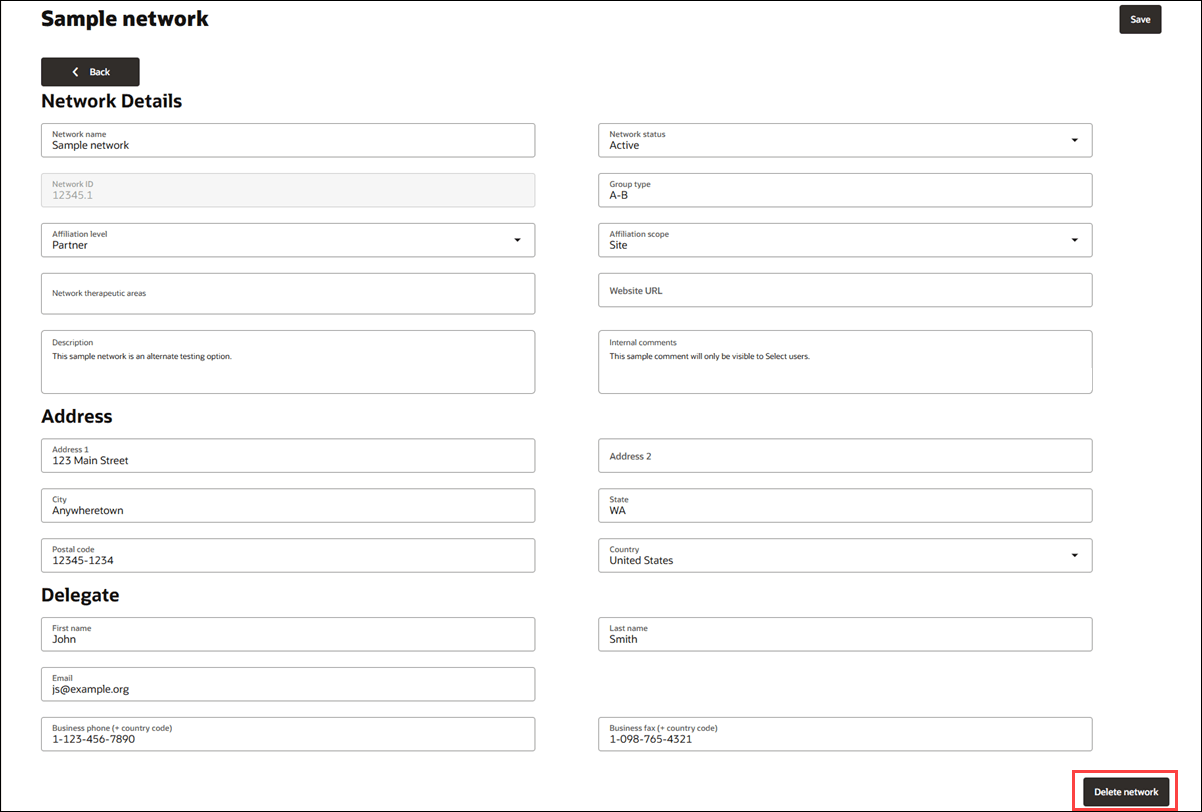
In the existing networks list, to the right of the network’s status badge, a right arrow navigates to the Network details page where you can update information for that network, as preferred. Click the Back button on the Network details page to return to the Account network list.
Release 25.1 also introduces the option to delete an existing network. You’ll see this option at the lower right of the Network details page, and you must confirm deletion if you click Delete network.
Account level Network deletion affects sites and site invitations as follows:
- Network won’t be considered for sites that have not yet been invited, and invitations proceed as if no network is assigned. When you or another Oracle Site Select user view the site’s assigned network in the Site profile > Network page, the network will not be set.
- For a network assigned to a site that has been invited and the network delegate is included in the invitation, then the network is deleted at the account level:
- The network delegate will still be listed as a study contact when viewing the study contacts tab. If you or anotherOracle Site Selectuser re-invites the site, the network delegate will receive re-invitation and study-related emails, such as a CDA notification. The invitation received modal/information will maintain that the network delegate received an email.
- No network will be set when you or anotherOracle Site Selectuser view the site’s assigned network in the Site profile > Network page.
- The Site profile > Network menu item will be disabled for a site affiliated with a now-deleted network (i.e., that affiliation will no longer exist).
EPIC: SEL-19019
Account support link configuration
We made a minor text update on the Account management: General settings page to reflect an Oracle organizational name change. Under the Support link configuration section, we updated the “Direct users to Oracle Health Science support” option to read “Direct users to Oracle Life Sciences support.”

EPIC: SEL-17867
Parent topic: What's new